
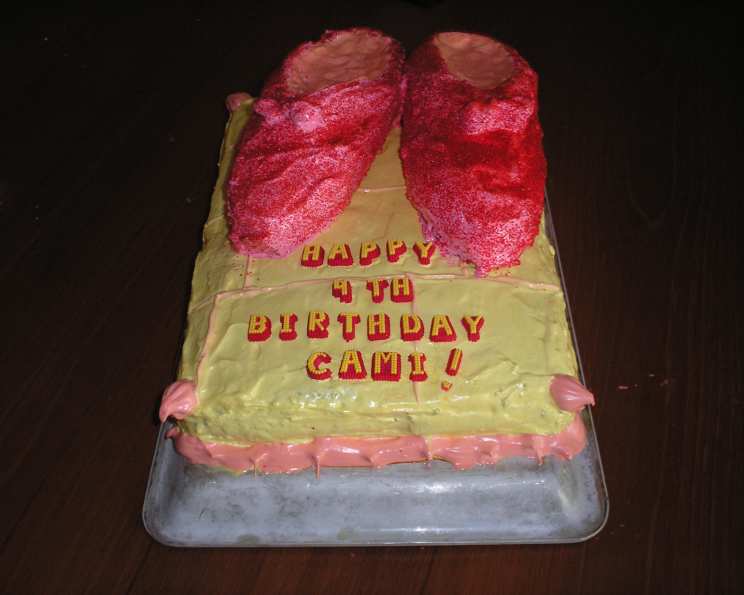
Dorothy’s Ruby Slippers Cake: A Whimsical Culinary Journey
My grandmother had this small, porcelain Dorothy figurine, ruby slippers and all, displayed prominently on her mantle. As a child, I was captivated by its glittery shoes and would often sneak it down to play with when she wasn’t looking. When I got older and discovered baking, I thought about how I could translate that childhood magic into an edible creation. That’s how the idea of Dorothy’s Ruby Slippers cake was born – a sweet tribute to a beloved story and a sprinkle of childhood wonder.
Recipe Overview
- Prep Time: 51 hours 30 minutes
- Cook Time: Varies
- Total Time: 51 hours 30 minutes
- Servings: Varies
- Yield: 1 cake
- Dietary Type: Not specified
Ingredients
Jello Cakes:
- 1 (18 1/4 ounce) box cake mix (yellow or lemon)
- 1 (18 1/4 ounce) box cake mix (strawberry)
- 1 (3 ounce) box lime Jell-O gelatin
- 1 (3 ounce) box strawberry Jell-O gelatin dessert
- 1 1/2 cups vegetable oil (divided)
- 1 1/2 cups water (divided)
- 8 eggs
Single Recipe Frosting:
- 1 1/2 cups sugar
- 1/4 cup water
- 2 egg whites
- 2 tablespoons light corn syrup
- 1/4 teaspoon salt
- 1 teaspoon vanilla
- yellow food coloring
Half Recipe Frosting:
- 3/4 cup sugar
- 1/8 cup water
- 1 egg white
- 1 tablespoon light corn syrup
- 1/8 teaspoon salt
- 1/2 teaspoon vanilla
- red food coloring (it is nearly impossible to get a true red)
- colored sprinkles (red)
Equipment Needed
- 9×13 inch cake pan
- Two 8-inch loaf pans
- Electric mixer
- Double boiler (or heatproof glass bowl and saucepan)
- Long serrated bread knife
- Wide spatula
- Long narrow spatula
- Toothpicks
- 8×8 inch baking dish
Instructions
-
Preheat your oven to 350°F (175°C). This step is crucial for even baking.
-
Prepare the yellow (or lemon) Jello cake. In a large bowl, combine one box of yellow (or lemon) cake mix, one box of lime Jell-O, 3/4 cup vegetable oil, 3/4 cup water, and 4 eggs.
-
Using an electric mixer, mix the ingredients on low speed until moistened. Then, mix on high speed for 3 minutes. This ensures the batter is well combined and aerated.
-
Pour the batter into a greased 9×13 inch pan. Ensure the pan is well-greased to prevent the cake from sticking.
-
Bake at 350°F (175°C) for 40 minutes. Be careful not to disturb the cake early during baking, as this type of cake can fall easily.
-
Prepare the strawberry Jello cake. In a large bowl, combine one box of strawberry cake mix, one box of strawberry Jell-O, 3/4 cup vegetable oil, 3/4 cup water, and 4 eggs.
-
Using an electric mixer, mix the ingredients on low speed until moistened. Then, mix on high speed for 3 minutes.
-
Divide the strawberry cake batter evenly between two greased 8-inch loaf pans.
-
Bake. Carefully check the loaf pans after 30 minutes and add time accordingly. The baking time will vary depending on your oven.
-
Test for doneness. Insert a toothpick into the center of each cake. If the toothpick comes out clean or with a few moist crumbs, the cake is done. If it comes out wet, continue baking for a few more minutes and test again.
-
Cool the cakes completely. Once cooled, remove the cakes from the pans and freeze for at least 3 hours. Freezing makes the cakes easier to cut and shape.
-
Prepare the Fluffy 7 Minute Frosting. You will need at least one and a half batches of Caryn’s Fluffy 7 Minute Frosting.
-
For each batch of frosting: In the top of a double boiler (or a heatproof glass bowl set over a saucepan of simmering water), combine the appropriate amount of sugar, water, egg whites, corn syrup, and salt. Blend the ingredients together.
-
Place the double boiler over simmering water.
-
Using an electric mixer, beat the mixture constantly at high speed for 7 minutes, or until the mixture triples in volume and forms stiff peaks. This step is critical for achieving the desired fluffy texture.
-
Remove the frosting from the heat and add the appropriate amount of vanilla. For the full recipe, add yellow food coloring to create the “yellow brick road” frosting. For the half recipe, add red food coloring to create the ruby slipper frosting.
-
Store the frosting in an airtight container in the refrigerator until ready to use.
-
After freezing the yellow cake for at least 3 hours, use a serrated bread knife to divide the cake horizontally.
-
Carefully cut the top layer in half vertically.
-
Cut the top layer in half again, this time from the other side of the cake. The top layer should now be cut into four equal rectangles.
-
Carefully remove each rectangle using a wide spatula and set aside.
-
Frost the bottom layer of the yellow cake with yellow frosting, reserving enough frosting to frost the top layer and the sides of the cake.
-
Replace the rectangles on top of the frosted base.
-
Frost the top and sides with the remaining yellow frosting. If desired, use an accent color to draw the lines of the bricks on top of the frosting.
-
Prepare the shoe pattern. On a piece of paper about 8 1/2 inches long by 4 inches wide, draw the rough shape of the sole of a shoe. Make sure your drawing is not bigger than the loaf pan; it should go to the edges of the loaf.
-
Cut out your shoe pattern.
-
After freezing the loaf cakes for at least 3 hours, remove one loaf from the freezer.
-
Secure the pattern to the top of the loaf using toothpicks.
-
Begin to carve the loaf into the shoe shape.
-
Make a small indentation on each side at the bottom to resemble a heel.
-
Remove the pattern.
-
Cut away a little cake at a time to form the shape of the toe of the shoe.
-
Cut diagonally down for about two-thirds of the length towards the toe to give the effect of high heels.
-
Round the edges of the shoe.
-
Carve out a shallow indentation in the top 1/3 of the shoe that is still level to create the mouth of the shoe.
-
If necessary, freeze the carved shoe again for an hour to make frosting easier.
-
Turn an 8×8 inch baking dish upside down to elevate the shoe for easier frosting.
-
Place the long, narrow spatula on top of the baking dish.
-
Put the shoe cake on top of the spatula, with the heel of the shoe near the handle.
-
Frost the shoe with red frosting.
-
Sprinkle generously with red sprinkles.
-
Carefully lift the shoe with the long spatula. Use another spatula to help lift the other end if needed.
-
Slowly and carefully place the shoe on the yellow brick road so the toe and heel are going in the long (13″) direction of the cake. You pretty much only have one shot at this, so be steady!
-
Repeat steps 27-43 with the second loaf cake.
-
Add any wording or accent frosting you choose.
-
Refrigerate if you do not plan on serving the cake for several hours or days.
Expert Tips & Tricks
- Ensure your cakes are completely cooled before freezing to prevent them from becoming soggy.
- Use a very sharp serrated knife for carving to achieve clean cuts.
- If the frosting becomes too soft while you’re working with it, chill it in the refrigerator for a few minutes to firm it up.
- Practice carving on a scrap piece of cake first to get a feel for the process.
- Don’t be afraid to add extra sprinkles! They add a lot to the overall look of the cake.
Serving & Storage Suggestions
Serve this cake chilled or at room temperature. To store, cover loosely with plastic wrap and refrigerate. It is best consumed within 3-4 days. Due to the frosting, freezing the finished cake is not recommended.
Nutritional Information
Please note that this is an estimate. The exact values depend on the specific ingredients used and serving sizes.
| Nutrient | Amount per Serving | % Daily Value |
|---|---|---|
| Calories | 10567.4 | N/A |
| Calories from Fat | 4326 g | 41% |
| Total Fat | 480.7 g | 739% |
| Saturated Fat | 71.9 g | 359% |
| Cholesterol | 1692 mg | 564% |
| Sodium | 9364.2 mg | 390% |
| Total Carbohydrate | 1472.6 g | 490% |
| Dietary Fiber | 9.4 g | 37% |
| Sugars | 1186.7 g | 4746% |
| Protein | 121.3 g | 242% |
Variations & Substitutions
- For a gluten-free version, use gluten-free cake mixes and ensure all other ingredients are also gluten-free.
- You can substitute the Jell-O flavors to match your preference or create different color combinations.
- Experiment with different sprinkles and edible glitter for added sparkle.
- Consider using a different type of frosting, such as buttercream, if you prefer a richer flavor.
- Instead of a yellow brick road, you could create a landscape from the Emerald City using green-tinted frosting.
FAQs (Frequently Asked Questions)
Q: Can I make the cakes ahead of time?
A: Absolutely! Baking the cakes a day or two in advance and freezing them makes the assembly process much easier.
Q: Is it necessary to freeze the cakes before carving?
A: Yes, freezing the cakes is highly recommended. It firms them up, making them less crumbly and easier to shape.
Q: Can I use store-bought frosting instead of making my own?
A: Yes, but homemade frosting will give you the best flavor and texture. If using store-bought, be sure to buy enough to fully frost the cake and shoes.
Q: How do I prevent the shoes from sliding off the cake?
A: Ensure the base cake is level and consider adding a small dab of frosting to the bottom of each shoe to act as glue.
Q: What if I can’t find the exact red sprinkles?
A: Any red sprinkles will work, but if you want a truly ruby look, consider mixing red sprinkles with edible glitter.
Final Thoughts
Creating Dorothy’s Ruby Slippers Cake is a labor of love, but the results are truly magical. This whimsical creation is sure to delight children and adults alike, bringing a touch of Oz to any celebration. Don’t be afraid to get creative with your decorations and add your personal touch. I encourage you to embark on this culinary adventure and share your own version of this enchanting cake. After all, there’s no place like (a home filled with the aroma of) cake!