
Mastering the Art of California and Maki Rolls: A Sushi Adventure
The first time I ever made sushi, I was terrified. Not of the raw fish – I grew up near the coast and had eaten plenty of sashimi – but of the rice. I’d seen countless chefs on television effortlessly molding perfect little pillows of pearly white grains, and the thought of attempting the same felt like climbing Mount Everest in flip-flops. My initial attempts were disastrous: sticky, uneven, and utterly unphotogenic. But with each failed batch, I learned something new, eventually mastering the delicate balance of sweet, tangy, and subtly savory. Today, making California and Maki rolls is almost meditative for me.
Recipe Overview
- Prep Time: 20 minutes
- Cook Time: 0 minutes (excluding sushi rice preparation)
- Total Time: 20 minutes (excluding sushi rice preparation)
- Servings: 4
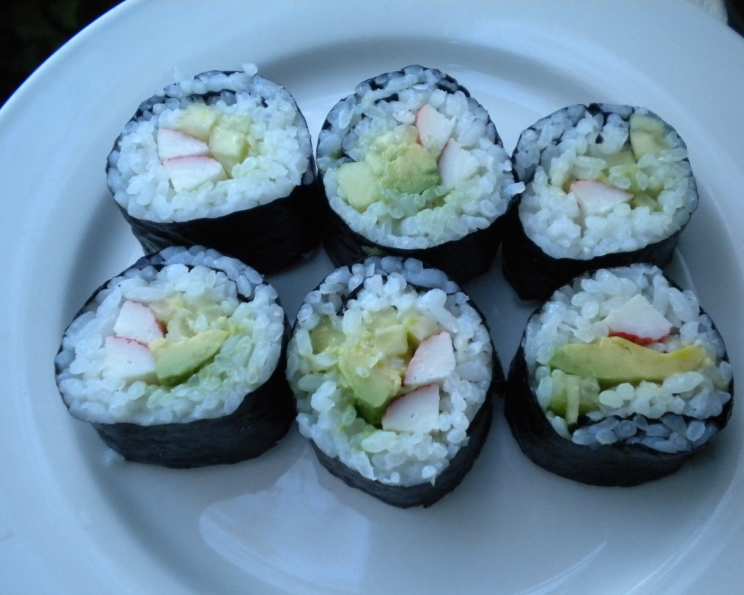
- Yields: 24 pieces
- Dietary Type: Gluten-Free (if using gluten-free soy sauce)
Ingredients
- 1/2 lemon, juiced
- 1 medium avocado, peeled, pitted, and sliced into 1/4-inch thick pieces
- 4 sheets nori
- 4 cups sushi rice, cooked (see separate sushi rice recipe)
- 1/3 cup sesame seeds, toasted
- 1 small cucumber, peeled, seeded, and cut into matchstick-size pieces
- 4 crabsticks, sliced lengthwise
- Pickled ginger, for serving
- Wasabi, for serving
- Soy sauce, for serving
Equipment Needed
- 2 bamboo sushi rolling mats
- Plastic wrap
- Sharp knife
- Small bowl of water with ice
Instructions
- Begin by preparing your ingredients. Squeeze the lemon juice over the avocado slices to prevent them from browning. This will also add a bright citrus note to the final product.
- Prepare your workspace. Cover a bamboo rolling mat with plastic wrap. This prevents the rice from sticking and makes cleanup much easier.
- Cut the nori sheets in half crosswise. This will give you 8 smaller sheets, each perfectly sized for making rolls.
- For California Rolls (rice on the outside): Lay 1 sheet of nori, shiny side down, on the plastic-covered mat.
- Wet your fingers with water to prevent the rice from sticking to them. Spread approximately 1/2 cup of the cooked sushi rice evenly onto the nori. Ensure the rice covers the entire surface of the nori.
- Sprinkle the rice with toasted sesame seeds. This adds flavor, texture, and visual appeal.
- Place the second plastic-covered bamboo rolling mat on top of the rice and carefully flip the two over so that the rice side is now down on the second mat. The nori should be facing up.
- Place 1/8 of the cucumber, avocado, and crab sticks in the center of the nori sheet, running horizontally across the middle.
- Grab the edge of the mat closest to you, keeping the fillings in place with your fingers, and roll it into a tight cylinder, using the mat to shape the cylinder. Apply gentle but firm pressure as you roll to ensure a compact and well-formed roll.
- For Maki Rolls (nori on the outside): Lay 1 sheet of nori, shiny side down, on the plastic-covered mat.
- Spread 1/2 cup of the rice over the surface of the nori, leaving about 1/2-inch of nori on the furthest edge uncovered so you will be able to seal the roll. This uncoated strip of nori will help the roll stick together.
- Press the rice down firmly but gently.
- Place 1/8 of the cucumber, avocado and crab sticks in the center of the sheet.
- Begin rolling the edge of the bamboo closest to you, using the mat to press down on the sushi roll firmly but gently as you roll.
- The nori should stick to itself when the roll is complete; if it doesn’t, use a cornstarch slurry to moisten it. A tiny dab of cornstarch mixed with water will act as a natural adhesive.
- Pull away the mat and set the finished roll aside.
- Cover the finished rolls with a damp cloth to prevent the rice from drying out.
- Repeat the rolling process until all of the rice and fillings have been used.
- To cut the rolls: Use a sharp knife that has been moistened with water. This will prevent the rice from sticking to the blade. Cut each roll into 6 equal pieces.
- Serve immediately with pickled ginger, wasabi, and soy sauce.
Expert Tips & Tricks
- Rice Perfection: The key to great sushi is great rice. Ensure your sushi rice is cooked perfectly according to your preferred method. It should be sticky but not mushy.
- Sharp Knife is Key: A dull knife will mangle your sushi rolls. Sharpen your knife before you start, and wipe it clean with a damp cloth between cuts.
- Toasting Sesame Seeds: Toasting sesame seeds enhances their nutty flavor. Spread them in a dry skillet over medium heat and toast for 2-3 minutes, or until golden brown and fragrant, stirring constantly.
- Rice Temperature: Work with the rice when it’s still slightly warm. It’s easier to handle and molds better.
- Filling Placement: Avoid overfilling the rolls. Too many ingredients will make them difficult to roll and cut neatly.
Serving & Storage Suggestions
Sushi is best enjoyed fresh, ideally within a few hours of making it. The rice can become dry and the avocado can brown if left out for too long. Serve your California and Maki rolls immediately with a side of pickled ginger (gari) to cleanse the palate between bites, a dollop of wasabi for a spicy kick, and soy sauce for dipping.
Leftover sushi can be stored in an airtight container in the refrigerator for up to 24 hours. However, the texture of the rice will change, and the flavors may not be as vibrant. It’s not recommended to freeze sushi, as this will significantly degrade the quality of the rice and fillings.
Nutritional Information
| Nutrient | Amount per Serving | % Daily Value |
|---|---|---|
| Calories | 141.2 kcal | N/A |
| Calories from Fat | 21 g | 15% |
| Total Fat | 2.4 g | 3% |
| Saturated Fat | 0.4 g | 1% |
| Cholesterol | 0 mg | 0% |
| Sodium | 3.2 mg | 0% |
| Total Carbohydrate | 26.9 g | 8% |
| Dietary Fiber | 1.8 g | 7% |
| Sugars | 0.3 g | 1% |
| Protein | 2.7 g | 5% |
Variations & Substitutions
- Vegetarian/Vegan: Omit the crab sticks and replace them with other vegetables like bell peppers, carrots, or asparagus. Tofu can also be used as a protein source.
- Spicy California Roll: Mix a small amount of sriracha or chili garlic sauce with the mayonnaise for a spicy kick.
- Smoked Salmon Roll: Replace the crab sticks with smoked salmon for a richer flavor.
- Brown Rice: Substitute white sushi rice with brown rice for a healthier option. Note that brown rice is less sticky and may be more challenging to work with.
- Gluten-Free: Ensure you use gluten-free soy sauce (tamari).
FAQs (Frequently Asked Questions)
Q: Can I make the sushi rice in advance?
A: Yes, you can make the sushi rice a few hours in advance. Allow it to cool to room temperature before using it for rolling.
Q: Why is my sushi roll falling apart?
A: This is often due to insufficient pressure when rolling or using rice that is too dry. Make sure to press firmly while rolling and use freshly cooked, properly seasoned sushi rice.
Q: How do I prevent the rice from sticking to everything?
A: Keep a small bowl of water nearby and dip your fingers in it frequently. This will prevent the rice from sticking to your hands and the knife.
Q: Can I use different fillings?
A: Absolutely! Sushi is a very customizable dish. Feel free to experiment with different combinations of vegetables, seafood, and sauces.
Q: What is the best way to cut the sushi roll?
A: Use a sharp knife that has been moistened with water. Cut with a smooth, even motion, wiping the blade clean between each cut.
Final Thoughts
Making sushi at home might seem intimidating at first, but with a little practice and patience, you’ll be creating restaurant-quality California and Maki rolls in no time. Don’t be afraid to experiment with different fillings and flavors to find your perfect combination. Whether you’re hosting a dinner party or simply craving a delicious and healthy meal, homemade sushi is always a crowd-pleaser. Gather your ingredients, sharpen your knives, and embark on your sushi-making adventure today! And don’t forget the sake!