
California Style Indian Fry Bread Tacos: A Culinary Fiesta!
The first time I tasted an Indian fry bread taco, it was at a summer festival in Northern California, and the memory is as vibrant as the sunshine that day. The aroma of freshly fried dough mingled with seasoned ground beef, creating an irresistible invitation. I remember biting into the warm, slightly chewy bread, the savory meat and crisp vegetables exploding with flavor. It was a symphony of textures and tastes, a unique twist on a classic taco that immediately won me over and has been a favorite ever since.
Recipe Overview
- Prep Time: 20 minutes
- Cook Time: 30 minutes
- Total Time: 50 minutes
- Servings: 4
- Dietary Type: Varies (See Variations for Vegetarian)
Ingredients
Bread Ingredients:
- 1 cup unbleached flour
- 1/4 teaspoon salt
- 1 teaspoon powdered milk
- 1 teaspoon baking powder
- 1/2 cup water
- Vegetable oil, for frying
Taco Ingredients:
- 1 lb ground beef
- 1 cup diced onion
- Salt and pepper, to taste
- 1 head lettuce, shredded
- 3 tomatoes, diced
- 2 cups cheddar cheese, shredded
- 1 (3 ounce) can diced green chilies, drained
- Sour cream (optional)
Equipment Needed
- Large bowl
- Fork
- Dutch oven or large, deep skillet
- Thermometer (optional, but recommended)
- Slotted spoon or spider
- Paper towels
- Large frying pan
Instructions
-
In a large bowl, sift together the flour, salt, powdered milk, and baking powder. This ensures that the dry ingredients are evenly distributed, leading to a more consistent fry bread.
-
Pour the water over the flour mixture all at once and stir the dough with a fork until it starts to form one big clump. The dough will seem shaggy at first, but keep stirring until it starts to come together.
-
Flour your hands generously. This is crucial to prevent the dough from sticking and making it easier to work with.
-
Using your floured hands, begin to mix the dough, trying to get all the flour incorporated into the mixture to form a ball. Gently bring the dough together, working from the outside in.
NOTE: You want to mix this well, but you do NOT want to knead it. Kneading it will develop the gluten, which will make for a heavy and tough fry bread when cooked. The inside of the dough ball should still be slightly sticky after it is formed, while the outside will be well floured. This delicate balance is key to achieving that light and airy texture.
-
Cut the dough into four (4) equal pieces. Aim for consistency in size so each fry bread cooks evenly.
-
Using your floured hands, shape, stretch, pat, and form each piece of dough into a disk of about 5 to 7 inches in diameter. Don’t worry about making them perfectly round; the rustic shape adds to the charm. Aim for an even thickness to ensure even cooking.
-
Use a large dutch oven or a deep, heavy-bottomed skillet and heat about 1 inch of vegetable oil to 350°F (175°C). Maintaining the correct oil temperature is essential for proper cooking.
If you don’t have a thermometer, you can tell if the oil is ready for each batch when a single un-popped popcorn kernel is dropped in and pops almost immediately. This is a classic chef’s trick for gauging oil temperature.
-
Carefully take one formed dough disk and gently place it into the hot oil, being careful not to splatter the hot oil. Use a slotted spoon or spider to gently lower the dough into the oil.
-
Press down gently on the dough as it fries, so the top is partially submersed into the hot oil. This helps the fry bread to puff up and cook evenly on both sides.
-
Fry until golden brown on the bottom, and then flip to fry the other side. Each side will take approximately 3 to 4 minutes. Monitor the color closely to prevent burning.
-
Once golden brown and cooked through, remove the fry bread from the oil and place it on a plate lined with paper towels to drain excess oil.
-
The fried bread can be kept warm in a 200°F (95°C) oven for up to 1 hour. This is a great way to prepare ahead and keep everything warm while you finish the taco filling.
-
Alternatively, they refrigerate well and can be reheated in a 350°F (175°C) oven for 10 to 15 minutes before serving.
-
While the fry bread is cooking, prepare the taco filling. In a large frying pan over medium-high heat, brown the ground beef and diced onions until the meat is cooked through and the onions are softened.
-
Drain any excess grease from the pan. Nobody wants greasy tacos!
-
Season the meat mixture with salt and pepper to taste.
-
Remove the ground beef mixture from the heat.
-
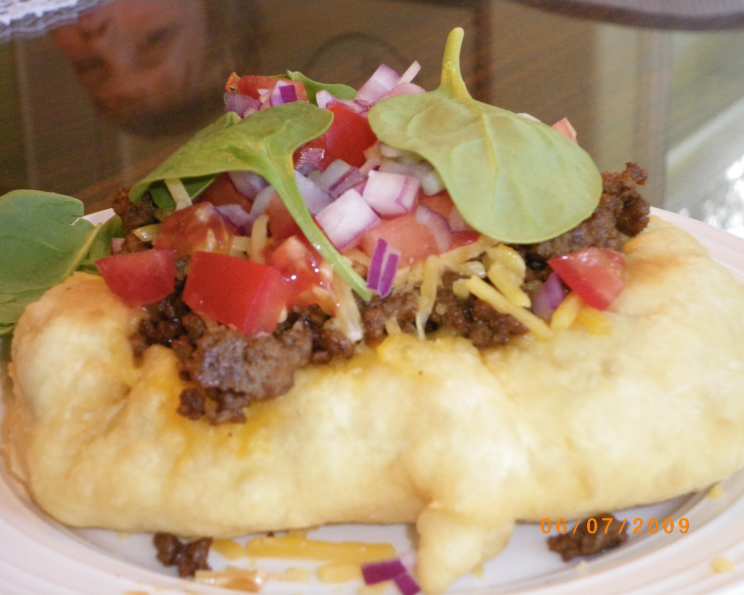
To assemble the tacos, place a fry bread, cupped side up, on each separate plate.
-
Layer the ground beef mixture, shredded lettuce, diced tomatoes, shredded cheddar cheese, and drained diced green chilies onto the top of each fry bread.
-
Top with sour cream, if desired.
-
Serve immediately and enjoy!
Expert Tips & Tricks
- Don’t overmix the dough: Overmixing develops the gluten, resulting in a tough fry bread. Aim for a shaggy dough that just comes together.
- Maintain the oil temperature: If the oil is too hot, the fry bread will burn on the outside before it cooks through. If it’s not hot enough, the bread will absorb too much oil and become greasy.
- Use a thermometer: A thermometer is your best friend for consistent results. Invest in an inexpensive one to take the guesswork out of frying.
- Don’t overcrowd the pan: Fry the bread one or two at a time to prevent the oil temperature from dropping too low.
- Press down gently: Pressing down on the fry bread while it cooks helps it to puff up and cook evenly.
- Drain well: Make sure to drain the fry bread thoroughly on paper towels to remove excess oil.
Serving & Storage Suggestions
Serve these California Style Indian Fry Bread Tacos immediately for the best texture and flavor. The warm, freshly fried bread is the perfect complement to the cool, crisp toppings.
Leftover fry bread can be stored in an airtight container at room temperature for up to 24 hours, or in the refrigerator for up to 3 days. Reheat in a 350°F (175°C) oven for 10-15 minutes, or until warmed through. You can also reheat them in a skillet over medium heat.
The ground beef filling can be stored in an airtight container in the refrigerator for up to 3 days. Reheat in a skillet over medium heat until heated through.
I do not recommend freezing the assembled tacos, as the lettuce and tomatoes will become soggy. However, you can freeze the fry bread and ground beef filling separately for up to 2 months. Thaw overnight in the refrigerator before reheating and assembling.
Nutritional Information
| Nutrient | Amount per Serving | % Daily Value |
|---|---|---|
| Calories | 640.5 kcal | N/A |
| Calories from Fat | 329 kcal | N/A |
| Total Fat | 36.6 g | 56% |
| Saturated Fat | 18.8 g | 94% |
| Cholesterol | 137.1 mg | 45% |
| Sodium | 947.9 mg | 39% |
| Total Carbohydrate | 36.4 g | 12% |
| Dietary Fiber | 4 g | 15% |
| Sugars | 6.1 g | N/A |
| Protein | 41.1 g | 82% |
Note: Nutritional information is an estimate and may vary based on specific ingredients and preparation methods.
Variations & Substitutions
- Vegetarian: Substitute the ground beef with seasoned black beans, lentils, or crumbled tofu.
- Spicy: Add a pinch of cayenne pepper to the ground beef mixture for a kick. You can also use pepper jack cheese instead of cheddar.
- Gluten-Free: Use a gluten-free flour blend for the bread. You may need to adjust the amount of water slightly to achieve the right consistency.
- Toppings: Get creative with your toppings! Try adding guacamole, salsa, olives, or pickled onions.
- Sweet Fry Bread: Sprinkle the fried bread with cinnamon and sugar for a sweet treat. Serve with honey or maple syrup.
FAQs (Frequently Asked Questions)
Q: Can I make the dough ahead of time?
A: Yes, you can make the dough ahead of time and store it in the refrigerator for up to 24 hours. Bring it to room temperature before shaping and frying.
Q: Can I bake the fry bread instead of frying it?
A: While frying is traditional, you can bake the bread at 375°F (190°C) for 15-20 minutes, or until golden brown. However, the texture will be different from fried bread.
Q: What is powdered milk and can I substitute it?
A: Powdered milk adds a subtle richness to the bread. You can omit it if you don’t have it on hand, but the flavor will be slightly different.
Q: How do I prevent the fry bread from getting soggy?
A: Ensure the oil is hot enough, don’t overcrowd the pan, and drain the bread well on paper towels.
Q: Can I use a different type of oil for frying?
A: Yes, you can use any neutral-flavored oil with a high smoke point, such as canola oil, peanut oil, or grapeseed oil.
Final Thoughts
These California Style Indian Fry Bread Tacos are a delightful culinary adventure that brings together the best of both worlds. The warm, crispy fry bread, combined with the savory taco filling, creates a truly unforgettable dish. Don’t be intimidated by the frying process; with a little practice, you’ll be whipping up these delicious tacos in no time. Experiment with different toppings and variations to create your own signature fry bread taco. Share your creations and feedback – I’d love to hear about your taco triumphs! Perhaps pair it with a refreshing agua fresca or a crisp Mexican beer for the perfect fiesta.