
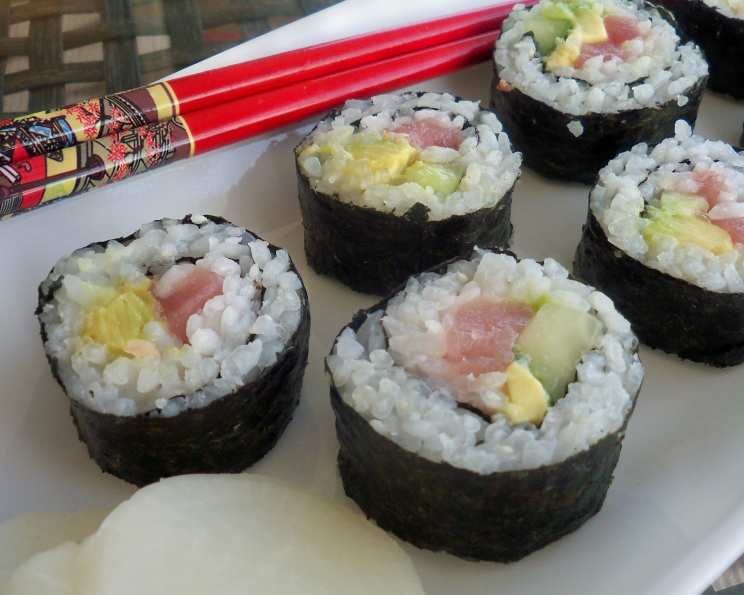
California Tuna Roll: A Taste of Sunshine in Every Bite
The first time I had a California Tuna Roll, I was a newly minted culinary student, working a summer job at a bustling sushi bar in Santa Monica. The vibrant colors of the tuna, avocado, and cucumber against the pearly white rice and dark green nori just screamed “California” to me. I remember the head chef, a gruff but kind man named Kenji, showing me the precise art of rolling – how to apply just the right amount of pressure, how to keep the roll tight and even, and most importantly, how to make it taste absolutely amazing. That summer, I rolled hundreds of these, and each one transported me to the sunny beaches and laid-back vibes of Southern California. Even today, the familiar combination of flavors takes me right back to that formative experience, reminding me of the joy and artistry I discovered in the world of sushi.
Recipe Overview
- Prep Time: 10 minutes
- Cook Time: 0 minutes (assuming sushi rice is already prepared)
- Total Time: 10 minutes
- Servings: 6 slices
- Yields: 6 slices
- Dietary Type: Gluten-Free (if using gluten-free soy sauce)
Ingredients
- ½ sheet toasted nori
- ⅓ cup prepared sushi rice
- 1 ounce sashimi grade tuna, sliced
- 2 pieces peeled English cucumbers (2 to 3, matchstick-sized pieces)
- 2 pieces sliced avocados (2 to 3)
- 1 ½ teaspoons mayonnaise
- 1 ½ teaspoons wasabi powder
- 1 tablespoon pickled ginger (optional)
- 1 tablespoon grated daikon radish (optional)
- 1 teaspoon wasabi paste (optional)
- 1 tablespoon soy sauce (optional)
Equipment Needed
- Sushi rolling mat (makisu)
- Sharp knife
- Small bowl
- Spoon or rice paddle
Instructions
-
Prepare your workspace: Lay a sushi rolling mat on a clean, flat surface. This will help you create a tightly rolled sushi.
-
Prepare the Nori: Place the toasted nori sheet (shiny side down) on the rolling mat. The shiny side of the nori should be facing down so the dull side is facing up and will hold the rice better.
-
Add the Sushi Rice: Spread the prepared sushi rice evenly over the center of the nori sheet. You don’t need to cover the entire sheet; leave about an inch of space at the top edge furthest from you. This allows you to seal the roll effectively. Use a spoon or rice paddle to gently spread the rice, being careful not to smash it.
-
Make the Wasabi Mayo: In a small bowl, mix together the mayonnaise with the wasabi powder until well combined. The amount of wasabi powder can be adjusted to your preference – add more for a spicier kick!
-
Spread the Wasabi Mayo: Gently spread the wasabi mayo mixture evenly over the sushi rice. This adds a creamy, spicy layer that complements the other ingredients.
-
Add the Filling: Place a row of sliced tuna, cucumber matchsticks, and avocado slices horizontally across the rice, about a third of the way up from the bottom edge of the nori. Be careful not to overfill the roll, or it will be difficult to close.
-
Roll the Sushi: Using the rolling mat, lift the edge of the mat closest to you and begin to roll the nori over the filling. Keep the roll tight by gently squeezing the mat as you roll.
-
Seal the Roll: Once you’ve rolled the sushi almost completely, moisten the farthest edge of the exposed nori with a little water. This will help it to seal properly and prevent the roll from unraveling.
-
Final Touches: Continue rolling the mat until the roll is completely sealed. Give the roll a final gentle squeeze to ensure it is compact and even.
-
Slice and Serve: Using a very sharp knife, carefully slice the sushi roll into 6 equal pieces. It helps to wipe the knife with a damp cloth between each slice to prevent the rice from sticking.
-
Garnish and Enjoy: Serve your California Tuna Roll garnished with pickled ginger, grated daikon radish, wasabi paste, and soy sauce, if desired. These condiments add extra layers of flavor and enhance the overall experience.
Expert Tips & Tricks
- Rice is Key: Using properly prepared sushi rice is crucial. It should be sticky enough to hold together but not mushy. If you don’t have time to make your own, you can often find pre-made sushi rice at Asian grocery stores.
- Sharp Knife, Clean Cuts: A sharp knife is essential for making clean, even slices. A dull knife will tear the nori and make the roll fall apart.
- Keep it Cool: Work with cold ingredients. This helps to prevent the avocado from browning and keeps the tuna fresh.
- Don’t Overfill: Resist the urge to cram too much filling into the roll. It will make it difficult to roll and slice neatly.
- Wet Your Hands: Before handling the sushi rice, wet your hands with a little water. This will prevent the rice from sticking to your fingers.
- Wasabi Mayo Adjustment: For less heat, omit the wasabi powder or use a small amount to taste. You can also use a milder wasabi paste instead.
Serving & Storage Suggestions
The California Tuna Roll is best served immediately after preparation to ensure the freshness of the ingredients and the optimal texture of the nori. If you have leftovers, store them in an airtight container in the refrigerator. They are best consumed within 24 hours. The nori will soften over time, but the flavors will still be delicious. Avoid freezing the sushi, as this will significantly impact the texture of the rice and avocado.
Nutritional Information
| Nutrient | Amount per Serving | % Daily Value |
|---|---|---|
| Calories | 49.6 kcal | N/A |
| Calories from Fat | 6 g | N/A |
| Total Fat | 0.7 g | 1% |
| Saturated Fat | 0.1 g | 0% |
| Cholesterol | 2.1 mg | 0% |
| Sodium | 11.3 mg | 0% |
| Total Carbohydrate | 8.7 g | 2% |
| Dietary Fiber | 0.3 g | 1% |
| Sugars | 0.1 g | 0% |
| Protein | 1.8 g | 3% |
Note: Nutritional information is an estimate and can vary based on specific ingredients and portion sizes.
Variations & Substitutions
- Spicy Tuna Roll: Add a dash of sriracha or chili oil to the wasabi mayo for an extra kick.
- Vegetarian Option: Replace the tuna with marinated tofu or additional avocado and cucumber.
- Gluten-Free: Ensure your soy sauce is gluten-free (tamari) to make this recipe entirely gluten-free.
- Brown Rice: Substitute sushi rice with brown rice for a healthier alternative. The texture will be slightly different, but the flavor is still great.
- Smoked Salmon Roll: Substitute the tuna with slices of smoked salmon.
FAQs (Frequently Asked Questions)
Q: What is sushi rice and how is it different from regular rice?
A: Sushi rice is short-grain Japanese rice seasoned with rice vinegar, sugar, and salt. This gives it a distinctive tangy flavor and sticky texture perfect for holding sushi rolls together.
Q: How do I make sure I am using sashimi-grade tuna?
A: Sashimi-grade tuna refers to tuna that is considered safe to eat raw. Purchase it from a reputable fishmonger or sushi supplier who can guarantee its quality and handling.
Q: Can I make sushi rolls ahead of time?
A: While it’s best to eat them fresh, you can make sushi rolls a few hours ahead of time. Wrap them tightly in plastic wrap and store them in the refrigerator to prevent the nori from becoming soggy.
Q: What can I use if I don’t have a sushi rolling mat?
A: If you don’t have a sushi rolling mat, you can use a clean kitchen towel or a sheet of plastic wrap. Just be sure to roll tightly and evenly.
Q: How can I prevent the rice from sticking to my knife when slicing?
A: Wet your knife with water before each slice. This will help to prevent the rice from sticking and ensure clean, even cuts.
Final Thoughts
The California Tuna Roll is a delightful way to experience the flavors of sushi at home. With a little practice, you can master the art of rolling and create a delicious and visually appealing dish that’s perfect for a light lunch, a party appetizer, or a satisfying snack. Don’t be afraid to experiment with different fillings and flavors to create your own signature roll. And remember, the most important ingredient is always love! So gather your ingredients, roll up your sleeves, and get ready to enjoy a taste of sunshine in every bite! Share your creations and feedback with me – I’d love to see your variations!