
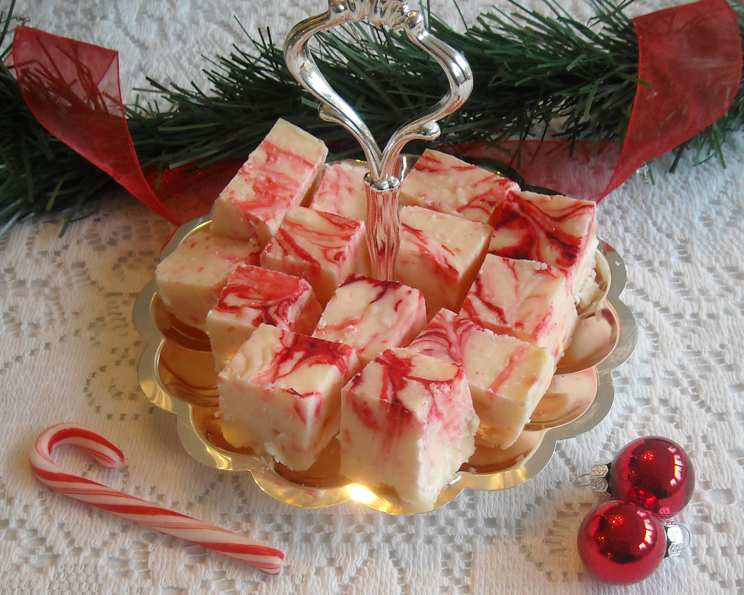
Candy Cane Fudge: A Festive Holiday Treat
Every Christmas, the scent of peppermint takes me back to my childhood. I can almost feel the tingle of excitement as I’d carefully unwrap a candy cane from its cellophane cocoon, the red and white stripes promising pure holiday magic. This Candy Cane Fudge perfectly captures that nostalgic joy. It’s a delightful burst of peppermint sweetness in every bite, and I love how easily it comes together – perfect for gifting or simply enjoying a cozy evening by the fire.
Recipe Overview
- Prep Time: 25 minutes
- Cook Time: 5 minutes
- Chill Time: 2 hours
- Servings: 64
- Yield: 2 1/4 pounds
- Dietary Type: Vegetarian
Ingredients
- 2 (10 ounce) packages vanilla baking chips (or white baking morsels)
- 14 ounces sweetened condensed milk
- ¾ – 1 teaspoon peppermint extract (depending on preferences)
- 1 ½ cups finely-crushed candy canes
- Red food coloring
Equipment Needed
- 8×8-inch square baking pan
- Aluminum foil
- Medium saucepan
- Butter knife
- Cutting board
Instructions
-
Begin by preparing your baking pan. Line an 8×8-inch square baking pan with aluminum foil, ensuring the foil extends slightly over the edges for easy removal later. Lightly coat the bottom of the foil with butter to prevent sticking.
-
In a medium saucepan, combine the vanilla chips and the sweetened condensed milk.
-
Cook over medium heat, stirring frequently, until the vanilla chips are completely melted. This should take about 3-5 minutes. Be patient and continue stirring, as the chips can burn easily if the heat is too high or if left unattended.
-
Remove the pan from the heat and continue to stir vigorously to remove any lumps that might be left from partially unmelted chips. A smooth, creamy texture is the goal here. Don’t stop stirring until all traces of the vanilla chips have disappeared.
-
Once the mixture is perfectly smooth, stir in the peppermint extract and crushed candy canes. Start with ¾ teaspoon of the extract and taste; add the remaining ¼ teaspoon if you prefer a stronger peppermint flavor. The amount of crushed candy canes may need to be adjusted based on how finely crushed they are. Stir well to ensure the candy canes are evenly distributed throughout the mixture.
-
Spread the fudge mixture evenly in the bottom of the prepared baking pan. Use a spatula or the back of a spoon to smooth the surface and ensure it reaches all corners.
-
Now it’s time to add the festive swirl. Dot the top of the fudge with several drops of red food coloring. I used about 9 drops, but feel free to reduce or increase that, depending on the amount of swirling you wish to create in your fudge.
-
With a butter knife, cut through the fudge and food coloring, making a swirling pattern throughout the fudge. Be careful not to over-mix, as you want to maintain distinct streaks of red. A few gentle swirls will do the trick.
-
Chill the fudge for at least 2 hours, or preferably longer, until it is firm and set. This allows the fudge to fully solidify and makes it easier to cut into clean squares.
-
Remove the fudge from the baking pan by lifting the foil from both ends. Transfer the fudge to a cutting board, and cut into 1-inch squares.
Expert Tips & Tricks
- Chip Quality Matters: Use high-quality vanilla baking chips for the best flavor and texture. Cheaper chips may not melt as smoothly.
- Low and Slow is Key: Keep the heat at medium to prevent burning the vanilla chips. Constant stirring is essential.
- Adjust the Peppermint: Start with a smaller amount of peppermint extract and taste as you go. It’s easier to add more than to take it away.
- Candy Cane Crunch: For a chunkier texture, reserve some of the crushed candy canes and sprinkle them on top of the fudge before chilling.
- Even Swirl: To create a more consistent swirl, use a toothpick or skewer instead of a butter knife.
- Troubleshooting Lumps: If your vanilla chips are not melting smoothly and forming lumps, try adding a tablespoon of milk or cream to the saucepan. This can help to loosen the mixture and promote smoother melting.
- Quick Chill: To speed up the chilling process, you can place the fudge in the freezer for about 30-45 minutes. However, be sure to check it frequently to prevent it from becoming too hard.
Serving & Storage Suggestions
Serve your Candy Cane Fudge chilled or at room temperature. It makes a delightful addition to holiday dessert platters, cookie exchanges, or as a homemade gift.
- Storage: Store the fudge in an airtight container at room temperature for up to 1 week, in the refrigerator for up to 2 weeks, or in the freezer for up to 2 months.
- Freezing: To freeze, wrap the fudge tightly in plastic wrap and then place it in a freezer-safe bag or container. Thaw in the refrigerator before serving.
- Presentation: Arrange the fudge squares on a festive platter or in small gift boxes lined with parchment paper. A sprinkle of extra crushed candy canes adds a final touch of holiday cheer.
Nutritional Information
| Nutrient | Amount per Serving | % Daily Value |
|---|---|---|
| Calories | 68 kcal | N/A |
| Calories from Fat | 31 kcal | N/A |
| Total Fat | 3.4g | 5% |
| Saturated Fat | 2.1g | 10% |
| Cholesterol | 3.4mg | 1% |
| Sodium | 16mg | 1% |
| Total Carbohydrate | 9g | 3% |
| Dietary Fiber | 0g | 0% |
| Sugars | 9g | N/A |
| Protein | 1g | 2% |
Variations & Substitutions
- Dark Chocolate Peppermint Fudge: Substitute half of the vanilla baking chips with dark chocolate chips for a richer flavor.
- Vegan Candy Cane Fudge: While this recipe is difficult to adapt to be completely vegan without dramatically changing the base, you can try using vegan white chocolate chips and plant-based sweetened condensed milk alternatives, though the result may vary.
- Peppermint Bark Fudge: Add a layer of melted dark chocolate on top of the fudge after it has chilled for an hour. Sprinkle with extra crushed candy canes before the chocolate sets.
- Other Extracts: Experiment with other extracts, such as vanilla, almond, or rum, for a different flavor profile. Adjust the amount to your liking.
FAQs (Frequently Asked Questions)
Q: Can I use regular milk instead of sweetened condensed milk?
A: No, sweetened condensed milk is crucial for the fudge’s texture and sweetness. Regular milk will not provide the same result.
Q: My fudge is too soft. What did I do wrong?
A: The most common cause is not chilling the fudge long enough. Make sure to chill it for at least 2 hours, or longer if needed. Also, ensure you used the correct amount of sweetened condensed milk.
Q: Can I use different types of candy instead of candy canes?
A: Yes, you can experiment with other hard candies, such as peppermint swirls or butterscotch candies. Just make sure they are finely crushed.
Q: How do I prevent the candy canes from sinking to the bottom of the fudge?
A: Make sure the fudge mixture has slightly cooled and thickened before adding the crushed candy canes. This will help them stay suspended throughout the fudge.
Q: What if I don’t have an 8×8-inch pan?
A: You can use a slightly larger or smaller pan, but the thickness of the fudge will vary. Adjust the chilling time accordingly.
Final Thoughts
This Candy Cane Fudge is more than just a sweet treat; it’s a little piece of holiday magic that you can create in your own kitchen. Whether you’re sharing it with loved ones or savoring it yourself, I hope this recipe brings a touch of joy and peppermint cheer to your celebrations. Don’t be afraid to get creative with the variations and make it your own. And please, let me know how it turns out – I’d love to hear your feedback! Happy baking!