
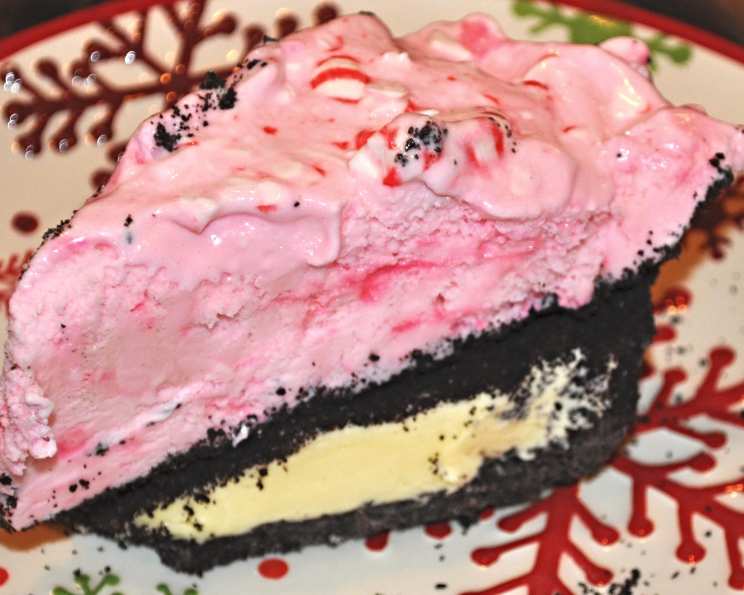
Candy Cane Ice Cream Pie With Oreo Cookie Crust
The scent of peppermint always takes me back to Christmases at my grandmother’s house. She’d have a candy dish overflowing with starlight mints, their crinkly wrappers promising a burst of cool, festive flavor. While I loved those simple candies, I always dreamed of a peppermint dessert that was a little more…extravagant. This Candy Cane Ice Cream Pie with Oreo Cookie Crust is exactly that – a nostalgic hug with a playful, delicious twist.
Recipe Overview
- Prep Time: 5 hours 8 minutes
- Total Time: 5 hours 8 minutes
- Servings: 12
- Yields: 1 pie
Ingredients
OREO PIE CRUST
- 20 Oreo cookies, crumbled (2 cups)
- ¼ cup butter, melted
ICE CREAM FILLING
- 1 pint vanilla ice cream, softened
- 10 Oreo cookies, crushed (1 cup)
- 1 ½ quarts peppermint ice cream, softened
WHIPPED CREAM TOPPING
- 1 ½ cups heavy cream
- 3 tablespoons sugar
- Wilton red-red concentrated food coloring (optional)
- 12-18 starlight peppermint candies, for garnish (optional)
Equipment Needed
- 9-inch deep-dish pie pan
- Mixing bowls
- Electric mixer
- Spatula
- Pastry bag with a large star tip (optional)
- Small, clean brush (optional)
Instructions
- Preheat your oven to 350 degrees Fahrenheit (177 degrees Celsius). This crucial first step will ensure the Oreo crust bakes to a perfectly crisp consistency.
- In a medium bowl, thoroughly mix the Oreo crumbs and melted butter until the mixture resembles wet sand. The butter acts as a binding agent, holding the crust together.
- Press the Oreo mixture firmly into the bottom and up the sides of a 9-inch deep-dish pie pan. Use the bottom of a measuring cup or your fingers to create an even and compact crust.
- Bake the crust for 8 minutes. This short baking time sets the crust and prevents it from becoming soggy when filled with the ice cream.
- Remove the crust from the oven and allow it to cool completely on a wire rack before adding the ice cream filling. This step is essential to prevent the ice cream from melting too quickly.
- In a separate bowl, allow 1 pint of vanilla ice cream to soften slightly. It should be soft enough to spread easily but not completely melted.
- Spread the softened vanilla ice cream evenly over the bottom of the cooled Oreo pie crust. This layer provides a smooth, creamy base for the next layer.
- Sprinkle the crushed Oreo cookies (1 cup) evenly over the vanilla ice cream layer. This adds a delightful textural contrast and enhances the Oreo flavor.
- Place the pie in the freezer to set for about 1 hour. This allows the vanilla ice cream layer to firm up, preventing the peppermint ice cream from mixing with it.
- In another bowl, soften 1 ½ quarts of peppermint ice cream. Again, ensure it’s spreadable but not completely melted.
- Remove the pie from the freezer and spread the softened peppermint ice cream evenly over the cookie layer, mounding it slightly in the center for a visually appealing effect.
- Return the pie to the freezer and freeze for at least 4 hours, or preferably overnight. This ensures the pie is thoroughly frozen and easy to slice.
- Now, prepare the whipped cream topping. In a chilled bowl, using an electric mixer on medium-high speed, beat 1 ½ cups of heavy cream with 3 tablespoons of sugar until stiff peaks form. Be careful not to overwhip, as this can result in a grainy texture.
- If desired, fit a large star tip into a large pastry bag. Using a small, clean brush, paint 5 long lines of Wilton red-red concentrated food coloring inside the bag, starting at the tip and ending 1 inch from the top edge. This creates a beautiful striped effect when the whipped cream is piped.
- Fill the pastry bag with the whipped cream. Pipe rosettes or other decorative swirls onto the pie.
- Alternatively, if you don’t have a pastry bag, simply spread the plain whipped cream evenly over the pie.
- Garnish the pie with 12-18 starlight peppermint candies (optional). Arrange them attractively on top of the whipped cream.
Expert Tips & Tricks
- To prevent the Oreo crust from sticking, lightly grease the pie pan with cooking spray before pressing in the crumbs.
- If your peppermint ice cream is too hard to scoop, let it sit at room temperature for a few minutes to soften slightly. Avoid microwaving, as this can cause it to melt unevenly.
- For a more intense peppermint flavor, add a few drops of peppermint extract to the peppermint ice cream before spreading it on the pie.
- If you’re short on time, you can use store-bought whipped cream topping instead of making it from scratch.
- To make the whipped cream topping ahead of time, stabilize it by adding a teaspoon of cornstarch or gelatin powder while beating. This will prevent it from weeping or separating.
Serving & Storage Suggestions
To serve the Candy Cane Ice Cream Pie, remove it from the freezer about 10-15 minutes before slicing to allow it to soften slightly. This will make it easier to cut and serve. Use a sharp knife to slice the pie into even wedges. Garnish each slice with an extra starlight peppermint candy, if desired.
Leftover pie can be stored in the freezer for up to a week. Cover it tightly with plastic wrap or foil to prevent freezer burn. It’s not recommended to store the pie at room temperature or in the refrigerator, as the ice cream will melt.
Nutritional Information
| Nutrient | Amount per Serving | % Daily Value |
|---|---|---|
| Calories | 329.1 kcal | N/A |
| Calories from Fat | 206g | 63% |
| Total Fat | 22.9 g | 35% |
| Saturated Fat | 12.6 g | 63% |
| Cholesterol | 60.6 mg | 20% |
| Sodium | 207.3 mg | 8% |
| Total Carbohydrate | 29.5 g | 9% |
| Dietary Fiber | 1 g | 3% |
| Sugars | 19.6 g | N/A |
| Protein | 3 g | 6% |
Note: Nutritional information is an estimate and may vary based on specific ingredients and portion sizes.
Variations & Substitutions
- Gluten-Free: Use gluten-free Oreo cookies to make the crust gluten-free.
- Dairy-Free: Substitute the dairy ice cream and whipped cream with dairy-free alternatives made from coconut milk, almond milk, or soy milk. Be sure to check the labels of the cookies for any potential dairy ingredients.
- Chocolate Mint Pie: Replace the vanilla ice cream layer with chocolate ice cream or chocolate mint ice cream for a richer, more decadent flavor.
- Peppermint Bark Pie: Add chopped peppermint bark to the peppermint ice cream layer for an extra layer of peppermint flavor and a crunchy texture.
- Seasonal Adaptations: During the summer, try using fresh berries or other seasonal fruits to garnish the pie.
FAQs (Frequently Asked Questions)
Q: Can I use a pre-made Oreo pie crust?
A: Yes, you can use a pre-made Oreo pie crust to save time. Just be sure to adjust the baking time accordingly.
Q: How do I prevent the whipped cream from melting?
A: Stabilize the whipped cream by adding a teaspoon of cornstarch or gelatin powder while beating. This will help it hold its shape for longer.
Q: Can I make this pie ahead of time?
A: Yes, this pie can be made ahead of time and stored in the freezer for up to a week. Just be sure to cover it tightly to prevent freezer burn.
Q: What if I don’t have a pastry bag?
A: If you don’t have a pastry bag, you can simply spread the whipped cream evenly over the pie with a spatula.
Q: Can I use regular food coloring instead of concentrated food coloring?
A: Yes, you can use regular food coloring, but you may need to use more to achieve the desired color intensity. Be careful not to add too much liquid, as this can affect the consistency of the whipped cream.
Final Thoughts
This Candy Cane Ice Cream Pie is more than just a dessert; it’s a celebration of the holiday season in every bite. The creamy ice cream, the crunchy Oreo crust, and the festive peppermint flavor combine to create a truly unforgettable treat. So, gather your loved ones, preheat your oven, and embark on this delicious culinary adventure. I encourage you to try this recipe and share your own creative twists and variations! And while you’re enjoying a slice, why not pair it with a warm cup of hot chocolate or a festive peppermint mocha? Happy baking!