
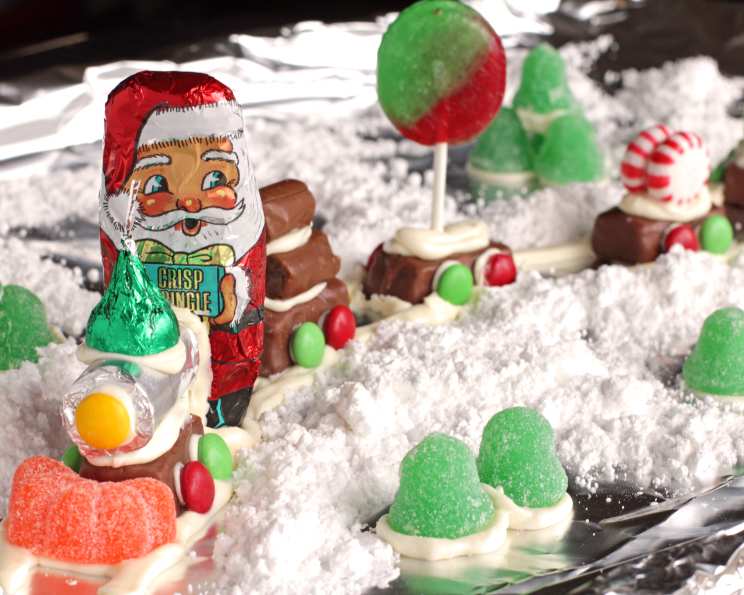
Candy Christmas Train: A Sweet Ride to Holiday Cheer
The scent of peppermint and chocolate always takes me back to my childhood Christmases. My grandmother, a woman who believed every day deserved a touch of sweetness, used to craft these incredible candy trains. Each car was a new surprise, a sugary landscape waiting to be explored. It wasn’t just the candy, it was the time spent with her, carefully arranging each piece, that made those trains so special. Now, I carry on that tradition, creating these edible locomotives to share the same joy with my own family.
Recipe Overview
- Prep Time: 30 minutes
- Cook Time: 0 minutes
- Total Time: 30 minutes
- Servings: 1 train
- Yield: 1 train
- Dietary Type: Not specified
Ingredients
- 1 (16 ounce) can Betty Crocker vanilla frosting
- 16 ounces fun size Snickers candy bars
- 1 (1 1/4 ounce) roll LifeSavers five-flavor roll candy
- 1 yellow M&M’s plain chocolate candy
- 1 piece aluminum foil, wrapped Santa
- 1 orange slice
- 1 Hershey chocolate kiss, in red or green aluminum foil
- 1 (1 lb) bag red & green M&M’s plain chocolate candy
- 3 Tootsie Rolls, midgies
- 1 small red lollipop
- 1 small green lollipop
- 2 red Starbrite peppermint candies
- 2 foil wrapped candies
Equipment Needed
- Cardboard
- Aluminum foil
- Tape
- Yardstick
- Pen
- Piping bag or ziplock bag
- Scissors (optional)
Instructions
- Begin by preparing the base. Cut a piece of cardboard that measures 5 inches wide by 18 inches long. This will serve as the foundation for your train.
- Wrap the cardboard completely in aluminum foil, securing it with tape on the back. This creates a clean and festive surface.
- To guide the placement of the train cars, use a yardstick and pen to mark two parallel lines along the length of the foil-covered base. Position the yardstick down the middle and draw a line along each long side.
- Fill a piping bag with the vanilla frosting. If you don’t have a piping bag, a ziplock bag with a small corner snipped off will work just as well.
- Pipe the vanilla frosting along the two marked lines on the foil base. These lines of frosting will act as the “tracks” for your train.
- Prepare the Snickers candy bars to serve as the train cars. Unwrap five of the fun size Snickers bars.
- Using more vanilla frosting, “glue” red and green M&M’s onto the sides of each unwrapped Snickers bar to resemble wheels. Distribute the M&M’s evenly along the length of each bar.
- The orange slice will be the “cow catcher” at the front of the train. Position the orange slice 1 inch from one end of the foil base and secure it in place with a generous dollop of frosting.
- Take one of the Snickers candy bars with the M&M “wheels” and attach it directly behind the orange slice. Use additional frosting underneath the candy bar to ensure it adheres firmly to the foil base. Press down slightly to set.
- Carefully remove the Life Savers from the Life Savers roll candy wrapper. Unfold the foil wrapper being careful not to tear it. Open one end of the wrapper and remove some of the candies so that the remaining Life Savers are the same length as the candy bar. Cut off any excess wrapper leaving enough foil to fold over the open end.
- Pipe a line of frosting down the center of the first candy bar (the one directly behind the orange slice). Gently press the foil-covered Life Savers onto the frosting, ensuring that the cut end of the Life Savers (the end where you removed some candies) faces away from the orange slice.
- Add a touch of whimsy to the engine by attaching a yellow M&M to the front. Pipe a small amount of frosting onto the end of the Life Savers foil (above the orange slice, cow catcher) and press the yellow M&M firmly onto the frosting. This will serve as a light.
- The foil-wrapped Santa is the driver! Pipe some frosting directly onto the foil base behind the first candy bar. Also, add some frosting to the back of the candy bar and the end of the Life Savers to hold Santa in place. Now press Santa’s feet into the frosting on the base and his belly onto the back of the candy bar and Life Savers.
- Leave approximately 1.5 inches of space between the first car (the engine) and the next. Position another candy car on the foil base, ensuring it is centered. Repeat this process, leaving 1.5 inches between each car, until all five candy bar “cars” are in place.
- Decorate the second car with Tootsie Rolls. Frost the top of the second candy car and then place three Tootsie Roll midgies on top, arranging them to resemble logs. Use additional frosting to secure them in place.
- The third car gets a lollipop load! Frost the top of the third candy car and then carefully insert the red and green lollipops into the frosting, positioning them both to face forward.
- Give the fourth car a peppermint cargo. Frost the top of the fourth candy car and then stick the two Starbrite peppermint candies onto the top, on their sides facing each other, with a dab of frosting between them to help them stand up.
- Complete the final car with an assortment of treasures! Frost the top of the fifth car and then press the foil-wrapped candies into the frosting, arranging them as desired.
- Allow the frosting to set for at least 15-20 minutes before handling or displaying your Candy Christmas Train.
Expert Tips & Tricks
- Frosting Consistency: If your frosting is too thick, microwave it for a few seconds to make it easier to pipe. Be careful not to overheat it, as it can become too runny.
- Candy Placement: Experiment with different candy arrangements to create unique and personalized train cars.
- Base Stability: For a more stable base, consider using a thicker piece of cardboard or even a small wooden board.
- Frosting Alternatives: If you prefer, you can use melted chocolate as an alternative to frosting. This will give the train a richer chocolate flavor and a firmer hold.
Serving & Storage Suggestions
Serve your Candy Christmas Train as a festive centerpiece for your holiday table or as a delightful edible gift. To store, keep the train in a cool, dry place, away from direct sunlight or heat. The train should last for several days at room temperature, although the frosting may soften over time. It is not recommended to refrigerate the train, as this can cause the candy to become sticky. Due to the nature of the ingredients, freezing is not advisable.
Nutritional Information
Please note that the nutritional information is an estimate and can vary based on specific brands and ingredient quantities used.
| Nutrient | Amount per Serving | % Daily Value |
|---|---|---|
| Calories | 6495 kcal | N/A |
| Total Fat | 284 g | 436% |
| Saturated Fat | 118 g | 588% |
| Cholesterol | 127 mg | 42% |
| Sodium | 2218 mg | 92% |
| Total Carbohydrate | 929 g | 309% |
| Dietary Fiber | 24 g | 95% |
| Sugars | 821 g | 3283% |
| Protein | 55 g | 110% |
Variations & Substitutions
- Halloween Train: Swap the red and green M&Ms for orange and black ones, and use Halloween-themed candies for decoration.
- Easter Train: Use pastel-colored M&Ms, jelly beans, and marshmallow chicks to create an Easter-themed train.
- Dietary Restrictions: Substitute the Snickers bars with allergy-friendly candy bars to accommodate dietary restrictions.
- Frosting Flavor: Experiment with different frosting flavors, such as chocolate, peppermint, or cream cheese, to add a unique twist.
- Candy Bar Variety: Use a variety of different fun-size candy bars for the train cars to add more visual appeal and flavor complexity.
FAQs (Frequently Asked Questions)
Q: How long does the Candy Christmas Train last?
A: The train can last for several days at room temperature if stored in a cool, dry place. However, the frosting may soften over time.
Q: Can I use different types of candy?
A: Absolutely! Feel free to get creative and use any candies you like. Just make sure they are relatively small and easy to attach to the train cars.
Q: Can I make this train ahead of time?
A: Yes, you can make the train a day or two in advance. Just store it in a cool, dry place until you are ready to serve it.
Q: What if my frosting is too runny?
A: If your frosting is too runny, try chilling it in the refrigerator for a few minutes to thicken it up.
Q: Can I use melted chocolate instead of frosting?
A: Yes, melted chocolate can be used as an alternative to frosting. This will give the train a richer chocolate flavor and a firmer hold.
Final Thoughts
Creating this Candy Christmas Train is more than just a recipe; it’s an opportunity to create lasting memories and share the joy of the holidays with loved ones. So, gather your ingredients, embrace your inner artist, and embark on this sweet adventure. I encourage you to try this recipe and make it your own with personal touches and creative embellishments. Don’t forget to share your creations and any feedback – I’d love to see your unique Candy Christmas Trains! Why not serve your train alongside a warm mug of hot chocolate for the ultimate cozy winter treat? Happy crafting, and happy holidays!