
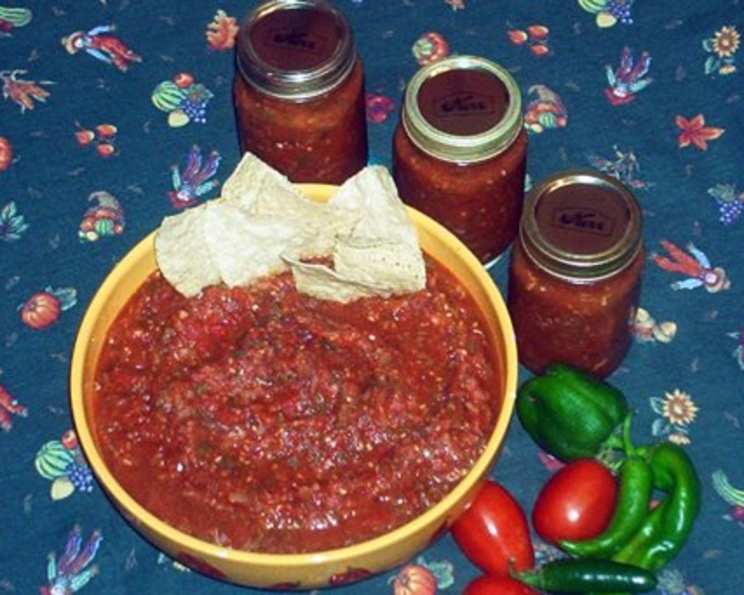
Garden-Fresh Salsa for Canning: A Taste of Summer All Year Round
The first time I ever tasted truly exceptional salsa, it wasn’t in a restaurant or even a kitchen. It was at a roadside farm stand in New Mexico, the air thick with the scent of roasting chiles. The woman behind the counter handed me a small paper cup filled with a vibrant red concoction, still warm from the jars. The taste—smoky, spicy, and bursting with the sun-ripened sweetness of tomatoes—was an absolute revelation. That day, I vowed to recreate that flavor, to capture the essence of summer in a jar. This recipe is my attempt to do just that.
Recipe Overview
- Prep Time: 3 hours (includes tomato draining time)
- Cook Time: 40 minutes
- Total Time: 5 hours
- Yields: Approximately 12 (500ml) jars
- Dietary Type: Vegan, Gluten-Free
Ingredients
- 8 quarts plum tomatoes
- Pickling salt
- 6 large onions
- 2-3 heads garlic
- 1 lb jalapeno peppers
- 6 large mild bell peppers
- 2 1/2 cups minced cilantro
- 1/4 cup ground cumin
- 1 (5 1/2 ounce) can tomato paste
- 3 tablespoons lime juice (Per 500 ml jar)
Equipment Needed
- Large pot
- Large bowl or sink
- Strainer
- Large canning pot with rack
- Canning jars (500ml)
- Jar lifter
- Lid lifter
- Funnel (optional, but helpful)
Instructions
-
Prepare the Tomatoes: Begin by bringing a large pot of water to a vigorous boil. This is your blanching station.
-
Blanch the Tomatoes: Gently lower the plum tomatoes into the boiling water, working in batches to avoid overcrowding the pot. Let them sit in the boiling water for precisely one minute. This loosens the skins, making them easier to peel.
-
Cool the Tomatoes: Immediately transfer the blanched tomatoes to a large bowl or sink filled with ice-cold water. This stops the cooking process and further aids in peeling.
-
Peel the Tomatoes: Once cooled, fish the tomatoes out of the cold water and peel off the skins. They should slip off quite easily.
-
Chop and Salt: Coarsely chop the peeled tomatoes and place them in a large bowl or pot. As you chop, sprinkle layers of the plum tomatoes with pickling salt. Aim to use approximately 4 tablespoons of pickling salt in total, distributing it evenly throughout.
-
Strain the Tomatoes: Transfer the salted, chopped tomatoes to a strainer set over a large bowl. This is crucial for removing excess water and preventing a watery salsa. Place the strainer in a cool place – not the refrigerator – and let the tomatoes drain for at least three hours, or even longer for best results. This step concentrates the tomato flavor, mimicking the effect of slow cooking without the extended time.
-
Sterilize the Jars: When you’re ready to proceed with canning, thoroughly clean and sterilize your canning jars. Place them in a large canning pot filled with enough water to cover them by at least one inch. Bring the water to a rolling boil and boil the jars for 10 minutes. Adding a splash of vinegar to the water can prevent mineral buildup on the jars if your water is hard.
-
Prepare the Vegetables: While the jars are sterilizing, prepare the remaining vegetables. Peel and chop the onions. Deseed the bell peppers and jalapeno peppers (wear gloves if you’re sensitive to spice!), and chop them. Peel and mince the garlic.
-
Combine Ingredients: In a separate bowl, whisk the tomato paste with about a cupful of the drained tomatoes until the mixture is smooth and lump-free. This ensures the tomato paste incorporates evenly into the salsa.
-
Combine all ingredients: Mix the tomato paste mixture with all the ingredients, except the lime juice, in a large kettle or pot.
-
Cook the Salsa: Bring the salsa mixture to a boil over medium-high heat, stirring frequently to prevent scorching. Once boiling, reduce the heat slightly to maintain a steady simmer.
-
Prepare Jars: Carefully remove the sterilized jars from the boiling water bath using a jar lifter and empty them one at a time, in the sink.
-
Add Lime Juice: Add 3 tablespoons of lime juice to each sterilized 500ml jar.
-
Pack the Jars: Pack the hot salsa into the prepared jars, leaving about 1/2 inch of headspace at the top of each jar. Use a clean spatula or utensil to release any trapped air bubbles.
-
Wipe Rims and Seal: Wipe the rims of the jars clean with a damp cloth to ensure a proper seal. Place the sterilized lids on the jars, followed by the screw bands. Tighten the bands fingertip tight – not too tight, as this can prevent proper sealing.
-
Process in a Water Bath: Return the filled jars to the boiling water bath, ensuring they are covered by at least one inch of water. Process the jars for 20 minutes. You may need to process in batches depending on the size of your canner.
-
Cool and Check Seals: Carefully remove the processed jars from the water bath using the jar lifter and place them on a towel-lined surface to cool. Allow the jars to cool completely, undisturbed, for at least 12-24 hours. As they cool, you should hear a “pop” sound as the lids seal.
-
Verify Seals: After the jars have cooled completely, check the seals by pressing down on the center of each lid. If the lid doesn’t flex or pop back up, the jar is properly sealed. If a jar didn’t seal, you can either reprocess it with a new lid or store it in the refrigerator and use it within a week.
Expert Tips & Tricks
- Salting is key: Don’t skimp on the pickling salt. It not only helps draw out excess moisture but also contributes to the overall flavor of the salsa.
- Jalapeno Heat: The heat level of jalapenos can vary significantly. Taste a small piece of your jalapeno before chopping and adjust the quantity accordingly. If you prefer a milder salsa, remove the seeds and membranes from the jalapenos.
- Cilantro Freshness: Add the minced cilantro right before cooking to preserve its vibrant flavor and color.
- Batching is Okay: Canning in batches is perfectly acceptable. While one batch is processing, you can sterilize and fill the next set of jars.
- Headspace Matters: Maintaining the correct headspace (1/2 inch) is crucial for proper sealing. Too much headspace can lead to spoilage, while too little can cause the jars to burst during processing.
Serving & Storage Suggestions
This canned salsa is incredibly versatile. Serve it with tortilla chips for a classic appetizer, use it as a topping for tacos, burritos, or grilled meats, or stir it into scrambled eggs for a flavorful breakfast.
Properly sealed jars of salsa can be stored in a cool, dark place (like a pantry) for up to one year. Once opened, refrigerate the salsa and use it within a week.
Nutritional Information
Please note that these are estimated values and may vary based on specific ingredient brands and quantities.
| Nutrient | Amount per Serving (estimated) | % Daily Value (estimated) |
|---|---|---|
| Calories | 50 kcal | 3% |
| Total Fat | 0.5g | 1% |
| Saturated Fat | 0g | 0% |
| Cholesterol | 0mg | 0% |
| Sodium | 150mg | 7% |
| Total Carbohydrate | 12g | 4% |
| Dietary Fiber | 3g | 12% |
| Sugars | 6g | – |
| Protein | 2g | 4% |
Variations & Substitutions
- Spice it Up: For a hotter salsa, add serrano peppers or habaneros in addition to or instead of the jalapenos. Remember to handle them with care and adjust the quantity to your liking.
- Smoked Salsa: Roast the tomatoes, onions, and peppers over an open flame or under the broiler before chopping for a smoky flavor.
- Fruit Salsa: Add diced mango, pineapple, or peaches for a sweet and tangy twist.
- Black Bean and Corn Salsa: Stir in cooked black beans and corn kernels for a heartier salsa.
- Vinegar version: For those who prefer the flavor of vinegar (as the original intro data suggests is often used in canning recipes): while this recipe was designed to avoid it, you can add a small amount (start with 1 tablespoon per jar and taste) along with the lime juice, but be mindful of balancing flavors.
FAQs (Frequently Asked Questions)
Q: Why do I need to blanch the tomatoes?
A: Blanching helps to loosen the skins of the tomatoes, making them easier to peel. This improves the texture of the final salsa.
Q: Can I use different types of tomatoes?
A: Plum tomatoes are preferred because they have less water content and more flesh, resulting in a thicker salsa. However, you can use other varieties, but be sure to drain them thoroughly.
Q: Do I have to use pickling salt?
A: Pickling salt is ideal because it doesn’t contain iodine or anti-caking agents, which can cloud the brine and affect the flavor. However, you can use kosher salt as a substitute.
Q: How do I know if my jars are properly sealed?
A: After cooling, the lids should be concave and not flex when pressed. You should also hear a “pop” sound as the jars cool, indicating a successful seal.
Q: What if a jar doesn’t seal?
A: If a jar doesn’t seal, you can either reprocess it with a new lid and following the sterilization and canning steps again, or store it in the refrigerator and use it within a week.
Final Thoughts
Canning your own salsa is a truly rewarding experience, allowing you to capture the vibrant flavors of summer and enjoy them throughout the year. Don’t be intimidated by the process – with a little patience and attention to detail, you can create a delicious and wholesome product that you can be proud to share with friends and family. So grab your freshest ingredients, gather your equipment, and get ready to savor the taste of homemade salsa all year round!