
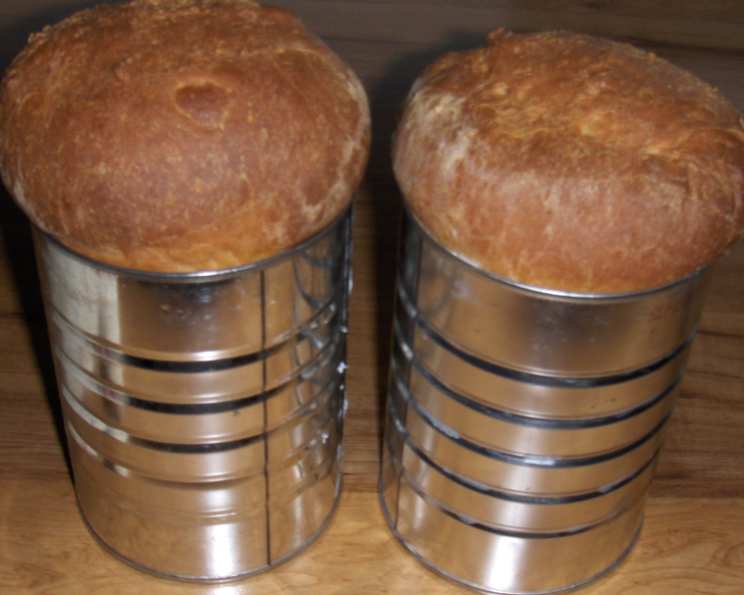
Canned White Yeast Bread: An Unexpected Ode to Simplicity
The scent of baking bread has always been a time machine for me. One whiff, and I’m instantly transported back to my grandmother’s kitchen, a warm, bustling space filled with the comforting aroma of yeast, flour, and a touch of magic. While her repertoire included intricate braided loaves and crusty sourdoughs, it was her surprisingly simple canned white yeast bread that truly captured my heart. The way the perfectly cylindrical loaves emerged from their humble coffee can vessels, their tops golden brown and slightly domed, always felt like a small miracle, a testament to the power of simple ingredients transformed by time and heat.
Recipe Overview
- Prep Time: 20 minutes
- Cook Time: 45-50 minutes (50-75 minutes for 2-pound cans)
- Total Time: 2 hours 35 minutes to 6 hours 35 minutes (including rising time)
- Servings: Variable, depending on slice thickness
- Yield: 2 loaves
- Dietary Type: Vegetarian
Ingredients
- 1 (.25 ounce) package active dry yeast
- 1/2 cup warm water (not hot, around 105-115°F)
- 1/2 teaspoon cardamom
- 3 tablespoons sugar, divided
- 1 (13 ounce) can evaporated milk
- 2 tablespoons vegetable oil (canola, sunflower, or other neutral oil)
- 1 teaspoon salt
- 4 – 4 1/2 cups all-purpose flour
Equipment Needed
- Large Mixing Bowl
- Electric Mixer (optional, but recommended)
- Two 1-pound coffee cans (or two standard loaf pans)
- Grease or cooking spray
- Greased Plastic Lids (or plastic wrap)
- Wire Rack
Instructions
-
Activate the Yeast: In a large bowl, dissolve active dry yeast in warm water. Be sure the water isn’t too hot, as this can kill the yeast. Stir in cardamom and 1 tablespoon of sugar. Let stand for 5 minutes, allowing the yeast to proof. You should see some bubbling or foaming, which indicates that the yeast is alive and active. If not, discard and start again with fresh yeast.
-
Combine Wet Ingredients: After the yeast has proofed, stir in the remaining 2 tablespoons of sugar, the can of evaporated milk, vegetable oil, and salt. Mix well to ensure the sugar and salt are fully dissolved.
-
Incorporate Flour (First Stage): Add 2 cups of the flour to the wet ingredients. Using an electric mixer on medium speed, beat until smooth. This step helps to develop the gluten and create a cohesive batter.
-
Incorporate Flour (Second Stage): Gradually add the remaining flour, stirring by hand (or with a dough hook on a heavy-duty mixer), until the batter becomes very heavy, but still too sticky to knead. The amount of flour needed may vary depending on humidity and other factors, so add it gradually until you reach the desired consistency. If you have a heavy-duty stand mixer, you can perform this entire step using the machine with a dough hook attachment.
-
Prepare the Cans: Thoroughly grease two 1-pound coffee cans (or standard loaf pans) with cooking spray or vegetable shortening. Make sure every part of the inside of the can is greased, so the bread releases cleanly.
-
Divide the Batter: Divide the batter evenly between the two prepared cans.
-
First Rise: Cover each can with a greased plastic lid or plastic wrap. This prevents the top from drying out during rising. Place the cans in a warm place (ideally around 75-85°F) and let them rise until the lids pop off the tops, which will take approximately 1 ½ hours. If you’ve frozen the dough at this stage, allow the cans to stand for 4 to 6 hours in a warm place. The time required for rising can vary depending on the temperature and humidity of your environment. A slightly warm oven (turned off) or a proofing drawer are excellent options.
-
Preheat the Oven: As the dough nears the end of its rising time, preheat your oven to 350°F (175°C).
-
Bake the Bread: Remove the lids from the cans and bake in the preheated oven for 45-50 minutes. If you are using 2-pound cans, bake for 1 hour to 1 hour and 15 minutes (75 minutes).
-
Check for Doneness: The bread is done when it is golden brown and a wooden skewer inserted into the center comes out clean. You can also check the internal temperature with a thermometer; it should reach 190-200°F (88-93°C).
-
Cool and Release: Once the bread is baked, cool in the cans for 10 minutes. Then, carefully loosen the crust around the edges with a knife to help release the bread from the cans. Gently slide the loaves from the cans and place them on a wire rack to cool completely.
Expert Tips & Tricks
- Yeast Proofing is Key: Always proof your yeast before beginning. If it doesn’t bubble after 5-10 minutes, it’s likely dead and you’ll need to start again with fresh yeast. Expired yeast is a common culprit for bread that doesn’t rise.
- Warmth is Your Friend: A warm environment is crucial for successful rising. If your kitchen is cold, try placing the dough in a slightly warmed oven (turned off) with the door ajar or in a microwave with a cup of hot water.
- Don’t Overmix: Overmixing can lead to tough bread. Be gentle when stirring in the final flour and avoid overworking the dough.
- Grease Generously: Ensure the coffee cans or loaf pans are thoroughly greased to prevent the bread from sticking.
- Even Baking: If your oven tends to bake unevenly, rotate the cans halfway through baking to ensure even browning.
- Freezing Dough: For make-ahead convenience, the dough can be frozen after being placed in the cans. Allow ample time for thawing and rising before baking.
Serving & Storage Suggestions
Serve this bread warm or at room temperature. It’s fantastic sliced for sandwiches, toast, or simply enjoyed with butter and jam. Its subtle cardamom flavor pairs well with both sweet and savory toppings.
- Room Temperature: Store cooled bread in an airtight container or plastic bag at room temperature for up to 2-3 days.
- Refrigerator: For longer storage, refrigerate in an airtight container for up to a week.
- Freezer: To freeze, wrap cooled loaves tightly in plastic wrap and then in foil. Freeze for up to 2-3 months. Thaw completely at room temperature before serving or reheating.
To reheat, wrap slices in foil and warm in a low oven (300°F) for 10-15 minutes, or toast individual slices.
Nutritional Information
Note: Nutritional information is an estimate and may vary based on specific ingredients and portion sizes.
| Nutrient | Amount per Serving | % Daily Value |
|---|---|---|
| Calories | 200 kcal | 10% |
| Total Fat | 5g | 7% |
| Saturated Fat | 2g | 10% |
| Cholesterol | 5mg | 2% |
| Sodium | 250mg | 11% |
| Total Carbohydrate | 35g | 13% |
| Dietary Fiber | 1g | 4% |
| Sugars | 3g | – |
| Protein | 5g | 10% |
Variations & Substitutions
- Whole Wheat: Substitute up to half of the all-purpose flour with whole wheat flour for a nuttier flavor and added fiber.
- Different Spices: Experiment with other spices like cinnamon, nutmeg, or a pinch of ground cloves.
- Sweet Bread: Add raisins, currants, or chopped nuts for a sweeter, more textured bread. Increase the sugar by a tablespoon or two to enhance the sweetness.
- Savory Bread: Add herbs like rosemary, thyme, or oregano for a savory twist. Consider adding grated cheese for extra flavor.
- Dairy-Free: Use a non-dairy milk alternative such as almond milk, soy milk, or oat milk in place of the evaporated milk. Be sure to choose an unsweetened variety.
- Gluten-Free: While this recipe is designed for wheat flour, you could attempt a gluten-free version using a gluten-free all-purpose flour blend. The results may vary, and you might need to adjust the liquid content.
FAQs (Frequently Asked Questions)
Q: Can I use bread flour instead of all-purpose flour?
A: While you can, all-purpose flour will provide a softer crumb. Bread flour may result in a slightly chewier texture.
Q: Why did my bread not rise properly?
A: The most common reasons are old or inactive yeast, water that was too hot (killing the yeast), or a too-cold environment for rising.
Q: Can I make this dough in a bread machine?
A: Yes, you can use a bread machine to mix and knead the dough. Follow your bread machine’s instructions for a basic white bread recipe, but incorporate the cardamom and use the specified ingredients. Once the cycle is complete, shape the dough and bake in cans as directed.
Q: My bread is browning too quickly. What should I do?
A: Tent the tops of the cans loosely with foil to prevent over-browning, especially during the last 15-20 minutes of baking.
Q: Can I halve this recipe?
A: Yes, you can halve all the ingredients and bake in one smaller can or loaf pan. Reduce the baking time accordingly, checking for doneness frequently.
Final Thoughts
This simple canned white yeast bread is a comforting reminder that the best things in life are often the simplest. From the humble ingredients to the satisfying aroma that fills your kitchen as it bakes, this bread is an invitation to slow down, savor the moment, and appreciate the magic of homemade goodness. Whether you’re a seasoned baker or a kitchen novice, I encourage you to give this recipe a try. Share your creation with loved ones, and don’t forget to leave a comment with your own variations and experiences. Perhaps, like me, you’ll discover a new family favorite! Pair this bread with a hearty soup, a simple salad, or just a smear of your favorite butter and let the warmth of homemade bread fill your soul.