
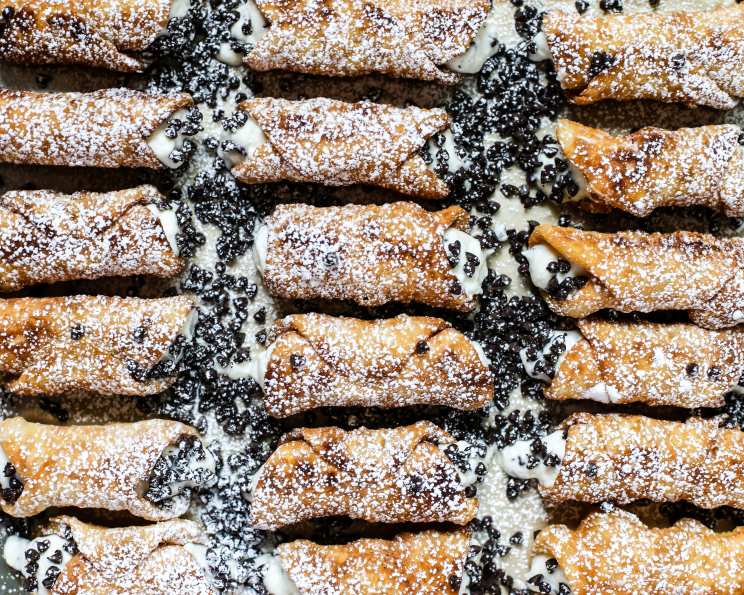
The Art of Cannoli: A Culinary Journey to Sicily
The first time I tasted a truly authentic cannoli, I was wandering through a bustling marketplace in Palermo. The air hung thick with the scent of citrus blossoms and roasting coffee, but one aroma cut through it all: a sweet, fried fragrance emanating from a small pasticceria. I watched, mesmerized, as a baker with flour-dusted hands expertly piped creamy ricotta into crisp, golden shells. That first bite – the shattering crunch of the shell, the velvety smoothness of the filling, the burst of candied orange – transported me instantly. It was more than just a dessert; it was a taste of Sicilian sunshine, a moment of pure culinary bliss. Now, I try to recreate that experience every time I make these at home.
Recipe Overview
- Prep Time: 1 hour
- Cook Time: 1 hour 15 minutes (includes chilling time)
- Total Time: 2 hour 15 minutes
- Servings: 24
- Yield: 24 cannoli
- Dietary Type: Not Gluten-Free
Ingredients
For the Shells:
- 4 cups sifted all-purpose flour
- 2 tablespoons sugar
- ¼ teaspoon salt
- 3 tablespoons butter, softened
- 2 egg yolks
- ¾ cup white wine
- Shortening, for frying (vegetable oil can be substituted, but shortening yields a crispier shell)
For the Filling:
- 4 cups whole milk ricotta cheese (ensure it’s very fresh and high-quality)
- 1 ½ cups powdered sugar
- 1 tablespoon vanilla extract
- ⅓ cup finely chopped maraschino cherries
- ¼ cup semisweet mini chocolate chips
- 1 cup heavy whipping cream, optional (for a lighter filling)
Equipment Needed
- Large mixing bowl
- Fork
- Rolling pin
- Well-floured surface
- Margarita glass (or 3-4 inch cookie cutter)
- Paring knife
- Metal cannoli tubes (or wooden dowels)
- Deep fryer or large pot
- Slotted spoon or spider
- Paper towels
- Cheesecloth
- Piping bag or Ziploc bag
Instructions
- Prepare the Dough: In a large mixing bowl, combine the sifted all-purpose flour, sugar, and salt.
- Incorporate the Butter: Cut in the softened butter using a pastry blender or your fingertips until the mixture resembles coarse crumbs.
- Add Egg Yolks: Add the egg yolks and stir with a fork.
- Incorporate the Wine: Gradually add the white wine, one tablespoon at a time, stirring with a fork until the dough starts to cling together. You may not need all of the wine, so add it carefully.
- Form and Rest the Dough: Form the dough into a ball, wrap it in plastic wrap, and let it rest at room temperature for 30 minutes. This allows the gluten to relax, making the dough easier to roll.
- Roll the Dough: On a well-floured surface, roll the dough almost paper-thin. This is crucial for achieving a crispy shell.
- Cut Out Circles: Using the rim of a margarita glass (about 3-4 inches across) or a round cookie cutter, make circle imprints into the rolled dough.
- Cut the Circles: Using a paring knife, ensure the circles are completely cut through.
- Shape the Shells: Roll each circle of dough around a metal cannoli tube, overlapping the ends and pressing to seal. Flaring out the edges slightly will help prevent the filling from leaking.
- Heat the Shortening: Heat the shortening in a deep fryer or large pot to approximately 360°F (182°C). Use a thermometer to ensure the temperature is accurate.
- Fry the Shells: Fry one or two cannoli at a time in the hot shortening for approximately 1 minute, turning to brown all sides evenly. Avoid overcrowding the fryer, as this will lower the temperature and result in greasy shells.
- Drain and Cool: Remove the fried shells from the hot grease using a slotted spoon or spider and drain on paper towels, seam side down.
- Remove the Tubes: Let the shells cool for a minute or two before attempting to remove the metal tubes. To remove the tube, hold the cannoli shell down on the paper towel and carefully slide the tube out from one end.
- Cool Completely: Leave the cannoli shells on paper towels, seam side down, to cool completely.
Note: Shells can be stored in airtight containers and made several days prior to filling. - Prepare the Filling: If the ricotta cheese is watery, drain it over cheesecloth for at least 30 minutes to remove excess moisture. This is essential for a firm filling.
- Combine Filling Ingredients: In a clean bowl, combine the drained ricotta cheese, powdered sugar, and vanilla extract. Mix until smooth and well combined.
- Prepare the Cherries: Squeeze the maraschino cherries with paper towels to remove all liquid. This prevents the filling from becoming watery and discolored.
- Incorporate Cherries and Chocolate: Stir in the squeezed maraschino cherries and semisweet mini chocolate chips into the ricotta mixture, being careful not to overmix.
- Optional: Lighten the Filling: For a lighter filling, you may whip 1 cup of heavy whipping cream to form stiff peaks and gently fold it into the ricotta mixture at this step.
- Chill the Filling: Chill the filling for about 30 minutes before piping it into the cooled cannoli shells. This will help the filling firm up and prevent the shells from becoming soggy.
- Fill the Cannoli: Using a piping bag or a Ziploc bag with a corner cut off, pipe the filling into the cooled cannoli shells. Fill from both ends to ensure the shell is completely filled.
- Garnish and Serve: You may garnish the cannoli by sprinkling powdered sugar on top. Whipped cream, a cherry, and shaved chocolate can also be used to garnish the top.
- Refrigerate: Keep refrigerated until time of serving.
Expert Tips & Tricks
- Crispy Shells are Key: The secret to a perfect cannoli is a crisp, non-greasy shell. Rolling the dough very thin and frying at the correct temperature are crucial.
- Don’t Overwork the Dough: Overworking the dough will develop the gluten too much, resulting in tough shells.
- Drain the Ricotta: As mentioned before, draining the ricotta is essential. You can even press it through a fine-mesh sieve for an even smoother texture.
- Fill Just Before Serving: For the crispiest results, fill the cannoli just before serving. The moisture in the filling will eventually soften the shells.
- Flavor Variations: Experiment with different extracts in the filling, such as almond or orange. You can also add a pinch of cinnamon or nutmeg for a warm spice.
- Try dipping the ends in melted chocolate before filling, or chopped pistachios.
Serving & Storage Suggestions
Serve cannoli chilled for the best flavor and texture. They are a perfect ending to an Italian meal or a delightful treat with a cup of coffee or espresso.
Cannoli are best enjoyed within a few hours of being filled. Unfilled shells can be stored in an airtight container at room temperature for up to a week. Filled cannoli should be stored in the refrigerator and consumed within 24 hours to prevent the shells from becoming soggy.
Nutritional Information
| Nutrient | Amount per Serving | % Daily Value |
|---|---|---|
| Calories | 247.7 kcal | N/A |
| Calories from Fat | 103 g | 42% |
| Total Fat | 11.5 g | 17% |
| Saturated Fat | 7.1 g | 35% |
| Cholesterol | 52.1 mg | 17% |
| Sodium | 76.9 mg | 3% |
| Total Carbohydrate | 27.4 g | 9% |
| Dietary Fiber | 0.7 g | 2% |
| Sugars | 9.7 g | 38% |
| Protein | 7.3 g | 14% |
Note: Nutritional information is an estimate and may vary based on specific ingredients and portion sizes.
Variations & Substitutions
- Gluten-Free Cannoli: Use a gluten-free flour blend to make the shells. Be sure to add a binder like xanthan gum to help with the texture.
- Dairy-Free Cannoli: Substitute the ricotta cheese with a dairy-free ricotta alternative made from nuts or soy. Use a dairy-free whipping cream alternative.
- Chocolate Cannoli: Add cocoa powder to the dough for chocolate-flavored shells.
- Citrus Cannoli: Add orange or lemon zest to the ricotta filling for a bright, citrusy flavor.
- Pistachio Cannoli: Sprinkle chopped pistachios on the ends of the filled cannoli for a nutty crunch and beautiful presentation.
FAQs (Frequently Asked Questions)
Q: Why are my cannoli shells not crispy?
A: This is usually due to the dough not being rolled thin enough or the shortening not being hot enough. Ensure the dough is paper-thin and the shortening is at 360°F (182°C).
Q: Can I use vegetable oil instead of shortening for frying?
A: Yes, you can, but shortening will result in a crispier shell. Vegetable oil will work in a pinch.
Q: How do I prevent the filling from making the shells soggy?
A: Drain the ricotta cheese thoroughly, chill the filling, and fill the cannoli just before serving.
Q: Can I freeze cannoli?
A: It’s best to freeze the unfilled shells. Filled cannoli don’t freeze well as the filling can become watery and the shells will lose their crispness.
Q: What can I use if I don’t have cannoli tubes?
A: You can use wooden dowels, metal rods, or even tightly rolled parchment paper. Just make sure they are heat-safe.
Final Thoughts
Making cannoli from scratch may seem daunting, but the effort is well worth it. The combination of the crisp, golden shells and the creamy, sweet filling is simply irresistible. Don’t be afraid to experiment with different flavors and garnishes to create your own signature cannoli. Whether you’re making them for a special occasion or simply to satisfy a sweet craving, these Sicilian treats are sure to delight. I encourage you to try this recipe and experience the magic of homemade cannoli! Feel free to share your creations and any feedback – happy baking!