
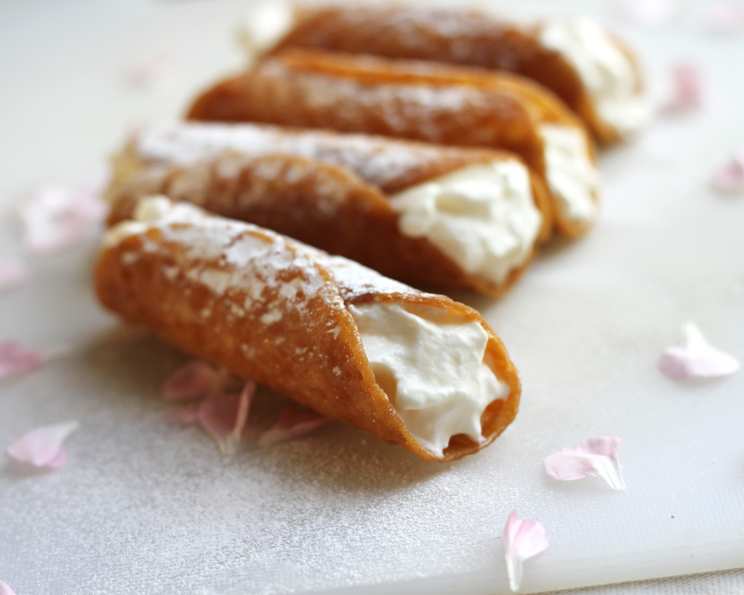
The Art of Cannoli: Crafting Perfect Shells and Creamy Ricotta Filling
My grandmother’s kitchen always smelled of magic, especially during the holidays. But there was one dessert that truly captivated me: cannoli. I remember being perched on a stool, watching her deftly roll out the dough, the aroma of frying oil filling the air. The anticipation was almost unbearable as I waited for the golden shells to be filled with that ethereal, sweet ricotta cream, studded with chocolate. Each bite was an explosion of textures and flavors, a sweet memory etched in my heart. To this day, the taste of a perfect cannoli transports me back to that cozy kitchen, surrounded by the love and laughter of family.
Recipe Overview
- Prep Time: 3 hours (includes draining ricotta)
- Cook Time: 2 minutes per shell
- Total Time: 3 days (includes ricotta draining and cream chilling)
- Servings: 44-50
- Yield: 44-50 cannoli
- Dietary Type: Not suitable for dairy-free, gluten-free, or vegan diets
Ingredients
For the Ricotta Cream:
- 64 ounces whole milk ricotta cheese, drained
- 16 ounces powdered sugar, sifted
- 1 cup granulated sugar
- 1 teaspoon vanilla extract
- 2-3 drops cinnamon oil
- 8 ounces bar milk chocolate candy bars with almonds (at room temperature)
For the Cannoli Shells:
- 2 eggs, at room temperature
- 1/2 teaspoon vanilla extract
- 11 tablespoons ice water
- 3 cups flour
- 1/4 cup granulated sugar
- 1/4 teaspoon salt
- 1 teaspoon unsweetened cocoa powder
- 1 teaspoon ground cinnamon
- 3 tablespoons Crisco shortening
- 1 egg white, beaten
- 3-4 quarts peanut oil
Equipment Needed
- Colander
- Large bowl
- Plastic wrap
- Small bowl
- Large bowl
- Pasta machine or rolling pin
- 4 1/2-inch circle cutter (or knife)
- Cannoli tubes (approximately 6 inches long and 1 inch in diameter)
- Large heavy kettle
- Deep frying thermometer
- Metal bowl
- Tongs
- Oven mitts or towels
- Oilcloth or newspaper
- Large rack
- Wire whip
- Mixing bowl
- Knife
Instructions
-
Draining the Ricotta: This is a crucial step, so plan ahead! At least three days before you intend to make the cannoli shells, place the ricotta cheese in a colander set inside a large bowl. Scrape all the ricotta into the colander, cover it tightly with plastic wrap, and refrigerate for two full days. The ricotta needs to be very dry for the filling to have the right consistency.
-
Preparing the Dough (Cannoli Shells): In a small bowl, beat the eggs until combined. Add the vanilla extract and ice water to the eggs and whisk until just combined.
-
In a large bowl, use your hands to combine the flour, sugar, salt, cocoa powder, and cinnamon. This ensures even distribution of the dry ingredients.
-
Add the Crisco shortening to the dry mixture and use your fingers to mix until the mixture resembles coarse crumbs.
-
Make a well in the center of the dry ingredients, then pour in the wet egg mixture.
-
Using your hands, mix the dough together. If the dough seems too dry, gradually add more ice water, a tablespoon at a time, until it comes together.
-
Turn the dough out onto a lightly floured surface and knead until smooth and well blended, about 3 minutes.
-
Shape the dough into a flattened ball, wrap it tightly in plastic wrap, and let it rest at room temperature for at least 30 to 60 minutes. This allows the gluten to relax, resulting in a more tender crust.
-
Rolling the Dough: After the dough has rested, cut it into 4 equal pieces. Starting at the middle setting, run one of the pieces of dough through the rollers of a pasta machine. Alternatively, you can roll the dough on a board with a rolling pin. Lightly dust the dough with flour as needed to prevent sticking.
-
Continue to pass the dough through the pasta machine, decreasing the setting each time until you reach the last or second to last setting. You may need to run the dough through the machine multiple times to achieve the desired thinness.
-
The dough needs to be very thin – about the same thickness as construction paper. Use a 4 1/2-inch circle cutter (or a sharp knife) to cut the dough into circles. If you don’t have a cutter, you can use a small bowl as a template.
-
Continue rolling out and cutting the remaining dough. If you don’t have enough cannoli tubes for all of the dough, lay the cut pieces on sheets of plastic wrap and keep them covered to prevent them from drying out.
-
Preparing to Fry: Place a rack in the bottom of a large, heavy kettle. This will prevent the cannoli shells from touching the bottom of the kettle and burning.
-
Pour about 2 inches of peanut oil into a smaller kettle. Heat the oil until a deep frying thermometer registers 375 degrees Fahrenheit. Maintaining the correct oil temperature is critical for achieving crispy, evenly browned shells.
-
Oiling the Cannoli Tubes: Briefly submerge the cannoli tubes in the hot oil, then drain them in a metal bowl. The thin coating of oil will help the fried dough slide off easily later.
-
Forming the Shells: Lay a dough circle flat and center a cannoli tube on it. Bring the left edge of the dough onto the tube, dab it with egg white, and then bring up the right side of the dough circle and dab it with egg white. Roll the tube so the dough adheres. Do not press the dough too tightly against the tube, or you will have difficulty removing the cannoli later. Be careful not to stretch or pull the dough, and avoid getting egg white on the tube itself, as this can also cause sticking.
-
Repeat the process with the remaining dough and tubes.
-
Frying the Shells: Carefully lower a few of the cannoli tubes into the hot oil. Be careful not to overcrowd the pan, which will lower the oil temperature and result in soggy shells.
-
Fry the shells until they are golden brown, about 2 minutes, turning them as needed to ensure even browning.
-
Using tongs, remove the cannoli tubes from the oil, holding them straight up to allow the excess oil to drain back into the pan. Briefly drain the cannoli (still on the tubes) in a metal bowl.
-
Removing the Shells: While the cannoli shells are still hot, carefully slide them off the tubes. Grasp each tube with a clean towel and gently twist the cannoli shell off the tube with your other hand protected by an oven mitt or towel. This step requires a bit of patience and care to avoid breaking the delicate shells.
-
Cooling and Storing: On a work surface covered with oilcloth or newspaper and topped with a large rack, place the barely warm cannoli shells. It is crucial that the shells remain on the racks overnight to allow them to fully cool and crisp up.
-
Repeat the frying and cooling process with the remaining dough. If you are reusing the cannoli tubes, let them cool slightly before wrapping them with more dough.
-
The cannoli shells can be made up to 2 months in advance of serving. Make sure they are properly drained overnight and then store them in sealed containers in a cool, dry place (not in the refrigerator).
-
Preparing the Ricotta Cream: Put the thoroughly dried ricotta in a large mixing bowl with a wire whip and blend until creamy and smooth.
-
Add the sifted confectioners’ sugar, granulated sugar, vanilla extract, and cinnamon oil to the ricotta. Blend until the mixture is smooth and well combined.
-
Transfer the ricotta cream to a bowl and gently stir in the chocolate pieces.
-
Store the ricotta cream in the refrigerator for 48 hours. After 48 hours, you can use some immediately, and freeze the rest for future use. Frozen ricotta cream can be defrosted in the refrigerator later.
-
Assembling the Cannoli: When ready to serve, use a knife or piping bag to carefully fill each cannoli shell with the ricotta cream.
-
Place the filled cannoli on a serving platter and sprinkle generously with confectioners’ sugar.
-
Serve the cannoli immediately, as the shells will soften over time. For the best texture, consume within an hour of filling.
Expert Tips & Tricks
- Draining the ricotta is key: Don’t skimp on the draining time. The drier the ricotta, the firmer and more flavorful the filling will be.
- Control the oil temperature: Use a deep-frying thermometer to ensure the oil stays at 375°F (190°C). Too hot, and the shells will burn; too cold, and they will be greasy.
- Don’t overcrowd the fryer: Frying too many shells at once will lower the oil temperature. Work in batches to maintain optimal crispness.
- Add a touch of citrus zest: A little lemon or orange zest in the ricotta filling adds brightness and complexity.
- Make your own candied citrus: Diced candied orange or lemon peel mixed into the ricotta is a classic touch.
- Dust the shells with cocoa powder: For a chocolatey twist, dust the cooled shells with cocoa powder before filling.
- Pipe the filling just before serving: This prevents the shells from becoming soggy.
Serving & Storage Suggestions
Serve cannoli as a dessert after an Italian meal or as a sweet treat any time of day. They are best served immediately after filling, as the shells tend to soften over time.
Unfilled cannoli shells can be stored in an airtight container at room temperature for up to 2 months. Do not refrigerate them, as this will make them soggy.
Ricotta cream filling can be stored in the refrigerator for up to 3 days, or frozen for up to 2 months. Defrost frozen filling in the refrigerator overnight before using.
Nutritional Information
(Estimated, per cannoli)
| Nutrient | Amount per Serving | % Daily Value |
|---|---|---|
| Calories | 724.8 kcal | N/A |
| Calories from Fat | 604 g | 83% |
| Total Fat | 67.2 g | 103% |
| Saturated Fat | 14.6 g | 73% |
| Cholesterol | 30.5 mg | 10% |
| Sodium | 56.7 mg | 2% |
| Total Carbohydrate | 26.6 g | 8% |
| Dietary Fiber | 0.6 g | 2% |
| Sugars | 18.2 g | N/A |
| Protein | 6.4 g | 12% |
Variations & Substitutions
- Citrus Ricotta: Add 2 tablespoons of orange or lemon zest to the ricotta filling for a bright, citrusy flavor.
- Pistachio Cannoli: Finely chop pistachios and press them onto the ends of the filled cannoli for a beautiful and nutty garnish.
- Chocolate-Dipped Shells: Dip the ends of the cooled cannoli shells in melted dark chocolate for an extra touch of decadence.
- Espresso Ricotta: Add a teaspoon of instant espresso powder to the ricotta filling for a coffee-infused treat.
FAQs (Frequently Asked Questions)
Q: Why is draining the ricotta so important?
A: Draining removes excess moisture, which prevents the filling from being watery and ensures the cannoli shells stay crispy.
Q: Can I use a different type of oil for frying the shells?
A: Peanut oil is recommended because of its high smoke point and neutral flavor, but vegetable oil or canola oil can also be used. Avoid oils with strong flavors, like olive oil.
Q: How do I prevent the shells from sticking to the cannoli tubes?
A: Make sure to lightly oil the tubes before wrapping them with dough, and avoid getting egg white directly on the tube.
Q: Can I make the cannoli shells ahead of time?
A: Yes, the shells can be made up to 2 months in advance and stored in an airtight container at room temperature.
Q: Why are my cannoli shells soggy?
A: This is usually caused by not draining the ricotta properly or by filling the cannoli too far in advance. Assemble the cannoli just before serving.
Final Thoughts
Cannoli are more than just a dessert; they are a taste of tradition, a celebration of family, and a sweet reminder of cherished memories. While the process may seem a bit involved, the end result is well worth the effort. Don’t be afraid to experiment with different flavors and garnishes to create your own signature cannoli. And most importantly, share them with loved ones and enjoy the experience! Mangiare, mangiare!