
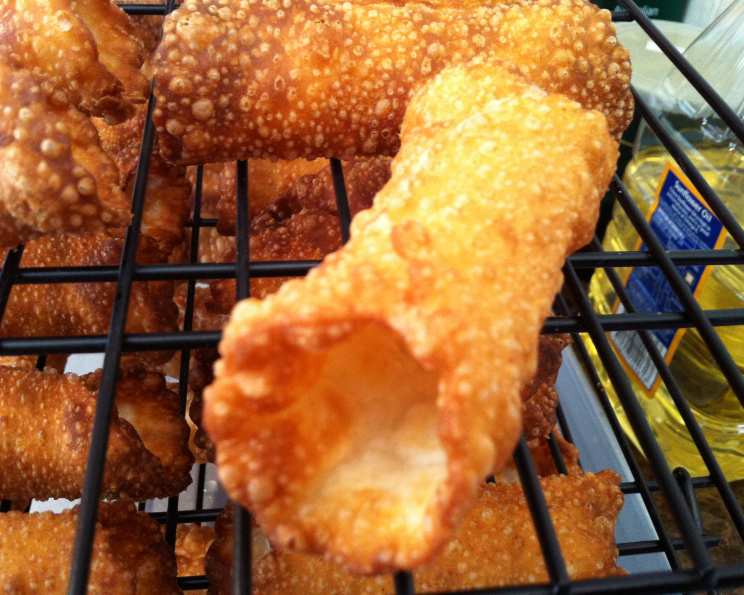
Mastering the Art of Cannoli Shells: A Culinary Journey
The aroma of fried dough, subtly sweet and undeniably inviting, instantly transports me back to my Nonna’s bustling kitchen. I can almost see her now, a whirlwind of flour and focused energy, expertly shaping and frying these very cannoli shells. The sizzle of the dough hitting the hot oil, the golden-brown perfection she always achieved – it wasn’t just a recipe; it was a labor of love, a tangible connection to our Sicilian heritage, and a tradition I’m honored to continue.
Recipe Overview
- Prep Time: 43 minutes
- Cook Time: 10 minutes
- Total Time: 1 hour 33 minutes
- Servings: 12
- Yield: 12 Cannoli Shells
- Dietary Type: Vegetarian
Ingredients
- 1 1/3 cups flour
- 1 tablespoon shortening
- 1 pinch salt
- 1/2 teaspoon sugar
- White wine (sweet or dry)
- Oil (for deep fat frying)
Equipment Needed
- Large bowl
- Rolling pin
- Sharp knife or pastry cutter
- Cannoli tubes (8 inches long by 1 inch in diameter, ideally made from sheet aluminum)
- Deep fryer or large pot
- Slotted spoon
- Cooling rack
Instructions
-
In a large bowl, thoroughly mix together the flour, shortening, salt, and sugar. This initial mixing ensures the dry ingredients are evenly distributed before the addition of any liquid.
-
Gradually add enough white wine (either sweet or dry will work, depending on your preference – a sweeter wine will impart a slightly sweeter flavor to the shells) to create a dough that is stiff but still workable. The key here is to add the wine slowly, mixing as you go, to avoid ending up with a dough that is too sticky. The dough should come together into a cohesive mass without being overly wet.
-
Form the dough into a ball. Gently knead it for a minute or two on a lightly floured surface until it’s smooth.
-
Place the dough in a bowl, cover it with plastic wrap or a clean kitchen towel, and let it rest for about 1 hour. This resting period allows the gluten in the flour to relax, resulting in a more tender and pliable dough that is easier to roll out. This step is crucial for achieving the characteristic crispy texture of cannoli shells.
-
After the dough has rested, lightly flour your work surface and roll it out to a thickness of about 1/8 inch. The thinner you roll the dough, the crispier your cannoli shells will be. Aim for an even thickness to ensure uniform cooking.
-
Using a sharp knife or a pastry cutter, cut the rolled-out dough into 5×5 inch squares. These squares will be wrapped around the cannoli tubes to form the shell shape.
-
Position a cannoli tube diagonally across a dough square, running from the top left corner to the bottom right corner.
-
Wrap one corner of the dough around the tube, and then wrap the opposite corner over the first, overlapping slightly. This overlap is important for creating a secure seal.
-
Press the overlapping edges together firmly to seal the seam. A well-sealed seam is crucial to prevent the cannoli shell from opening up during frying. You can use a little water or egg white to help seal the edges if needed.
-
Heat the oil in a deep fryer or a large pot to 350-375°F (175-190°C). It’s vital to use a thermometer to ensure the oil is at the correct temperature. Too low, and the shells will be greasy; too high, and they will burn before they cook through.
-
Carefully lower the wrapped cannoli shells into the hot oil, one at a time. Do not overcrowd the fryer, as this will lower the oil temperature and result in soggy shells.
-
Fry the shells until they are deep golden brown and crispy, turning them occasionally to ensure even browning. This usually takes about 2-3 minutes per shell.
-
Use a slotted spoon or tongs to carefully remove the fried cannoli shell from the hot oil. Place it on a wire rack to cool slightly.
-
While the shell is still warm (but cool enough to handle), gently slide it off the cannoli tube. Be careful, as the shells can be fragile at this stage. If the shell is sticking, you can gently tap the tube on the counter to loosen it.
-
Allow the cannoli shells to cool completely on the wire rack before filling. Cooling them completely ensures that they will retain their crispness.
Expert Tips & Tricks
- Dough Consistency is Key: If your dough is too dry, it will be difficult to roll out and seal. Add a little more white wine, a teaspoon at a time, until you reach the desired consistency. If your dough is too wet, it will be sticky and difficult to work with. Add a little more flour, a tablespoon at a time, until it reaches the desired consistency.
- Preventing Bubbles: To minimize bubbles forming during frying, prick the dough squares a few times with a fork before wrapping them around the cannoli tubes.
- Perfect Sealing: For extra insurance against the seams opening during frying, lightly brush the overlapping edges of the dough with a beaten egg white before pressing them together. The egg white acts as a glue, creating a stronger seal.
- Reusing Oil: After frying, allow the oil to cool completely. Strain it through a fine-mesh sieve lined with cheesecloth to remove any food particles. Store the strained oil in an airtight container in a cool, dark place. You can reuse frying oil a few times, but discard it if it becomes dark, thick, or develops an off-odor.
- Flavor Infusion: For a subtle flavor twist, you can infuse the frying oil with citrus zest (lemon or orange) or a cinnamon stick while it’s heating up. Remove the zest or cinnamon before frying the cannoli shells.
Serving & Storage Suggestions
Serve your freshly made cannoli shells as soon as possible after filling them to maintain their crispness. Fill them with your favorite cannoli cream (like ricotta-based filling) just before serving. Dust the filled cannoli with powdered sugar and garnish with chocolate shavings, candied fruit, or chopped nuts.
Unfilled cannoli shells can be stored in an airtight container at room temperature for up to 2-3 days. Do not refrigerate unfilled shells, as this will cause them to become soggy. For longer storage, you can freeze unfilled shells in an airtight container for up to 1 month. Thaw them at room temperature before filling. Once filled, cannoli are best enjoyed immediately. If you have leftover filled cannoli, store them in the refrigerator for up to 24 hours, but be aware that the shells will soften over time.
Nutritional Information
| Nutrient | Amount per Serving | % Daily Value |
|---|---|---|
| Calories | 75 kcal | 4% |
| Total Fat | 3g | 4% |
| Saturated Fat | 1g | 5% |
| Cholesterol | 0mg | 0% |
| Sodium | 5mg | 0% |
| Total Carbohydrate | 10g | 4% |
| Dietary Fiber | 0g | 0% |
| Sugars | 1g | 2% |
| Protein | 1g | 2% |
Note: Nutritional information is an estimate and may vary based on specific ingredients and portion sizes.
Variations & Substitutions
- Gluten-Free Cannoli Shells: Substitute the all-purpose flour with a high-quality gluten-free flour blend. You may need to adjust the amount of liquid to achieve the correct dough consistency.
- Lard or Butter: Instead of shortening, you can use lard or unsalted butter for a richer flavor. Make sure the lard or butter is very cold before incorporating it into the flour.
- Citrus Zest: Add 1 teaspoon of grated lemon or orange zest to the dough for a bright, citrusy flavor.
- Chocolate Cannoli Shells: Add 2 tablespoons of unsweetened cocoa powder to the dough for chocolate cannoli shells. You may need to add a little extra liquid to compensate for the dryness of the cocoa powder.
- Wine Alternatives: If you don’t have white wine, you can use Marsala wine or a mixture of water and vinegar.
FAQs (Frequently Asked Questions)
Q: Why are my cannoli shells not crispy?
A: There are several reasons why your cannoli shells might not be crispy. The dough may have been too thick, the oil temperature may have been too low, or the shells may not have been cooled completely before filling.
Q: Can I bake the cannoli shells instead of frying them?
A: While frying is traditional, you can bake the cannoli shells at 350°F (175°C) for about 15-20 minutes, or until golden brown and crispy. However, the texture will be slightly different from fried shells.
Q: How do I prevent the filling from making the shells soggy?
A: Fill the cannoli shells just before serving to prevent the filling from making them soggy. You can also brush the inside of the shells with melted chocolate to create a moisture barrier.
Q: Can I make the dough ahead of time?
A: Yes, you can make the dough ahead of time and store it in the refrigerator for up to 24 hours. Bring the dough to room temperature before rolling it out.
Q: What type of oil is best for frying cannoli shells?
A: Neutral-flavored oils with a high smoke point, such as canola, vegetable, or peanut oil, are best for frying cannoli shells.
Final Thoughts
Now that you’re armed with this time-tested recipe and a wealth of tips, I encourage you to embrace the process and create your own batch of delectable cannoli shells. Don’t be afraid to experiment with flavors and fillings to make them your own. Whether you’re sharing them with loved ones or savoring them yourself, these crispy, sweet treats are sure to bring a touch of Sicilian sunshine to your day. And please, share your creations and feedback – I’d love to hear about your cannoli-making adventures! Perhaps pair them with a strong espresso or a glass of Vin Santo for the ultimate Italian indulgence. Buon appetito!