
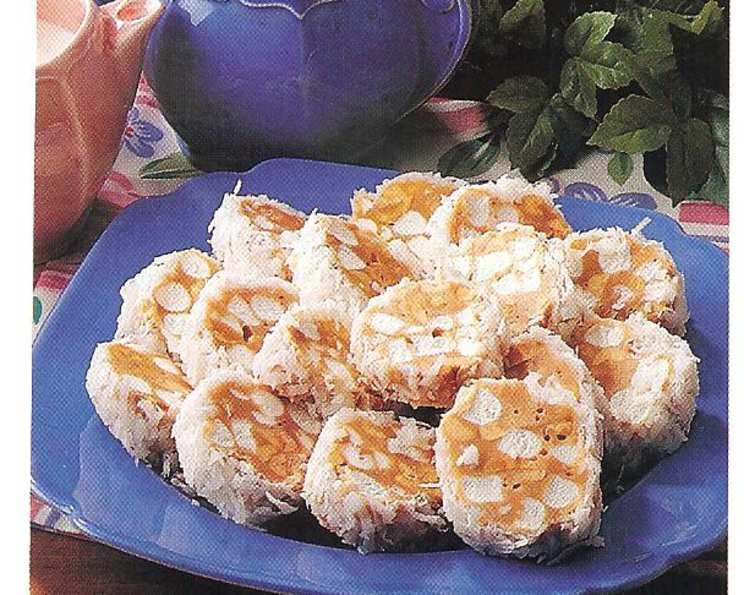
Homemade Caramel Nut Rolls: A Sweet Nostalgia
There’s a certain kind of magic that only homemade candy can conjure, a feeling of warmth and shared joy. I remember one particular holiday season, a flurry of sugar and laughter filling my grandmother’s kitchen. The air, thick with the scent of melted caramel and toasted nuts, always meant one thing: her legendary caramel nut rolls. Each bite was a perfect blend of sweet, salty, and chewy—a taste of pure, unadulterated happiness wrapped in a blanket of toasted coconut. Today, I’m thrilled to share this cherished recipe, a timeless treat that’s sure to create sweet memories of your own.
Recipe Overview
- Prep Time: 15 minutes
- Cook Time: 5 minutes
- Total Time: 20 minutes (plus chilling time)
- Servings: Varies (approximately 2 logs)
- Yield: 2 pounds
- Dietary Type: Not specified (contains dairy and sugar)
Ingredients
- 1/2 pound caramels (about 28 pieces)
- 1/4 cup butter
- 2 tablespoons half-and-half or milk
- 1 1/2 cups confectioners’ sugar
- 1 cup salted peanuts or other nuts of your choice (such as pecans or walnuts)
- 2 cups miniature marshmallows
- 1 cup flaked coconut
Equipment Needed
- 2-quart casserole dish or mixing bowl (microwave-safe)
- Microwave
- Spoon or spatula
- Two large sheets of waxed paper
Instructions
-
Begin by unwrapping all the caramels. Place the unwrapped caramels, butter, and half-and-half (or milk) into a 2-quart casserole dish or microwave-safe mixing bowl.
-
Microwave the mixture on medium power for 3-5 minutes. It’s crucial to monitor the mixture closely to prevent burning. After 2 minutes, stir the mixture thoroughly. Then, continue microwaving in 1-minute intervals, stirring after each interval, until the caramels are completely melted and the mixture is smooth.
-
Once the caramel mixture is smooth, stir in the confectioners’ sugar until it is fully incorporated and the mixture is uniform in color and texture.
-
Next, add the nuts of your choice (salted peanuts are classic, but pecans, walnuts, or a mix would work wonderfully) and stir them into the caramel-sugar mixture.
-
Now, gently stir in the miniature marshmallows. Be careful not to overmix; you want to incorporate them with just a few strokes, so they retain some of their individual shape and don’t completely melt into the caramel.
-
Prepare two large sheets of waxed paper. Sprinkle each sheet generously with flaked coconut. This coconut will prevent the caramel from sticking and will provide a lovely coating for the finished rolls.
-
Divide the caramel mixture in half. Spoon each half onto one of the coconut-covered waxed paper sheets.
-
Using your hands (you might want to lightly grease them with butter or cooking spray to prevent sticking) or the waxed paper itself, shape each portion of the mixture into a log. Carefully roll the logs in the coconut, ensuring they are completely coated on all sides.
-
Once the logs are shaped and coated, wrap them tightly in the waxed paper. Chill the logs in the refrigerator until they are firm and hard enough to slice, typically for at least 2 hours, or preferably overnight.
-
When ready to serve, remove the logs from the refrigerator and slice them into bite-sized pieces.
Expert Tips & Tricks
- Prevent sticking: Lightly grease your hands with butter or cooking spray before shaping the caramel logs. This will make the process much easier and prevent the caramel from sticking to your fingers.
- Microwave power: The cooking time in the microwave can vary depending on your microwave’s power. Keep a close eye on the caramel mixture and adjust the cooking time accordingly. If it starts to bubble excessively or burn, reduce the power level or shorten the cooking intervals.
- Soft caramels: If your caramel pieces are particularly hard, you can add an extra tablespoon of half-and-half or milk to help them melt more smoothly.
- Nut variations: Feel free to experiment with different types of nuts. Toasted pecans or walnuts add a deeper, richer flavor, while cashews provide a softer texture. You can also use a mix of different nuts for added complexity.
- Marshmallow control: For a chewier roll, add the marshmallows while the caramel mixture is still quite warm. For a more distinct marshmallow presence, let the caramel cool slightly before adding them.
Serving & Storage Suggestions
These caramel nut rolls are best served chilled or at room temperature. They make a wonderful addition to holiday dessert platters, a sweet treat for parties, or a simple indulgence to enjoy with a cup of coffee or tea.
To store, wrap the sliced or unsliced logs tightly in plastic wrap or store them in an airtight container. They will keep at room temperature for up to a week, in the refrigerator for up to two weeks, or in the freezer for up to two months. If freezing, wrap the logs very securely to prevent freezer burn. Thaw in the refrigerator before slicing and serving.
Nutritional Information
Please note that the following is an estimate. Actual values may vary based on specific ingredients and portion sizes.
| Nutrient | Amount per Serving | % Daily Value |
|---|---|---|
| Calories | 250 kcal | 13% |
| Total Fat | 12g | 18% |
| Saturated Fat | 7g | 35% |
| Cholesterol | 15mg | 5% |
| Sodium | 150mg | 7% |
| Total Carbohydrate | 35g | 12% |
| Dietary Fiber | 1g | 4% |
| Sugars | 25g | N/A |
| Protein | 3g | 6% |
Variations & Substitutions
- Chocolate caramel nut rolls: Add 1/4 cup of unsweetened cocoa powder to the caramel mixture along with the confectioners’ sugar for a rich, chocolatey twist.
- Spiced caramel nut rolls: Incorporate 1/2 teaspoon of ground cinnamon or pumpkin pie spice into the caramel mixture for a warm, comforting flavor.
- Dairy-free caramel nut rolls: Substitute the butter with a vegan butter alternative and the half-and-half with a plant-based milk like almond or soy milk. Ensure the caramels are also dairy-free.
- Nut-free caramel rolls: Replace the nuts with toasted sunflower seeds or pepitas for a nut-free alternative.
- Coconut lovers: Increase the amount of flaked coconut to 1 1/2 cups for an even more pronounced coconut flavor. You can also toast the coconut lightly before using it.
FAQs (Frequently Asked Questions)
Q: Can I use pre-made caramel sauce instead of caramel candies?
A: While pre-made caramel sauce might seem like a shortcut, it often contains different ingredients and a higher moisture content than caramel candies, which could affect the final texture and consistency of the rolls. For the best results, stick with the caramel candies.
Q: How do I prevent the caramel logs from becoming too hard in the refrigerator?
A: To prevent the caramel from becoming excessively hard, avoid chilling them for too long. Two to three hours should be sufficient for them to firm up enough to slice.
Q: Can I add other mix-ins besides nuts and marshmallows?
A: Absolutely! Get creative and add other mix-ins like dried cranberries, chopped pretzels, toffee bits, or even a sprinkle of sea salt for a sweet and salty combination.
Q: My caramel mixture is grainy. What did I do wrong?
A: A grainy caramel mixture is usually caused by overheating the caramels or not stirring frequently enough. Be sure to microwave on medium power and stir often to ensure smooth melting.
Q: What’s the best way to slice the caramel logs without them sticking to the knife?
A: Use a sharp, thin-bladed knife and lightly coat it with cooking spray or dip it in hot water before each slice. This will help prevent the caramel from sticking and ensure clean, even cuts.
Final Thoughts
These homemade caramel nut rolls are more than just a candy; they’re a symbol of warmth, tradition, and shared moments. Whether you’re making them for a special occasion or simply craving a sweet treat, I encourage you to give this recipe a try. Don’t be afraid to experiment with different variations and make it your own. Share your creations with loved ones and let the sweet nostalgia fill your kitchen. Enjoy the process and savor every delicious bite!