
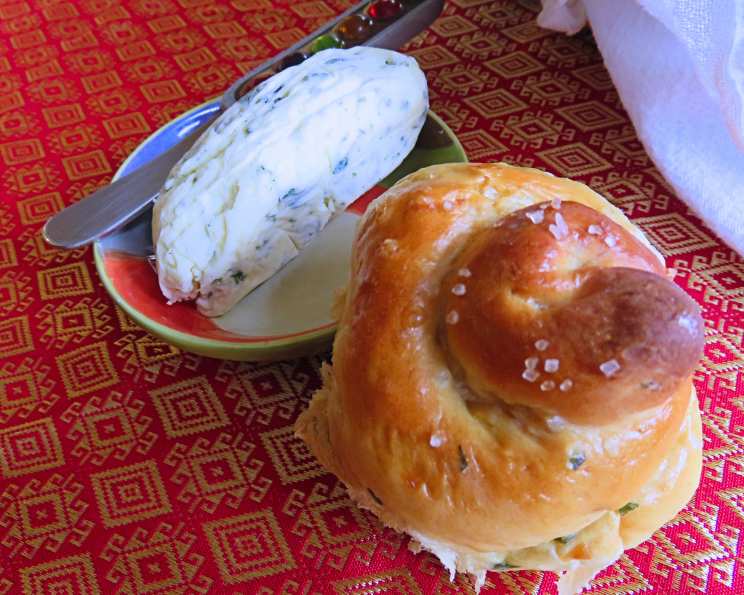
Caramelized Onion Rolls With Herb Butter: A Symphony of Savory Flavors
The aroma of caramelized onions is, for me, pure nostalgia. It instantly transports me back to my grandmother’s kitchen, where she would stand patiently over a low flame, coaxing sweetness from humble onions for hours. The rich, heady scent would fill the entire house, a promise of the deliciousness to come. These caramelized onion rolls capture that comforting memory in every bite, adding a touch of herbaceous freshness to a timeless classic. They’re perfect alongside a hearty soup, as a standout addition to your bread basket, or simply enjoyed warm with a generous smear of herb butter.
Recipe Overview
- Prep Time: 45 minutes
- Cook Time: 20 minutes
- Total Time: 2 hours 45 minutes
- Servings: 24 rolls
- Yield: 24 rolls
- Dietary Type: Vegetarian
Ingredients
For the Herb Butter:
- ½ cup butter, softened
- 1 tablespoon fresh parsley, finely chopped
- 1 tablespoon fresh thyme, finely chopped
For the Onion Rolls:
- 1 ½ cups milk
- ¼ cup butter, softened
- 2 teaspoons butter, softened
- 1 teaspoon olive oil
- 1 ½ teaspoons sea salt, coarse
- 1 package active dry yeast (1/4 oz)
- ½ cup warm water
- 2 large Vidalia onions, thinly sliced
- 2 eggs, divided
- 4 teaspoons fresh parsley, finely chopped, divided
- 2 teaspoons fresh thyme, finely chopped
- 5 ½ cups all-purpose flour, divided
Equipment Needed
- Large pot
- Small bowl
- Frying pan
- Large mixing bowl
- Baking sheet
Instructions
-
Prepare the Herb Butter: In a small bowl, combine the ½ cup of softened butter with 1 tablespoon each of finely chopped fresh parsley and thyme. Mix well until thoroughly combined. Cover the bowl and refrigerate the herb butter until needed. Chilling the butter allows the flavors to meld together and makes it easier to spread later.
-
Create the Dough Base: In a large pot, combine the milk, ¼ cup softened butter, olive oil, and sea salt. Place the pot over medium heat and bring the mixture to a boil, stirring occasionally to prevent scorching. Once boiling, immediately remove the pot from the heat and allow the mixture to cool slightly. This cooling process is crucial; the mixture should be warm, not hot, before adding the yeast.
-
Activate the Yeast: Pour the ½ cup of warm water into a small bowl. Sprinkle the active dry yeast over the warm water and let it stand for about 5 minutes, or until the yeast becomes foamy. This indicates that the yeast is active and ready to leaven the dough. If the yeast doesn’t foam, it may be old or inactive, and you’ll need to start again with fresh yeast.
-
Caramelize the Onions: Add the remaining 2 teaspoons of butter to a frying pan and melt it over medium-low heat. Add the thinly sliced Vidalia onions to the pan and cook for approximately 20 minutes, stirring occasionally, until they are deeply browned and caramelized. Patience is key here – the low and slow cooking process brings out the natural sweetness of the onions.
-
Cool and Chop the Onions: Remove the frying pan from the heat and allow the caramelized onions to cool completely. Once cooled, coarsely chop the onions and set them aside. This step is important to ensure the onions are evenly distributed throughout the dough.
-
Combine Wet and Dry Ingredients: In a large mixing bowl, whisk together 1 egg, 3 teaspoons of finely chopped fresh parsley, thyme, the cooled milk mixture, and the foamy yeast mixture. This combination forms the wet base for the dough.
-
Incorporate the Flour: Gradually stir in 3 cups of all-purpose flour into the wet ingredients until just combined. Be careful not to overmix at this stage. Gradually add the remaining flour, stirring slowly, until the dough is no longer sticky. The amount of flour needed may vary slightly depending on humidity.
-
Knead the Dough: Turn the dough out onto a lightly floured surface and knead it for 3-5 minutes, or until it becomes smooth and elastic. Kneading develops the gluten in the flour, which gives the rolls their chewy texture.
-
Incorporate the Onions: Form the dough into a disk. Add about half of the chopped caramelized onions on top of the disk. Fold the disk in half and knead in the onions until they are evenly distributed throughout the dough. This step infuses the dough with the rich, savory flavor of the caramelized onions.
-
First Rise: Place the dough in a greased bowl, turning to coat the entire surface. Cover the bowl with a clean kitchen towel or plastic wrap and let it rise in a warm place until doubled in size, approximately 45-60 minutes.
-
Punch Down and Divide: Once the dough has doubled, punch it down to release the air. This helps to even out the dough’s texture. Cut the dough in half with a knife, then cut each piece into four pieces. Finally, cut each of those pieces into thirds. You should end up with 24 pieces.
-
Shape the Rolls: Roll each piece of dough into a 7-inch long rope. Spiral each rope, pinching the end into the roll to seal it. This creates a distinctive swirl pattern, making them look like small Danish pastries.
-
Second Rise: Place the shaped rolls on a baking sheet lined with parchment paper. Cover them loosely with plastic wrap or a clean kitchen towel and let them rise until almost doubled in size, about 20-30 minutes.
-
Preheat and Prepare for Baking: Preheat your oven to 375°F (190°C). Lightly beat the remaining egg and brush it over the tops of the rolls. This egg wash gives the rolls a beautiful golden-brown color. Top the rolls with the remaining caramelized onions and fresh parsley.
-
Bake the Rolls: Bake the rolls for 18-20 minutes, or until they are golden brown and cooked through. Keep a close eye on them during the last few minutes to prevent over-browning.
-
Serve and Enjoy: Remove the rolls from the oven and let them cool slightly on a wire rack. Serve warm with the prepared herb butter.
Expert Tips & Tricks
- Onion Sweetness: For the best flavor, use Vidalia onions or another sweet onion variety. The natural sweetness of these onions really shines when caramelized.
- Prevent Sticking: Use parchment paper to line your baking sheet. This ensures the rolls don’t stick and makes cleanup a breeze.
- Warm Rise: For a faster rise, place the dough in a slightly warmed oven (turned off!) or near a warm stovetop.
Serving & Storage Suggestions
Serve these rolls warm, ideally within a few hours of baking, for the best flavor and texture. The herb butter adds a delightful richness and complements the caramelized onion flavor perfectly. Leftover rolls can be stored in an airtight container at room temperature for up to 2 days, or in the refrigerator for up to 4 days. To reheat, wrap the rolls in foil and warm them in a 350°F (175°C) oven for 5-10 minutes. You can also freeze the baked rolls for up to 2 months. Thaw them completely before reheating.
Nutritional Information
| Nutrient | Amount per Serving | % Daily Value |
|---|---|---|
| Calories | 181.9 kcal | – |
| Calories from Fat | 67 g | 37% |
| Total Fat | 7.5 g | 11% |
| Saturated Fat | 4.4 g | 22% |
| Cholesterol | 35.9 mg | 11% |
| Sodium | 203.2 mg | 8% |
| Total Carbohydrate | 24 g | 8% |
| Dietary Fiber | 1.1 g | 4% |
| Sugars | 0.7 g | 2% |
| Protein | 4.3 g | 8% |
Variations & Substitutions
- Vegan Option: Substitute the milk with your favorite plant-based milk (almond, soy, or oat milk work well). Use vegan butter for both the dough and the herb butter.
- Gluten-Free: Use a gluten-free all-purpose flour blend, but be aware that the texture may be slightly different. You may need to adjust the amount of flour and kneading time.
- Cheese Addition: Add a sprinkle of grated Parmesan or Gruyere cheese on top of the rolls before baking for a cheesy twist.
- Herb Variations: Experiment with different herbs in the butter, such as chives, rosemary, or dill.
FAQs (Frequently Asked Questions)
Q: Can I make the dough ahead of time?
A: Yes! After the first rise, punch down the dough, wrap it tightly in plastic wrap, and refrigerate it for up to 24 hours. Let it come to room temperature before shaping and baking.
Q: Can I use a different type of onion?
A: While Vidalia onions are recommended for their sweetness, you can use yellow or white onions if needed. Just make sure to caramelize them properly to bring out their flavor.
Q: How do I know when the rolls are fully baked?
A: The rolls are done when they are golden brown and sound hollow when tapped on the bottom. An instant-read thermometer inserted into the center should read around 200°F (93°C).
Q: My yeast didn’t foam. What should I do?
A: If your yeast doesn’t foam, it’s likely inactive. You’ll need to discard the mixture and start again with fresh yeast. Make sure the water is warm (not hot) to avoid killing the yeast.
Q: Can I freeze the unbaked rolls?
A: Yes, you can freeze the shaped, unbaked rolls. Place them on a baking sheet lined with parchment paper and freeze until solid. Then, transfer them to a freezer-safe bag or container. When ready to bake, let them thaw in the refrigerator overnight and then let them rise until doubled before baking as directed.
Final Thoughts
These caramelized onion rolls with herb butter are a truly special treat, perfect for adding a touch of homemade goodness to any meal. Don’t be intimidated by the slightly longer preparation time – the rich, savory flavor and satisfying texture are well worth the effort. I encourage you to give this recipe a try and share your feedback! Pair them with a comforting bowl of soup, a fresh salad, or simply enjoy them on their own. The possibilities are endless!