
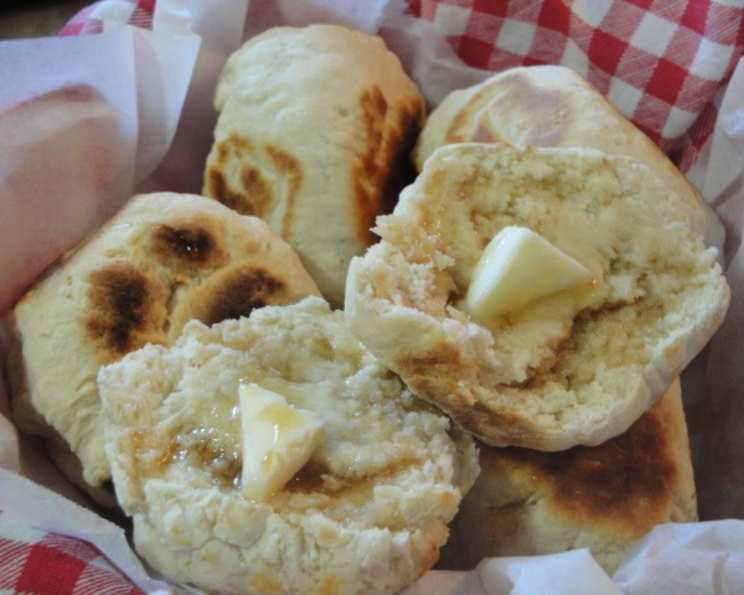
Caribbean Fried Dumplins: A Taste of Island Comfort
The scent of fried dough always takes me back to my grandmother’s kitchen in Barbados. She would be up before sunrise, humming a calypso tune as she kneaded and shaped these very dumplins, or “bakes” as she affectionately called them. I remember standing on a stool, mesmerized as she expertly flipped them in the hot oil until they were golden brown and slightly puffed. The joy on everyone’s faces as we devoured them, slathered with butter and guava jam, is a memory I cherish and try to recreate every time I make these simple yet deeply satisfying treats.
Recipe Overview
- Prep Time: 10 minutes
- Cook Time: 15 minutes
- Total Time: 25 minutes
- Servings: 10
- Yield: 10 Dumplins
- Dietary Type: Vegetarian (Can be made vegan with plant-based milk)
Ingredients
- 4 cups self-rising flour (see note below for making your own)
- 2 teaspoons sugar
- ½ teaspoon salt
- 1 ¼ cups milk
- Oil, for frying
Note: To make your own self-rising flour, for each pound (approximately 4 cups) of all-purpose flour, add 2 teaspoons of salt and 2 tablespoons of baking powder.
Equipment Needed
- Large mixing bowl
- Non-stick frying pan
- Slotted spoon or spatula
- Paper towels
- Plate
Instructions
-
In a large bowl, sift together the self-rising flour, sugar, and salt. This ensures the dry ingredients are evenly distributed and helps create a lighter, more tender dumplin.
-
Gradually add the milk to the dry ingredients, mixing with your hands or a wooden spoon until a smooth dough forms. If the dough seems too dry, add a little more milk, a tablespoon at a time, until it comes together. Be careful not to add too much liquid, as the dough should be firm but pliable.
-
Mix and knead the dough gently. Over-mixing and over-kneading can develop the gluten too much, resulting in tough dumplins. Aim for a smooth, elastic dough without working it excessively.
-
Divide the dough into 10 equal-sized balls. Lightly flour your hands and knead each ball a few times to smooth it out.
-
Press the balls gently to flatten them slightly. You want them to be about ½ inch thick. This helps them cook evenly in the pan.
-
In a non-stick frying pan, heat a little bit of oil over medium heat. The oil should be hot enough that a small piece of dough sizzles gently when dropped in.
-
Place 5 of the dumplings in the heated pan, making sure not to overcrowd it. Overcrowding can lower the temperature of the oil and result in greasy dumplins.
-
Reduce the heat to low and fry for approximately 15 minutes, until they are golden brown, turning once halfway through. The low heat allows the dumplins to cook through without burning on the outside.
-
Stand the dumplings on their side for about 1 minute to brown the edges. This gives them a nice, even color and adds a bit of extra crispness.
-
Transfer the dumplings to a plate lined with paper towels to drain any excess oil.
-
Repeat with the remaining 5 dumplings.
-
Serve immediately while still warm. These dumplins are best enjoyed fresh!
Important Note for Electric Ranges: Frying these dumplins on an electric range can be tricky due to the inconsistent heat. A gas range or an electric skillet with precise temperature control is recommended for optimal results. You can also deep-fry the dumplins, but be aware that they will be greasier.
Expert Tips & Tricks
- For a richer flavor, try adding a tablespoon of melted butter or coconut oil to the dough.
- If you don’t have self-rising flour, you can use all-purpose flour with baking powder and salt (as described above).
- To prevent the dumplins from sticking to the pan, make sure the pan is well-oiled and heated before adding the dough.
- For a sweeter treat, add a tablespoon of brown sugar or honey to the dough.
- If your dumplins are browning too quickly on the outside but are still doughy inside, reduce the heat even further and cover the pan with a lid for a few minutes to allow them to cook through.
Serving & Storage Suggestions
Caribbean fried dumplins are incredibly versatile. Serve them warm with savory dishes like stewed chicken, saltfish, or callaloo. They are also delicious as a sweet treat, served with butter, honey, jam, or even a sprinkle of cinnamon sugar.
Leftover dumplins can be stored at room temperature for up to 2 days, or in the refrigerator for up to 4 days. To reheat, wrap them in foil and warm them in a preheated oven at 350°F (175°C) for about 10 minutes, or until heated through. You can also microwave them for a quicker option, but they may become slightly chewy.
Nutritional Information
(Estimated, per serving)
| Nutrient | Amount per Serving | % Daily Value |
|---|---|---|
| Calories | 200 kcal | 10% |
| Total Fat | 2g | 3% |
| Saturated Fat | 1g | 5% |
| Cholesterol | 0mg | 0% |
| Sodium | 766mg | 32% |
| Total Carbohydrate | 40g | 13% |
| Dietary Fiber | 1g | 4% |
| Sugars | 1g | 2% |
| Protein | 6g | 12% |
Variations & Substitutions
- Vegan Dumplins: Substitute the milk with your favorite plant-based milk, such as almond, soy, or oat milk. Ensure the plant-based milk is unsweetened for best results.
- Spicy Dumplins: Add a pinch of cayenne pepper or a finely chopped scotch bonnet pepper to the dough for a little kick.
- Herb Dumplins: Mix in some chopped fresh herbs, such as thyme, parsley, or chives, for a more savory flavor.
- Sweet Potato Dumplins: Add 1/2 cup of mashed cooked sweet potato to the dough for a slightly sweet and moist variation.
- Gluten-Free Dumplins: Substitute the self-rising flour with a gluten-free self-rising flour blend. You may need to adjust the amount of liquid depending on the specific blend you use.
FAQs (Frequently Asked Questions)
Q: Why are my dumplins tough?
A: Over-mixing the dough can develop too much gluten, resulting in tough dumplins. Be sure to mix and knead the dough gently until it just comes together.
Q: Can I use all-purpose flour instead of self-rising flour?
A: Yes, you can. For each cup of all-purpose flour, add 1 ½ teaspoons of baking powder and ¼ teaspoon of salt.
Q: How do I know when the dumplins are cooked through?
A: The dumplins should be golden brown on both sides and feel firm to the touch. You can also insert a toothpick into the center to check for doneness; it should come out clean.
Q: Can I freeze the dumplins?
A: Yes, you can freeze them after they have been cooked and cooled completely. Wrap them individually in plastic wrap and then place them in a freezer-safe bag. They can be stored in the freezer for up to 2 months. Reheat them in a preheated oven.
Q: Why are my dumplins greasy?
A: The oil may not have been hot enough when you added the dumplins, or you may have overcrowded the pan. Ensure the oil is heated to medium heat before adding the dumplins, and fry them in batches.
Final Thoughts
These Caribbean fried dumplins are more than just a recipe; they’re a connection to my roots and a taste of pure comfort. I encourage you to try making them yourself and experience the joy of sharing this simple yet delicious treat with your loved ones. Don’t be afraid to experiment with different variations and add your own personal touch. And please, share your feedback – I’d love to hear how they turned out! Perhaps serve them alongside a hearty bowl of Caribbean pepperpot or a refreshing glass of sorrel for a truly immersive culinary experience.