
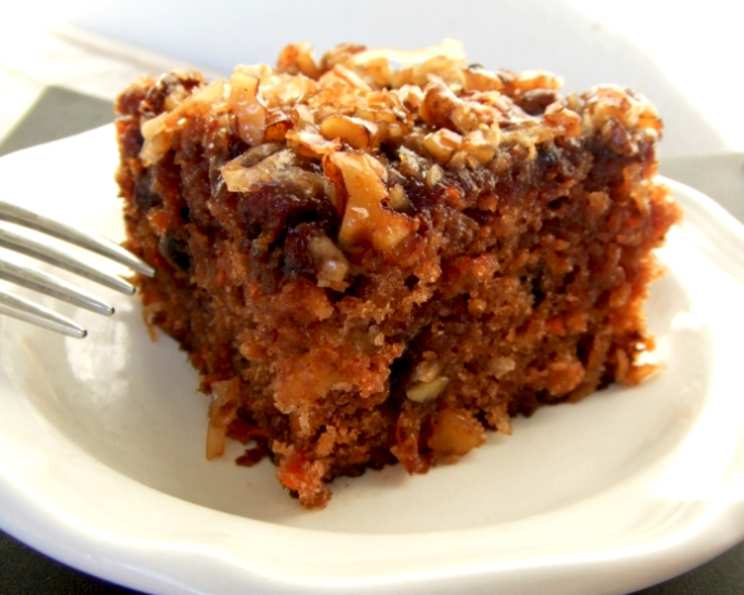
Carrot Cake With Buttermilk Glaze
My grandmother, bless her heart, was not a fancy baker. She didn’t do delicate pastries or elaborate fondant work. Her genius was in taking simple, honest recipes and elevating them with a touch of love and, dare I say, a healthy dose of butter. This carrot cake, adapted from her well-worn recipe card, brings back floods of memories: the scent of cinnamon and warm sugar filling her kitchen, the excited chatter of cousins anticipating that first bite, and the slightly sticky fingers from sneaking extra bits of the broiled buttermilk glaze. It’s a cake that’s meant to be shared, savored, and celebrated, a true testament to the power of simple, delicious baking.
Recipe Overview
- Prep Time: 25 minutes
- Cook Time: 55 minutes
- Total Time: 1 hour 20 minutes
- Servings: 10-12
- Yield: One 13×9 inch cake
- Dietary Type: Not specified
Ingredients
For the Cake:
- 2 cups all-purpose flour
- 2 teaspoons baking soda
- ½ teaspoon salt
- 2 teaspoons ground cinnamon
- 2 cups sugar
- 3 large eggs
- ¾ cup vegetable oil
- ¾ cup buttermilk
- 2 teaspoons vanilla extract
- 2 cups shredded carrots
- 1 (8 ounce) can crushed pineapple, drained
- 1 cup flaked coconut
- 1 cup chopped walnuts
For the Buttermilk Glaze:
- 1 cup sugar
- 1 teaspoon baking soda
- ½ cup buttermilk
- ½ cup butter or margarine
- 1 tablespoon light corn syrup
- 1 teaspoon vanilla extract
- ½ cup flaked coconut
- ½ cup chopped walnuts (fine chop)
Equipment Needed
- 13 x 9-inch baking dish
- Mixing bowls
- Electric mixer
- Wooden spoon
- Heavy saucepan
- Kabob skewer (or similar tool for poking holes)
Instructions
- Preheat your oven to 350 degrees F (175 degrees C). Spray a 13 x 9-inch baking dish generously with cooking spray. There’s no need to grease the pan separately due to the oil in the cake batter.
- In a large mixing bowl, beat the eggs with the sugar, vegetable oil, buttermilk, and vanilla extract for a full 5 minutes using an electric mixer. This step is crucial for creating a light and airy texture, so don’t skimp on the beating time!
- In a separate, medium-sized bowl, whisk together the all-purpose flour, baking soda, ground cinnamon, and salt until evenly combined.
- Gradually add the dry ingredients to the wet ingredients in the larger bowl. Use a wooden spoon to gently stir until just combined. It’s important not to overmix at this stage; overmixing can result in a tough cake.
- Fold in the shredded carrots, drained crushed pineapple, flaked coconut, and chopped walnuts using the wooden spoon. Mix until everything is evenly distributed throughout the batter.
- Transfer the batter to the prepared 13 x 9-inch baking dish.
- Bake in the preheated oven for 30 minutes. After 30 minutes, loosely cover the baking dish with aluminum foil to prevent the top of the cake from browning excessively.
- Continue baking for another 25 minutes, or until a wooden skewer inserted into the center of the cake comes out clean. The total baking time should be around 55 minutes.
- While the cake is baking, prepare the buttermilk glaze. In a heavy-bottomed saucepan, combine the sugar, baking soda, butter (or margarine), buttermilk, and light corn syrup.
- Bring the mixture to a boil over medium-high heat, stirring constantly to prevent sticking.
- Once boiling, cook for approximately 2 minutes, continuing to stir.
- Add the ½ cup flaked coconut and ½ cup finely chopped walnuts to the glaze.
- Continue cooking for another 2 minutes, or until the glaze turns a golden-brown color. Be careful not to burn the glaze; it can go from golden to burnt very quickly.
- Remove the saucepan from the heat and stir in the vanilla extract.
- Once the cake is finished baking, remove it from the oven. Use a kabob skewer (or a fork) to poke holes all over the surface of the hot cake. This will allow the glaze to soak in evenly.
- Pour the hot buttermilk glaze evenly over the hot cake, making sure to cover the entire surface.
- Return the glazed cake to the oven and broil for 1-2 minutes, or until the glaze is bubbly and slightly caramelized. Keep a close eye on the cake while broiling to prevent burning.
- Remove the cake from the oven and cool completely before serving.
Expert Tips & Tricks
- Don’t overmix the batter: Overmixing develops the gluten in the flour, leading to a tough cake. Stir just until the ingredients are combined.
- Use a light-colored baking pan: Dark pans tend to bake faster and can result in over-browning or burning.
- Test for doneness accurately: A wooden skewer inserted into the center should come out clean. If it comes out with wet batter, bake for a few more minutes and test again.
- Make-ahead glaze: The glaze can be made a day in advance and reheated gently before pouring over the cake.
- Adjust sweetness: Reduce the sugar in the cake batter by 1/4 cup if you prefer a less sweet cake. The glaze adds significant sweetness.
- Toasting nuts: Toast the walnuts and coconut lightly before adding them to the cake and glaze. This will enhance their flavor and texture.
Serving & Storage Suggestions
This carrot cake is best served at room temperature. You can cut it into squares and serve it as is, or top it with a dollop of whipped cream or a scoop of vanilla ice cream for an extra treat.
To store leftovers, cover the cake tightly with plastic wrap or transfer it to an airtight container. The cake will keep at room temperature for up to 2 days, in the refrigerator for up to 5 days, or in the freezer for up to 2 months.
To reheat frozen cake, thaw it in the refrigerator overnight. You can also reheat individual slices in the microwave for a few seconds until warmed through.
Nutritional Information
| Nutrient | Amount per Serving | % Daily Value (approximate) |
|---|---|---|
| Calories | 650-800 kcal | N/A |
| Total Fat | 35-45g | N/A |
| Saturated Fat | 12-15g | N/A |
| Cholesterol | 70-90mg | N/A |
| Sodium | 500-700mg | N/A |
| Total Carbohydrate | 80-100g | N/A |
| Dietary Fiber | 3-5g | N/A |
| Sugars | 60-80g | N/A |
| Protein | 7-9g | N/A |
Note: This is an estimate based on typical ingredient values. Actual nutritional content may vary.
Variations & Substitutions
- Gluten-Free: Substitute the all-purpose flour with a gluten-free all-purpose flour blend. You may need to add a binding agent like xanthan gum to improve the texture.
- Dairy-Free: Use dairy-free butter and buttermilk alternatives (such as almond or soy milk mixed with a tablespoon of lemon juice or vinegar) in both the cake and the glaze.
- Nut-Free: Omit the walnuts and coconut entirely, or replace them with other additions like raisins, dried cranberries, or chocolate chips.
- Spice It Up: Add a pinch of ground ginger, nutmeg, or cloves to the cake batter for a warmer, spicier flavor.
- Citrus Zest: Add the zest of an orange or lemon to the cake batter for a brighter flavor.
FAQs (Frequently Asked Questions)
Q: Can I use cream cheese frosting instead of the buttermilk glaze?
A: Absolutely! While this recipe is designed for the buttermilk glaze, a cream cheese frosting would also be delicious. Just make sure the cake is completely cooled before frosting.
Q: Can I make this cake in a different size pan?
A: Yes, but you’ll need to adjust the baking time accordingly. For example, if you use two 9-inch round cake pans, the baking time will likely be shorter.
Q: What if I don’t have buttermilk?
A: You can make a buttermilk substitute by adding 1 tablespoon of lemon juice or white vinegar to a liquid measuring cup, then filling the cup with milk to reach 3/4 cup. Let it sit for 5 minutes before using.
Q: Can I freeze the unglazed cake?
A: Yes, you can freeze the baked cake before adding the glaze. Wrap it tightly in plastic wrap and then in foil. Thaw completely before glazing.
Q: My glaze is too thin. How can I thicken it?
A: Cook the glaze for a longer period of time, allowing the excess liquid to evaporate. Be sure to stir constantly to prevent burning.
Final Thoughts
This carrot cake with buttermilk glaze is more than just a recipe; it’s a slice of nostalgia, a comforting reminder of simpler times and the joy of homemade goodness. I encourage you to gather your ingredients, preheat your oven, and create your own memories with this delightful cake. Don’t be afraid to experiment with variations, and most importantly, share it with the people you love. And if you try this recipe, please leave a comment and let me know how it turned out! Pair this with a cup of hot coffee or tea for the perfect afternoon treat. Happy baking!