
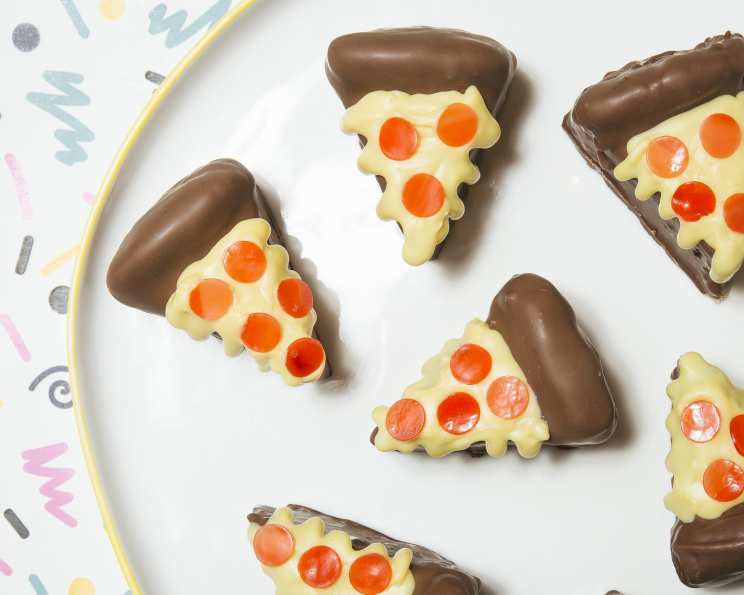
Cartoon Pizza Slice Cake Truffles: A Slice of Whimsy
Baking is more than just a process for me; it’s a portal to precious memories. As a child, my fondest recollections involve helping my grandmother create elaborate, themed desserts for family gatherings. One year, it was a playful pizza cake, complete with marzipan toppings and a vibrant, edible “sauce.” Though not truffles, the pure joy of crafting something so whimsical and delicious stuck with me. These Cartoon Pizza Slice Cake Truffles are a delightful homage to those cherished moments, bringing that same spark of imagination and flavor into a bite-sized treat.
Recipe Overview
- Prep Time: 45 minutes
- Cook Time: 30 minutes
- Total Time: 1 hour 45 minutes
- Yields: 14 truffles
- Dietary Type: Vegetarian
Ingredients
- 1 (15 1/4 ounce) box yellow cake mix (plus necessary ingredients called for on the box, such as eggs, oil, and water)
- White frosting (store-bought or homemade)
- Brown chocolate candy melts
- Yellow candy melts
- Red fruit leather (i.e., fruit roll-ups)
Equipment Needed
- Baking pan (size specified on cake mix box)
- Large bowl
- Wooden cutting board
- Microwave-safe bowls
- Whisk
- Parchment paper
- Baking sheet
- Paring knife
- Round #804 piping tip
- Small piping bag
Instructions
- First, prepare the yellow cake mix according to the package directions. Be sure to use the correct pan size as specified on the box. This will ensure the cake bakes evenly and to the correct height.
- Bake the cake according to the package directions. Keep a close eye on it during the last few minutes of baking to prevent it from drying out. A toothpick inserted into the center should come out clean.
- Let the cake cool completely on a wire rack. This is essential for preventing the truffles from becoming too soft and mushy.
- Once the cake is completely cool, scrape off the darker, slightly crusty layer of cake on top. This layer can sometimes be dry and will affect the texture of the truffles.
- Crumble the remaining cake into a large bowl. Ensure there are no large chunks remaining, as this will make it difficult to shape the truffles later.
- Add ¼ cup of white frosting to the bowl with the cake crumbles. You can start with less and add more as needed, but avoid adding too much, as this will make the mixture too sticky.
- Mush and mix the cake and frosting together by hand. The mixture should be easily shapeable, like play dough. If it’s too dry, add a little more frosting, one tablespoon at a time. If it’s too wet, add more crumbled cake.
- Divide the cake mixture into two portions onto a large wooden cutting board.
- Shape each portion into an even 3D disc, about 4 ½ x 1 inches. Make sure the top is as evenly flat as possible. This will ensure uniform pizza slices.
- Cut each disc into 8 even slices, just like a pizza. You should end up with 16 pizza slices total.
- Set aside 2 pizza slices. These will be divided among the remaining 14 slices to use for “crusts.”
- Tear off a little bit of dough from the reserved slices, shape it into a small log, and place it on the tops of a pizza slice, folding over the sides. This creates the raised edge of the pizza crust.
- Spread the dough across the back and front with your finger to securely attach it. Ensure the crust adheres well to the slice, or it may detach during the chocolate coating process.
- Add about 1 ½ cups brown candy melts to a microwave-safe bowl. Microwave in 30-second intervals, stirring in between, until melted. Be careful not to overheat the candy melts, as they can seize up and become unusable.
- Whisk until smooth. A smooth consistency is essential for a flawless coating.
- Working quickly, dip each pizza slice into the brown candy melts using a fork. Use the fork to fully coat each slice and then lift it out of the bowl, allowing the excess chocolate to drip back into the bowl.
- Scrape excess off on the rim of the bowl. This will prevent the chocolate coating from being too thick and messy.
- Set on a parchment-lined baking sheet. Parchment paper prevents the chocolate from sticking and makes it easy to remove the truffles later.
- If needed, chill in the fridge for 5 minutes. This will help the chocolate set quickly, especially in warmer environments.
- Trim the chocolate that has pooled on the bottom of each pizza with a paring knife. This creates a clean, professional look.
- Cut “pepperonis” out of a sheet of red fruit leather using a round #804 piping tip. The piping tip acts as a cookie cutter, ensuring uniform pepperoni shapes.
- Add about 1 cup yellow candy melts to a microwave-safe bowl. Microwave in 30-second intervals, stirring in between, until melted.
- Whisk until smooth, then transfer to a small piping bag.
- This should have a thicker consistency than the brown candy melts, so let it set up a little bit before cutting off the tip. This will prevent the “cheese” from being too runny and spreading uncontrollably.
- Working with a few at a time, pipe the yellow candy melts onto the top of the pizzas first. This creates the base layer of cheese.
- Then go in and pipe in the drips, letting it drip off the sides. This adds a realistic and fun cartoon effect.
- Immediately top with the pepperoni slices. Press them gently into the melted yellow chocolate so they adhere properly.
- If the chocolate sets up in the piping bag, just place the bag in a bowl and microwave for 10 seconds. Be careful not to overheat the chocolate.
- Let the chocolate set completely, chilling in the fridge for 5 minutes if needed. This will ensure all the elements are firmly in place before serving.
- Transfer to a platter and enjoy!
Expert Tips & Tricks
- For an extra layer of flavor, add a pinch of salt to the cake crumbles before mixing with the frosting. The salt enhances the sweetness and adds depth.
- If you find the cake mixture too crumbly, try adding a tablespoon of melted butter or cream cheese instead of more frosting. This can create a richer, smoother texture.
- To prevent the chocolate from seizing, add a teaspoon of vegetable oil to the candy melts while melting.
- For a more vibrant “cheese” effect, add a tiny drop of yellow food coloring to the melted yellow candy melts.
- Get creative with your toppings! Consider using other types of fruit leather for different toppings like olives or mushrooms.
Serving & Storage Suggestions
Serve these Cartoon Pizza Slice Cake Truffles chilled or at room temperature. They are best enjoyed within 2-3 days. Store them in an airtight container in the refrigerator. They can also be frozen for up to a month; however, the texture of the chocolate may change slightly upon thawing. To thaw, place them in the refrigerator overnight.
Nutritional Information
| Nutrient | Amount per Serving | % Daily Value |
|---|---|---|
| Calories | 133.6 kcal | N/A |
| Calories from Fat | 32 kcal | N/A |
| Total Fat | 3.6 g | 5% |
| Saturated Fat | 0.5 g | 2% |
| Cholesterol | 0.6 mg | 0% |
| Sodium | 203.2 mg | 8% |
| Total Carbohydrate | 24.2 g | 8% |
| Dietary Fiber | 0.3 g | 1% |
| Sugars | 13.4 g | N/A |
| Protein | 1.4 g | 2% |
Note: Nutritional information is an estimate and may vary based on specific ingredients used.
Variations & Substitutions
- Gluten-Free: Use a gluten-free cake mix and ensure all other ingredients are gluten-free.
- Dairy-Free: Use a dairy-free frosting and dairy-free chocolate melts.
- Cake Flavors: Experiment with different cake flavors! Chocolate cake, red velvet cake, or even funfetti would work well.
- Toppings: Get creative with the toppings! Use different colored candy melts, sprinkles, or edible glitter.
FAQs (Frequently Asked Questions)
Q: Can I make these ahead of time?
A: Yes, you can prepare the cake truffles a day or two in advance and store them in the refrigerator until ready to decorate.
Q: My chocolate is seizing up. What do I do?
A: Try adding a teaspoon of vegetable oil or shortening to the chocolate and stir until smooth. Avoid overheating the chocolate.
Q: Can I use regular chocolate instead of candy melts?
A: Yes, but you will need to temper the chocolate to achieve a smooth, glossy finish.
Q: My frosting is too thick. How can I thin it out?
A: Add a teaspoon of milk or cream to the frosting and stir until you reach the desired consistency.
Q: How do I prevent the pizza slices from sticking to the parchment paper?
A: Ensure the parchment paper is completely smooth and free of wrinkles. You can also lightly grease the parchment paper with cooking spray.
Final Thoughts
These Cartoon Pizza Slice Cake Truffles are a guaranteed crowd-pleaser, perfect for parties, celebrations, or simply a fun weekend baking project. Don’t be afraid to let your creativity shine when it comes to decorating – the more whimsical, the better! Share your creations with friends and family and watch their faces light up with joy. These adorable treats are bound to become a new favorite in your baking repertoire. I encourage you to give this recipe a try and share your feedback. Who knows, maybe these truffles will spark some cherished baking memories for you, too!