
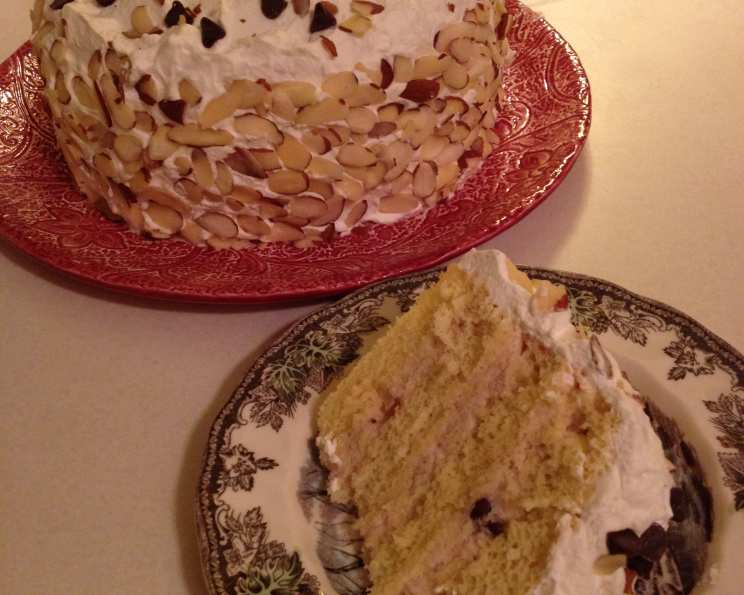
The Divine Cassata Cake: A Sicilian Masterpiece
My earliest memory of Cassata cake involves sneaking slivers from my Nonna’s meticulously crafted masterpiece during summer visits. The vibrant candied fruits, the creamy ricotta filling, and the moist cake soaked in rum syrup – it was a symphony of flavors and textures that transported me to sun-drenched Sicilian shores. Each bite was a celebration, a testament to the love and artistry poured into this iconic dessert. I’m thrilled to share this recipe with you, so you can bring a taste of Sicily to your own kitchen.
Recipe Overview
- Prep Time: 45 minutes
- Cook Time: 25 minutes
- Total Time: 12 hours 45 minutes (includes chilling time)
- Servings: 12
- Yield: 1 Cassata Cake
- Dietary Type: Not specified
Ingredients
Filling:
- 2 lbs whole milk ricotta cheese
- 2 1/4 cups confectioners’ sugar
- 1/2 teaspoon ground cinnamon
- 1 1/2 teaspoons vanilla extract
- 2 ounces miniature semisweet chocolate chips
Cake:
- 1 1/2 cups cake flour, plus extra for flouring the pans
- 1/2 teaspoon baking powder
- 1/4 teaspoon salt
- 5 eggs
- 1/2 cup cold water
- 1 1/4 cups white sugar
- 1 teaspoon vanilla extract
- 1/2 teaspoon cream of tartar
Rum Syrup:
- 1/3 cup white sugar
- 1/4 cup water
- 2 tablespoons light rum
Frosting and Garnish:
- 1 teaspoon unflavored gelatin
- 1 tablespoon water
- 2 cups heavy cream
- 2 tablespoons confectioners’ sugar
- 1 cup sliced almonds, toasted
Equipment Needed
- Fine-mesh strainer
- Cheesecloth
- Stand mixer
- Two 9-inch cake pans
- Small saucepan
- Microwave-safe bowl
- Cake board or plate
Instructions
-
Begin by preparing the ricotta filling. Line a fine-mesh strainer with a double layer of wet cheesecloth. Place the ricotta in the strainer and set it over a bowl. Fold the cheesecloth over the top of the ricotta. Refrigerate for at least 4 hours, or up to overnight. This step is crucial for draining excess whey from the ricotta, ensuring a creamy and stable filling. Discard the whey that collects in the bowl. Using whole milk ricotta is essential; low-fat versions are thinner and will result in a soupy filling.
-
Once the ricotta has drained, move on to assembling the filling. In a stand mixer fitted with the paddle attachment, beat the confectioners’ sugar, cinnamon, vanilla extract, and chocolate chips into the thickened ricotta on low speed until well combined. Transfer the filling to a bowl, cover with plastic wrap, and chill until needed. This allows the flavors to meld together beautifully.
-
Now, preheat your oven to 325°F (160°C). Grease and flour two 9-inch cake pans. Ensuring the pans are properly prepared will prevent the cakes from sticking and make removal easier.
-
In a separate bowl, sift together the cake flour, baking powder, and salt. Set aside. Sifting these dry ingredients ensures a light and airy cake.
-
Separate the eggs, placing the whites in one bowl and the yolks in another. Set the whites aside. In the bowl of the stand mixer, beat the yolks until very thick and pale yellow, about 4 minutes. This step incorporates air into the yolks, contributing to the cake’s light texture. Gradually add the cold water, then the sugar, and beat well until the sugar is dissolved. Add the vanilla extract, then slowly add the sifted flour mixture.
-
In a clean bowl, beat the egg whites with the cream of tartar until stiff peaks form. The cream of tartar stabilizes the egg whites, helping them to achieve and maintain their volume. Gently fold the egg whites into the yolk batter carefully, ensuring not to deflate the whites.
-
Divide the batter evenly between the prepared cake pans. Bake in the preheated oven for 25 minutes, or until a cake tester inserted into the center comes out clean. Begin checking for doneness around 23 minutes; oven temperatures can vary.
-
Cool the cakes in the pans for 10 minutes, then turn them out onto a rack to cool completely. Cooling the cakes upside down on the rack can help to prevent them from sinking in the center.
-
While the cakes are cooling, prepare the rum syrup. Place the sugar and water in a small saucepan. Bring to a boil over medium heat, then simmer until the sugar is completely dissolved. Cool to room temperature, then stir in the rum. Allow the syrup to cool completely before using it to soak the cake layers.
-
Split the cake layers horizontally, to make 4 thin layers. This creates more surface area for the rum syrup and filling. Place one layer on a cake board or plate and drizzle or brush with rum syrup. Be generous but avoid oversaturating the cake, which can make it soggy. Top with 1 to 1 1/2 cups of the filling. Place another cake layer on top, and repeat until all four layers have been placed.
-
Next, prepare the frosting. In a microwave-safe bowl, sprinkle the gelatin over the cold water and let stand for five minutes. This allows the gelatin to bloom, ensuring it dissolves properly. Microwave in 10-second intervals until the gelatin is just dissolved, stirring after each interval. If it boils, discard it and start over. Overheating the gelatin can affect its ability to set properly.
-
In a stand mixer, whip the heavy cream with the confectioners’ sugar until soft peaks form. Add the melted gelatin and whip until stiff peaks form. Be careful not to overwhip the cream, which can cause it to become grainy.
-
Spread the frosting over the top and sides of the cake. Press the sliced almonds all around the sides of the cake. The toasted almonds add a lovely crunch and nutty flavor.
Expert Tips & Tricks
- For an extra layer of flavor, consider adding a thin layer of marzipan between the cake and the frosting.
- If you don’t have rum, you can use other liqueurs like brandy or amaretto for the syrup.
- To prevent the bottom cake layer from becoming soggy, place a thin layer of melted chocolate on the cake board before assembling.
- If the cake layers are uneven, use a serrated knife to trim them before assembling the cake.
Serving & Storage Suggestions
Serve the Cassata cake chilled. It can be sliced and served directly from the refrigerator. This cake is best enjoyed within 2-3 days of assembly. Store leftover cake in an airtight container in the refrigerator. Due to the creamy filling and frosting, it’s not recommended to leave it at room temperature for extended periods. Freezing is possible, but the texture of the frosting and filling may change slightly upon thawing.
Nutritional Information
| Nutrient | Amount per Serving | % Daily Value |
|---|---|---|
| Calories | 631.5 kcal | N/A |
| Calories from Fat | 286 g | 45% |
| Total Fat | 31.9 g | 49% |
| Saturated Fat | 17.2 g | 86% |
| Cholesterol | 170.4 mg | 56% |
| Sodium | 174.5 mg | 7% |
| Total Carbohydrate | 72.1 g | 24% |
| Dietary Fiber | 1.6 g | 6% |
| Sugars | 53 g | N/A |
| Protein | 15.3 g | 30% |
Note: Nutritional information is an estimate and may vary based on specific ingredients and preparation methods.
Variations & Substitutions
- Citrus Zest: Add orange or lemon zest to the ricotta filling for a brighter, more vibrant flavor.
- Candied Fruit: Incorporate chopped candied fruit into the filling for a more traditional Cassata.
- Chocolate Cake: Use chocolate cake layers instead of vanilla for a richer, more decadent version.
- Gluten-Free: Use a gluten-free cake flour blend to make the cake gluten-free.
FAQs (Frequently Asked Questions)
Q: Can I use low-fat ricotta cheese?
A: It’s best to use whole milk ricotta cheese for the filling. Low-fat versions are thinner and will result in a soupy filling that won’t hold its shape as well.
Q: Can I make the cake ahead of time?
A: Yes, you can bake the cake layers and prepare the ricotta filling a day in advance. Store them separately in the refrigerator until you’re ready to assemble the cake.
Q: How do I prevent the cake layers from becoming soggy?
A: Be careful not to oversaturate the cake layers with the rum syrup. Drizzle or brush it on lightly. You can also place a thin layer of melted chocolate on the cake board before assembling.
Q: Can I freeze the assembled Cassata cake?
A: Yes, you can freeze the assembled cake, but the texture of the frosting and filling may change slightly upon thawing. Wrap it tightly in plastic wrap and then in foil before freezing.
Q: What if I don’t have time to make the rum syrup?
A: You can substitute with another liqueur or even a simple syrup flavored with vanilla extract. The rum syrup adds a unique flavor, but other options can still work well.
Final Thoughts
Now that you’re armed with this recipe, I encourage you to embark on your own Cassata cake adventure. This isn’t just a dessert; it’s a slice of Sicilian history and a celebration of simple, high-quality ingredients. Don’t hesitate to experiment with variations and make it your own. And please, share your creations and experiences! Perhaps serve your Cassata with a chilled glass of Vin Santo for the perfect pairing. Buon appetito!