
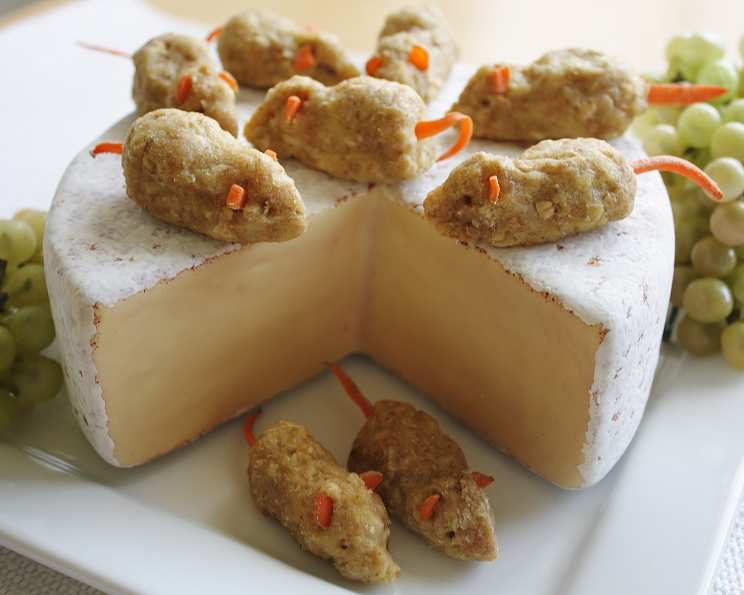
Cat-N-Kitten Chicken Mouse Treats: A Purr-fectly Healthy Snack
I remember the first time I tried making homemade pet treats. I’d always meticulously prepared balanced meals for my own dogs, but it seemed like store-bought treats were just full of…well, things I couldn’t even pronounce. That’s when I started experimenting, and the joy on my pups’ faces when they devoured my creations was incredibly rewarding. I started thinking about my friends and neighbors who had cats and the challenges they faced in sourcing healthy, appealing snacks for their furry companions. It seemed like the feline world was often overlooked, and that is how this little treat came to be. With a little creativity and a focus on wholesome ingredients, this recipe quickly became a favorite among the neighborhood cats, a testament to the fact that even the pickiest eaters appreciate a tasty, homemade snack made with love.
Recipe Overview
- Prep Time: 20 minutes
- Cook Time: 25 minutes
- Total Time: 45 minutes
- Yields: 36 treats
- Serves: Varies (Treat)
- Dietary Type: High-Protein, Grain-Influenced
Ingredients
- 1 lb ground chicken
- ½ cup whole wheat flour
- ½ cup quick oats
- 1 large egg
- 1 teaspoon catnip, minced (optional)
- 4-6 baby carrots
Equipment Needed
- Large Mixing Bowl
- Baking Sheet
- Parchment Paper (Optional)
- Nonstick Cooking Spray (Optional)
- Sharp Knife
- Toothpick
Instructions
-
Preheat your oven to 350 degrees F (175 degrees C). Prepare a baking sheet by either greasing it lightly with nonstick cooking spray or lining it with parchment paper. This will prevent the treats from sticking. Set the prepared baking sheet aside.
-
In a medium-sized mixing bowl, combine the ground chicken, whole wheat flour, quick oats, egg, and minced catnip (if using). The catnip is entirely optional, but most cats seem to enjoy the flavor and aroma it adds.
-
Using your hands, thoroughly mix all the ingredients together until they are fully incorporated and the mixture is smooth. The consistency should be firm enough to hold its shape. If the mixture seems too wet or sticky, gradually add a little more flour, a tablespoon at a time, until you achieve the desired consistency.
-
Take approximately 1 to 2-inch round balls of the mixture and gently roll them between your palms. Then, shape each ball into an oval. Gently pinch one end of the oval to create a pointed “nose,” mimicking the shape of a mouse.
-
Carefully arrange the formed mouse shapes in rows on the prepared baking sheet, leaving a little space between each treat to allow for even baking.
-
Now, prepare the “ears” for the mice. Cut thin disks from 2 to 3 baby carrots. Then, cut each disk in half and then cut each half in half again, resulting in 4 small wedges from each baby carrot disk. These wedges will serve as the mouse ears.
-
Take two small carrot wedges and gently press them onto the top of each mouse shape, creating the ears. Repeat this process until all the mouse treats have two ears each. Press them firmly enough so they stay in place during baking.
-
Next, create the “tails” for the mice. Using the remaining baby carrots, carefully slice 36 thin (lengthwise) strips to use as tails. You can achieve this by first cutting the carrot into thin planks and then cutting the planks into thin strips.
-
Insert one carrot strip firmly into the back of each mouse treat, creating a tail. Press it in well so it stays in place while baking.
-
Finally, create the “eyes” for the mice. Using a toothpick, gently poke two small holes on the head of each mouse treat where the eyes would be. These holes are primarily for aesthetic purposes, giving the treats a more finished look.
-
Place the baking sheet in the preheated oven and bake for 20 to 25 minutes. The treats are done when they are firm to the touch and slightly golden brown on the bottom. Keep a close eye on them during the last few minutes of baking to prevent burning.
-
Once baked, carefully remove the baking sheet from the oven and let the mouse treats cool completely on the baking sheet before handling them. This allows them to firm up further and prevents them from breaking apart.
-
Once the treats are completely cool, you can store them. Place them in a covered container and store them in the refrigerator for up to 2 weeks. For longer storage, you can freeze them in an airtight container for several months.
-
This recipe makes approximately 36 mouse treats.
Expert Tips & Tricks
- Consistency is Key: The texture of the chicken mixture is crucial. If it’s too wet, the treats will spread during baking. If it’s too dry, they’ll be crumbly. Adding a little more flour or a tiny bit of water (if too dry) can fix this.
- Baking Time: Ovens vary, so keep a close eye on the treats. They should be firm and lightly golden. If they start to brown too quickly, you can tent the baking sheet with foil.
- Catnip Power: Catnip isn’t just a fun addition, it can also help entice picky eaters. However, some cats don’t react to catnip, so don’t worry if your cat isn’t immediately interested.
- Size Matters: Adjust the size of the treats according to your cat’s size and dietary needs. Smaller treats are great for kittens or for training.
- Safe Substitutions: If your cat has allergies, you can substitute the whole wheat flour with oat flour or rice flour. Make sure to check with your vet before making any significant dietary changes.
Serving & Storage Suggestions
Serve these treats as a reward or a special snack for your feline friend. Start with a small amount to see how your cat reacts to the new treat.
Store the cooled treats in an airtight container in the refrigerator for up to 2 weeks. For longer storage, freeze them in an airtight container for up to 3 months. When freezing, it’s a good idea to freeze them in single layers to prevent them from sticking together. To thaw, simply remove the desired number of treats from the freezer and let them thaw in the refrigerator for a few hours or overnight. They are best served cold or at room temperature.
Nutritional Information
Note: Nutritional information is an estimate and may vary based on specific ingredient brands and preparation methods.
| Nutrient | Amount per Serving | % Daily Value (Estimated) |
|---|---|---|
| Calories | ~30 kcal | N/A |
| Total Fat | ~1.3g | N/A |
| Saturated Fat | ~0.4g | N/A |
| Cholesterol | ~16mg | N/A |
| Sodium | ~10mg | N/A |
| Total Carbohydrate | ~2g | N/A |
| Dietary Fiber | ~0.3g | N/A |
| Sugars | ~0.1g | N/A |
| Protein | ~2.7g | N/A |
Variations & Substitutions
- Fishy Treats: Substitute the ground chicken with an equal amount of flaked cooked salmon or tuna for a fish-flavored variation. Be sure to remove any bones from the fish before mixing.
- Grain-Free: Replace the whole wheat flour and quick oats with almond flour or coconut flour for a grain-free option. You may need to adjust the amount of flour to achieve the right consistency.
- Vegetarian Option: While cats are obligate carnivores, you can still create palatable treats with a small amount of cooked and pureed sweet potato or pumpkin, reducing the amount of chicken slightly.
- Herb Infusion: Experiment with other cat-safe herbs, such as rosemary or thyme (in very small amounts), to add different flavor profiles to the treats.
FAQs (Frequently Asked Questions)
Q: Can I use cooked chicken instead of ground chicken?
A: Yes, you can use cooked chicken. Just make sure it’s finely shredded or processed in a food processor before mixing it with the other ingredients.
Q: My cat is allergic to wheat. What can I substitute the flour with?
A: You can use oat flour, rice flour, or almond flour as a gluten-free alternative. Be sure to check with your vet if you are concerned about allergies.
Q: How long will these treats last?
A: Stored in the refrigerator in an airtight container, these treats will last up to 2 weeks. They can also be frozen for up to 3 months.
Q: Can I add other vegetables to the recipe?
A: Yes, you can add finely grated or pureed vegetables such as zucchini or carrots in small amounts, but ensure they are cat-safe and don’t exceed 1/4 cup.
Q: My cat is very picky. What can I do to make these treats more appealing?
A: Try adding a small amount of tuna juice or a sprinkle of Parmesan cheese (if your cat tolerates dairy) to the mixture. Alternatively, ensure the catnip is fresh and aromatic.
Final Thoughts
Creating these Cat-N-Kitten Chicken Mouse Treats isn’t just about providing a snack; it’s about showing your feline companion some extra love and care. Knowing exactly what goes into their treats gives you peace of mind, and the joy of seeing them enjoy something you’ve made is truly rewarding. So, gather your ingredients, put on your apron, and get ready to create a batch of these adorable and healthy treats for your beloved cat. Don’t hesitate to get creative with variations and substitutions to cater to your cat’s specific tastes and dietary needs. I would love to hear about your experience making these treats and any variations you tried – please share your feedback, stories, and pictures!