
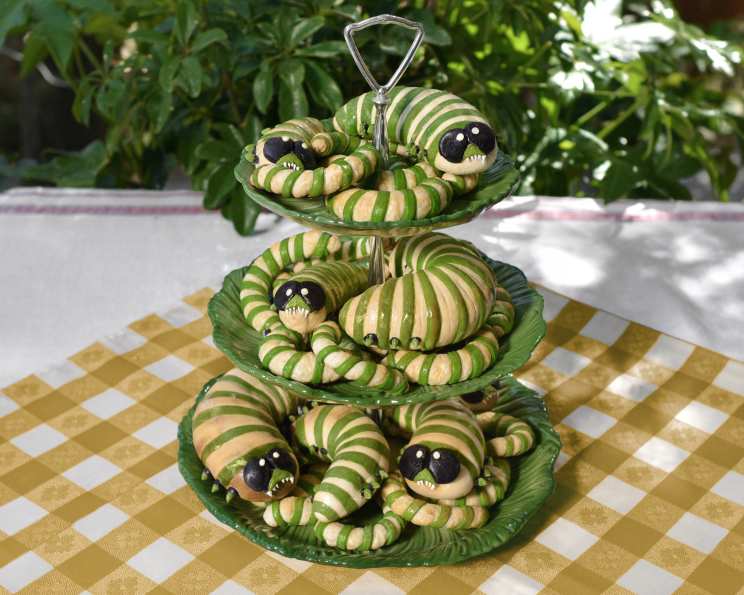
Caterpillar Croissants: A Whimsical Pastry Adventure
I’ll never forget the day my niece, Lily, declared that everything needed more sprinkles and, even better, should resemble a bug. It was a tall order, especially considering I was aiming for something a tad more sophisticated than a plate of chocolate-covered ants. But Lily’s imagination is infectious, and her request sparked a delightful pastry project that resulted in these charming caterpillar croissants. Each stripe, each little foot, is a testament to the joy of baking and the magic of seeing the world through a child’s eyes. These aren’t just croissants; they’re edible art, guaranteed to bring a smile to faces of all ages.
Recipe Overview
- Prep Time: 8 hours 35 minutes
- Cook Time: 20 minutes
- Total Time: 8 hours 55 minutes
- Yields: 25 Croissants of varying sizes
- Dietary Type: Not specified
Ingredients
BLACK DOUGH (yeast-free)
- 1 tablespoon black gel food coloring
- 3 tablespoons room temperature water
- ½ cup room temperature whole milk
- 3 tablespoons sugar
- ½ tablespoon unsalted butter, melted
- ½ cup plus 2 tablespoons bread flour
- ⅛ cup all-purpose flour, plus more for working
- ¼ tablespoon salt
- ½ tablespoon melted butter
WHITE DOUGH (yeast-free)
- 1 tablespoon white gel food coloring
- 3 tablespoons room temperature water
- ½ cup room temperature whole milk
- 3 tablespoons sugar
- ½ tablespoon unsalted butter, melted
- ½ cup plus 2 tablespoons bread flour
- ⅛ cup all-purpose flour, plus more for working
- ¼ tablespoon salt
- ½ tablespoon melted butter
GREEN Dough (Yeast-free)
- 1 tablespoon leaves green gel food coloring
- 3 tablespoons room temperature water
- ½ cup room temperature whole milk
- 3 tablespoons sugar
- ½ tablespoon unsalted butter, melted
- ½ cup plus 2 tablespoons bread flour
- ⅛ cup all-purpose flour, plus more for working
- ¼ tablespoon salt
- ½ tablespoon melted butter
Croissant Base
- ½ ounce active dry yeast
- ¼ cup warm water (about 100 degrees F)
- ¼ cup sugar
- 2 tablespoons unsalted butter, melted, plus more for bowl
- 2 ¼ cups bread flour
- 3 cups all-purpose flour
- 2 tablespoons all-purpose flour
- 1 tablespoon salt
- 2 cups warm whole milk
For the butter sheet
- ¼ cup all-purpose flour
- 2 cups butter, softened
ROYAL ICING
- 3 large egg whites
- 3 ½ cups confectioners’ sugar
- brown food coloring
Equipment Needed
- Stand mixer
- Dough hook attachment
- Glass bowls
- Zip lock bags
- Parchment paper
- Rolling pin
- Pastry cutter
- Ruler
- Large bowl for covering
- Baking sheet
Instructions
-
Prepare the Colored Doughs: For each of the colored doughs (black, white, and green), begin by combining the food coloring, water, milk, and sugar in a glass bowl. Whisk vigorously until well combined.
-
Combine Dry Ingredients: In a separate bowl, combine the appropriate amounts of bread flour, all-purpose flour, and salt for the dough you are working on.
-
Mix the Dough: Pour the dry ingredients, wet ingredients, and melted butter into a stand mixer fitted with a dough hook. Mix on low speed for approximately five minutes, until a dough forms. If the dough appears too dry and you notice crumbs that haven’t incorporated after five minutes, add one additional tablespoon of milk. Conversely, if the dough is too sticky, add a tablespoon of flour.
-
Rest the Dough: Once the “dead dough” (dough without leavening agents) is mixed, place it in a zip-lock bag and store it in a cool place until you are ready to use it. Repeat steps 1-4 for each of the black, white and green doughs.
-
Activate the Yeast: In a glass bowl, activate the active dry yeast in warm water and sugar for at least five minutes. The mixture should become foamy.
-
Combine Dry Ingredients for Croissant Base: While the yeast is activating, mix the bread flour, all-purpose flour, and salt in a separate bowl.
-
Warm the Milk: Heat 2 cups of whole milk on the stove or in the microwave, ensuring it doesn’t exceed 110 degrees F.
-
Mix the Croissant Dough: In a stand mixer fitted with a dough hook attachment, combine the melted butter, warm milk, and activated yeast mixture. Pour in the flour mixture and mix on low speed for about five minutes until the dough forms.
-
First Rise: Remove the dough from the mixer and place it in a greased bowl. Cover with a damp cloth and let it rise for about an hour.
-
Prepare the Butter Sheet: While the dough is rising, prepare the butter sheet. Beat the softened butter in a stand mixer with the all-purpose flour until very light and fluffy. Spread the mixture out on a large sheet of parchment paper to a thickness of about 1/8 inch, creating a rectangle roughly 8×14 inches. Cover with another sheet of parchment paper and refrigerate until firm but pliable.
-
Chill and Temper Butter Sheet: Remove the butter sheet from the refrigerator and allow it to warm slightly before using.
-
First Fold: Once the croissant dough has risen, punch it down and roll it out on a large, clean surface dusted with flour. Roll it into a roughly 16×16-inch square. Place the butter sheet on one half of the dough and fold the other half over it, pressing the edges to seal. Ensure the butter is soft enough to fold without breaking but not so warm that it melts out.
-
Book Fold: Fold one end of the dough 1/4 of the length towards the center, and repeat on the opposite side. Then, fold the resulting rectangle in half once more, creating a “book-like” shape.
-
Chill: Wrap the dough tightly in plastic wrap and refrigerate overnight.
-
Lamination: In the morning, carefully roll out the dough book into an 8-inch by 14-inch rectangle and repeat the folding process (refrigerating for one hour between each fold). Do this at least 3-4 times. The more you laminate the dough, the flakier and more layered your croissant will be.
-
Shape the Caterpillars: Once the dough has been folded and laminated enough, roll it out and cut it into your desired shapes. For the caterpillars, cut out several 3×3-inch, 6×4-inch, and 8×6-inch squares. Roll each square into a cylindrical shape to create the little bodies.
-
Seal and Smooth: Cover and seal each cylinder with a very thin coat of the white “dead dough” (dough without yeast). This will provide a smooth surface for decorating.
-
Preheat Oven: Preheat your oven to 375 degrees F.
-
Apply Green Stripes: Roll out the green dough to a little thinner than 1/8 of an inch thickness. Use a ruler and pastry cutter to cut out 1/4-inch strips.
-
Wrap the Caterpillars: Fuse the end of each green strip to the underside of a croissant using a bit of egg wash (one egg beaten with 1 tablespoon of water). Gently wrap the green dough in a spiral formation around the length of each croissant, using egg wash to ensure it stays in place.
-
Proofing: Prepare three croissants at a time, covering them with a large bowl to prevent drying. Allow them to rise for approximately 40 minutes.
-
Egg Wash and Bake: Baste the croissants with egg wash and bake in the preheated oven for roughly 20 minutes. Check after 10 minutes to ensure they don’t over-brown.
-
Add Features: Once the croissants are baked, use the remaining black, white, and green dead doughs to cut out the eyes and feet. Affix each feature using egg wash as glue.
-
Final Bake: Return the decorated croissants to the oven for about 5 minutes until the features are baked and set.
-
Royal Icing Teeth: The teeth can be created with a little piped royal icing made with egg whites, confectioners’ sugar, and brown food coloring.
Expert Tips & Tricks
- Butter Consistency is Key: The butter for the butter sheet should be firm but pliable. Too hard, and it will break through the dough; too soft, and it will melt and create a greasy croissant.
- Chill Time is Crucial: Don’t skip the chilling steps between folds. This allows the gluten to relax and the butter to firm up, preventing it from melting into the dough.
- Don’t Overwork the Dough: Handle the dough gently during lamination to avoid developing too much gluten, which can result in a tough croissant.
- Humidity Control: If your environment is humid, you may need to add a bit more flour to the dough to prevent it from becoming too sticky.
- Get Creative with Colors: Feel free to experiment with different food colorings to create a vibrant rainbow of caterpillar stripes!
Serving & Storage Suggestions
Serve these delightful caterpillar croissants fresh from the oven for the ultimate flaky, buttery experience. They are best enjoyed within a day or two of baking. Store leftover croissants in an airtight container at room temperature for up to 2 days, or in the refrigerator for up to 4 days. For longer storage, freeze them in an airtight container for up to 2 months. To reheat, bake in a preheated oven at 350°F (175°C) for about 5-10 minutes, or until warmed through.
Nutritional Information
(Note: These values are estimates and can vary based on specific ingredients and portion sizes.)
| Nutrient | Amount per Serving | % Daily Value |
|---|---|---|
| Calories | 402 kcal | 20% |
| Total Fat | 18.6g | 28% |
| Saturated Fat | 11.5g | 57% |
| Cholesterol | 48.6mg | 16% |
| Sodium | 647.2mg | 26% |
| Total Carbohydrate | 53.8g | 17% |
| Dietary Fiber | 1.2g | 4% |
| Sugars | 24.8g | 99% |
| Protein | 5.8g | 11% |
Variations & Substitutions
- Vegan Caterpillars: Use plant-based milk and butter alternatives to create a vegan version of this recipe. Be sure to check the fat content of the vegan butter, as some varieties may not perform as well in lamination.
- Gluten-Free: While adapting this recipe to be gluten-free will be challenging, you could experiment with a high-quality gluten-free croissant dough recipe as the base.
- Flavor Variations: Add extracts like vanilla or almond to the dough for a hint of extra flavor. You could also incorporate spices like cinnamon or cardamom for a warm, inviting aroma.
- Seasonal Colors: Change the colors of the stripes to match the seasons. Use autumnal hues like orange, yellow, and brown in the fall, or pastel shades in the spring.
FAQs (Frequently Asked Questions)
Q: Why do I need to make a “dead dough” without yeast?
A: The “dead dough” is used for the colored stripes and facial features. Because it doesn’t contain yeast, it won’t rise and distort the shape of your caterpillar design during baking.
Q: Can I use store-bought croissant dough for this recipe?
A: While you can use store-bought dough, the results may not be as impressive as with homemade. The lamination and flakiness of homemade dough are what give these croissants their signature texture.
Q: My butter keeps melting when I’m laminating the dough. What can I do?
A: Make sure your butter is properly chilled and that you’re working in a cool environment. If the butter starts to melt, return the dough to the refrigerator for a longer chilling period before continuing.
Q: How do I prevent the stripes from peeling off during baking?
A: Using a generous amount of egg wash will help the stripes adhere to the croissant dough. Also, ensure that the stripes are firmly pressed onto the dough before baking.
Q: Can I freeze the unbaked croissants for baking later?
A: Yes, you can freeze the unbaked croissants after shaping them. Place them on a baking sheet lined with parchment paper and freeze until solid. Then, transfer them to a freezer bag or container. When ready to bake, thaw them overnight in the refrigerator and then proof as directed in the recipe before baking.
Final Thoughts
These caterpillar croissants are more than just a delicious treat; they’re a fun and creative project that brings joy to the baking process. Don’t be afraid to get creative with your decorations and embrace the imperfections – after all, each caterpillar is unique! So gather your ingredients, roll up your sleeves, and prepare to embark on a whimsical pastry adventure. Share your creations with friends and family, and don’t forget to tag me in your photos – I can’t wait to see your adorable caterpillar creations!