
A Taste of Tradition: Baking the Perfect Challah
My grandmother, Bubbe Rose, had hands that knew dough like they knew her own grandchildren. I remember the warm, yeasty aroma that always filled her kitchen, a fragrant promise of something special. The scent would curl around you like a hug, drawing you in to watch the magic unfold. Bubbe Rose never used a recipe, just a lifetime of feeling and instinct. While my own challah journey started with a Betty Crocker cookbook, the feeling of connection, the weight of the dough, and the golden sheen of the finished loaf still brings me right back to her kitchen.
Recipe Overview
- Prep Time: 2 hours 30 minutes (including rising time)
- Cook Time: 25-30 minutes
- Total Time: 2 hours 55 minutes – 3 hours
- Yields: 1 large loaf (approximately 16 slices)
- Serves: 16
- Dietary Type: Dairy-Free (can be modified to be vegetarian, see variations)
Ingredients
- 2 1⁄2 – 2 3⁄4 cups all-purpose flour or bread flour (I prefer bread flour for a chewier texture)
- 2 1⁄2 teaspoons dry yeast or quick active dry yeast
- 2 tablespoons sugar
- 1 teaspoon salt
- 3⁄4 cup water
- 1 tablespoon vegetable oil, plus more for greasing the bowl and brushing the loaf
- 1 large egg
- 1 egg yolk
- 2 tablespoons cold water
- Poppy seeds, for sprinkling (optional, sesame seeds are also great!)
Equipment Needed
- Large mixing bowl
- Electric mixer (optional, can be kneaded by hand)
- Measuring cups and spoons
- Lightly floured surface
- Greased bowl for rising
- Cookie sheet
- Wire rack
- Pastry brush
Instructions
-
Combine the dry ingredients: In a large bowl, mix together 1 1/4 cups of the flour, the yeast, sugar, and salt. Make sure the yeast isn’t expired for optimal rising!
-
Heat the wet ingredients: Heat the water and 1 tablespoon of vegetable oil in a microwave-safe container or on the stovetop until very warm (120 to 130°F). This temperature is crucial for activating the yeast. Too hot, and you’ll kill the yeast; too cold, and it won’t activate. Use a thermometer for accuracy.
-
Combine wet and dry: Add the warm water mixture to the flour mixture in the large bowl.
-
Mix: Using an electric mixer on low speed, beat the mixture for 1 minute, scraping the bowl frequently. This helps to incorporate all the ingredients.
-
Increase speed: Beat on medium speed for another minute, again scraping the bowl frequently. You should see the dough starting to come together.
-
Add the egg: Beat in 1 egg until the dough is smooth.
-
Incorporate the remaining flour: Stir in enough of the remaining flour to form a dough that is easy to handle. You might not need all of the remaining flour, so add it gradually until the dough pulls away from the sides of the bowl.
-
Knead the dough: Turn the dough out onto a lightly floured surface. Knead the dough for about 5 minutes, or until it becomes smooth and elastic. Kneading develops the gluten, which gives challah its characteristic texture. If the dough is too sticky, add a little more flour, a tablespoon at a time.
-
First rise: Place the dough in a greased bowl, turning it to coat all sides with the grease. This prevents the dough from drying out. Cover the bowl with plastic wrap or a clean kitchen towel and let it rise in a warm place for 1 1/2 to 2 hours, or until doubled in size. A warm place is key – I often put mine in a slightly warmed oven (turned off!) or near a sunny window.
-
Check for readiness: The dough is ready when an indentation remains when you gently press your finger into it.
-
Prepare the baking sheet: Lightly grease a cookie sheet with shortening or cooking spray.
-
Punch down the dough: Punch down the dough to release the air. This helps to even out the texture.
-
Divide the dough: Divide the dough into 3 equal parts.
-
Shape the ropes: Roll each part into a rope, about 14 inches long. Try to keep the ropes as even in thickness as possible for a uniform braid.
-
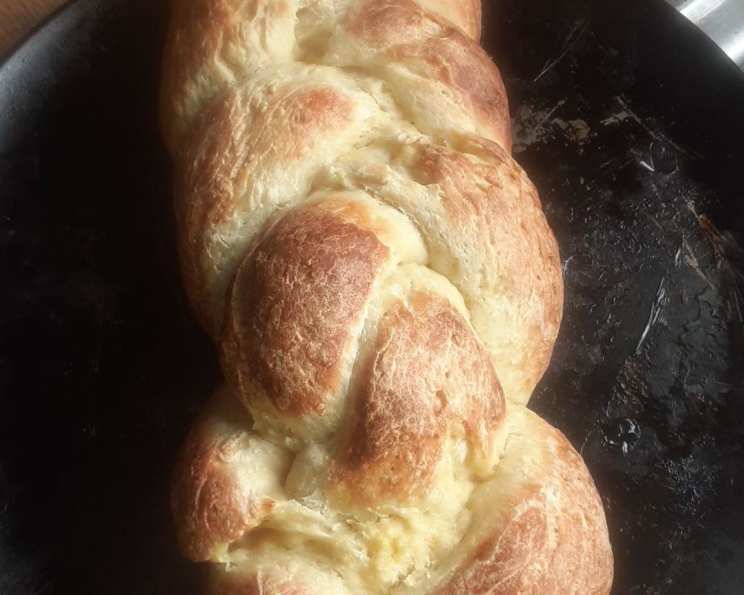
Braid the challah: Place the ropes close together on the prepared cookie sheet. Braid the ropes gently and loosely – do not stretch them too much. This allows the dough to rise properly during the second proofing.
-
Secure the ends: Fasten the ends of the braid and tuck them under the loaf securely. This prevents the braid from unraveling during baking.
-
Brush with oil: Brush the entire loaf with vegetable oil. This helps to keep the crust soft.
-
Second rise: Cover the braided loaf and let it rise in a warm place for 40 to 50 minutes, or until doubled in size.
-
Preheat the oven: Preheat the oven to 375°F (190°C).
-
Prepare the egg wash: In a small bowl, mix together the egg yolk and 2 tablespoons of cold water.
-
Egg wash and seeds: Gently brush the egg yolk mixture over the entire surface of the braid. This gives the challah its beautiful golden-brown color and shine. Sprinkle with poppy seeds, if desired.
-
Bake: Bake for 25 to 30 minutes, or until golden brown.
-
Check for doneness: Check the bread at 15 minutes. If it seems to be browning too quickly, tent it loosely with aluminum foil to prevent burning. The internal temperature should reach 190-200°F.
-
Cool: Remove the challah from the cookie sheet and place it on a wire rack to cool completely before slicing.
Expert Tips & Tricks
- Use a stand mixer: While you can knead the dough by hand, a stand mixer with a dough hook makes the process much easier, especially for larger batches.
- Proof the yeast: If you’re unsure about your yeast’s viability, proof it by dissolving it in the warm water with a teaspoon of sugar. If it foams up after 5-10 minutes, it’s good to go.
- Don’t over-knead: Over-kneading can result in a tough challah. Aim for a smooth, elastic dough.
- Control the rise: Temperature is key for rising. Too cold, and it will take much longer; too hot, and the dough may rise too quickly and collapse.
- Get creative with braiding: There are many different braiding techniques for challah, from simple 3-strand braids to more complex 6-strand or even round braids. Experiment and find your favorite!
- Add inclusions: Raisins, chocolate chips, or even savory herbs can be added to the dough for extra flavor.
- Freezing: Baked challah freezes beautifully. Wrap it tightly in plastic wrap and then foil, and it will keep for up to 2 months.
Serving & Storage Suggestions
Challah is best served fresh, ideally within a day or two of baking. It’s delicious on its own, toasted with butter, or used for sandwiches. It also makes fantastic French toast! Store leftover challah in an airtight container at room temperature for up to 3 days, or in the refrigerator for up to a week. To reheat, wrap individual slices in foil and warm in a low oven (300°F) for a few minutes.
Nutritional Information
Please note that these values are approximate and can vary based on specific ingredients and portion sizes.
| Nutrient | Amount per Serving | % Daily Value |
|---|---|---|
| Calories | 94.3 kcal | N/A |
| Calories from Fat | 14 kcal | N/A |
| Total Fat | 1.6 g | 2% |
| Saturated Fat | 0.3 g | 1% |
| Cholesterol | 22 mg | 7% |
| Sodium | 151.3 mg | 6% |
| Total Carbohydrate | 16.8 g | 5% |
| Dietary Fiber | 0.7 g | 2% |
| Sugars | 1.6 g | N/A |
| Protein | 2.8 g | 5% |
Variations & Substitutions
- Vegan Challah: Substitute the egg and egg yolk with flax eggs (1 tbsp ground flaxseed mixed with 3 tbsp water, let sit for 5 minutes) or applesauce. Use a plant-based milk (almond, soy, or oat) for the egg wash, brushed with a bit of maple syrup or agave for shine.
- Gluten-Free Challah: This is a bit trickier but possible! Use a high-quality gluten-free bread flour blend and add xanthan gum to help bind the dough. Gluten-free doughs tend to be drier, so you may need to add a bit more water. Be prepared for a slightly different texture.
- Sweet Challah: Add more sugar (up to 1/4 cup) and a teaspoon of vanilla extract to the dough for a sweeter flavor. You can also add dried fruit like raisins or cranberries.
- Savory Challah: Omit the sugar or reduce it to 1 tablespoon. Add herbs like rosemary, thyme, or garlic powder to the dough. Top with everything bagel seasoning or flaky sea salt before baking.
- Honey Challah: Substitute some of the sugar with honey for a richer flavor. Use about 1-2 tablespoons of honey in place of sugar.
FAQs (Frequently Asked Questions)
Q: Can I make the dough ahead of time?
A: Yes! You can prepare the dough through the first rise and then refrigerate it overnight. Let it come to room temperature for about an hour before shaping and baking.
Q: My challah is browning too quickly. What should I do?
A: Tent the challah loosely with aluminum foil to prevent it from burning.
Q: My dough isn’t rising. What could be the problem?
A: The yeast might be old or the water might not have been warm enough. Also, the environment might be too cold for proper rising.
Q: Can I use active dry yeast instead of instant yeast?
A: Yes, you can. You may need to let the yeast proof in the warm water for 5-10 minutes before adding it to the other ingredients.
Q: How do I get a shiny crust on my challah?
A: The egg wash is key! Make sure to brush the challah evenly with the egg yolk and water mixture before baking. A second coat after the first 15 minutes of baking can also help.
Final Thoughts
There’s something truly special about the process of making challah. From the simple ingredients to the intricate braiding, each step is an act of love and tradition. Whether you’re a seasoned baker or just starting out, I encourage you to give this recipe a try. Share your creations with loved ones, and don’t be afraid to experiment with different flavors and techniques. The most important ingredient is always the joy of baking! I hope this recipe brings the same warm, yeasty aroma and sense of connection to your kitchen as it does to mine.