
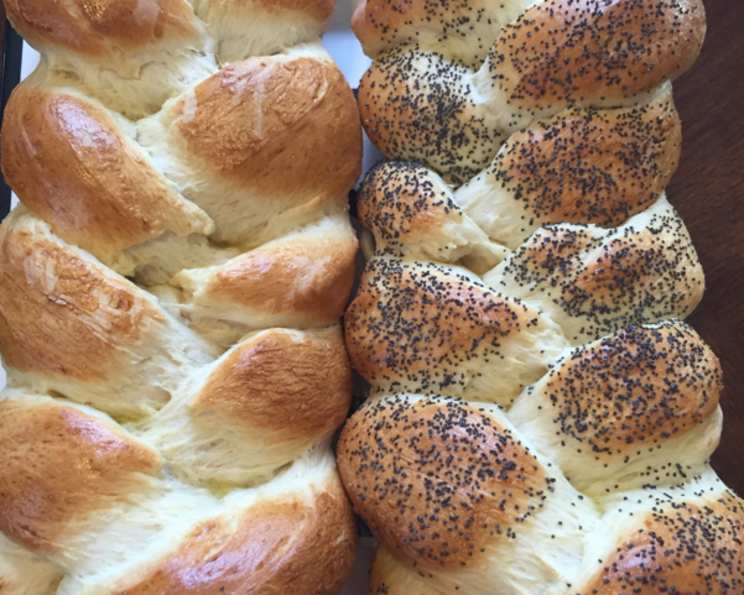
My Grandmother’s KitchenAid Challah: A Symphony of Tradition and Modern Ease
The scent of challah baking in the oven is more than just an aroma; it’s a portal back to my grandmother’s bustling kitchen. I remember standing on a stool, mesmerized as she braided the dough, her hands moving with practiced grace. The warm, yeasty fragrance would fill the house, a promise of Shabbat dinners filled with laughter, family, and the unparalleled taste of her homemade challah. While she mixed everything by hand, I’ve adapted her recipe to utilize the trusty KitchenAid, making it accessible to even the busiest of modern bakers, without sacrificing the essence of her original masterpiece.
Recipe Overview: KitchenAid Challah
- Prep Time: 25 minutes
- Cook Time: 15-20 minutes
- Total Time: 2 hours (including rising time)
- Yields: 4 medium-size challahs
- Dietary Type: Dairy Free
Ingredients
- 2 cups water
- 3 tablespoons dry yeast
- 1/2 cup sugar
- 2 eggs
- 1/4 cup oil (vegetable or canola recommended)
- 7 – 7 1/2 cups flour (all-purpose or bread flour)
- 1/2 tablespoon salt
- Optional: 1 egg yolk + 1 tablespoon water for glaze
- Optional: Sesame seeds or poppy seeds for topping
Equipment Needed
- KitchenAid stand mixer with dough hook
- Large mixing bowl (for rising)
- Measuring cups and spoons
- Greased baking sheet
- Pastry brush (if glazing)
Instructions
-
In the KitchenAid mixer bowl, combine the water, dry yeast, and sugar. This mixture needs to proof, allowing the yeast to activate. Let it stand for about 5-10 minutes, or until the mixture starts to bubble, indicating the yeast is alive and ready to work its magic.
-
Add the eggs, oil, flour, and salt to the mixer bowl. Begin with 7 cups of flour and add more, a little at a time, if needed. The amount of flour needed can vary depending on humidity and the type of flour used.
-
Attach the dough hook to your KitchenAid mixer. Mix on speed 2 for approximately 5 minutes. The dough should come together into a smooth, slightly sticky ball. If the dough is sticking excessively to the sides of the bowl, add a tablespoon or two of flour until it pulls away cleanly.
-
Lightly grease a large mixing bowl with oil. Transfer the dough to the greased bowl, turning it to coat all sides. This prevents the dough from drying out as it rises. Cover the bowl tightly with plastic wrap or a clean kitchen towel.
-
Place the covered bowl in a warm, draft-free spot to rise. A slightly warmed oven (turned off!) or a sunny windowsill works well. Let the dough rise until it has roughly doubled in bulk, which typically takes about 1 to 1.5 hours.
-
Once the dough has doubled, gently punch it down to release the air. Turn the dough out onto a lightly floured surface.
-
Divide the dough into four equal portions. For each portion, divide again into either 3 strands for a classic braid, or more for more elaborate braids. Roll each portion into long strands, about 12-14 inches in length.
-
Braid the strands together, pinching the ends to seal. Place the braided challahs on a greased baking sheet, leaving ample space between them.
-
Cover the shaped challahs with a clean kitchen towel and let them rise again for about 30 minutes. This second rise is crucial for a light and airy texture.
-
Preheat your oven to 400°F (200°C).
-
Just before baking, prepare an optional glaze by whisking together the egg yolk and water. Gently brush the glaze over the challahs. This gives them a beautiful golden-brown sheen. If desired, sprinkle the tops with sesame seeds or poppy seeds.
-
Bake the challahs in the preheated oven for 15-20 minutes, or until they are golden brown and sound hollow when tapped on the bottom. Keep an eye on them; ovens can vary, and you want to avoid over-baking.
-
Transfer the baked challahs to a cooling rack to cool completely before slicing and serving.
Expert Tips & Tricks
- The Water Temperature is Key: Use lukewarm water (around 105-115°F or 40-46°C) to activate the yeast properly. Too hot, and you’ll kill the yeast; too cold, and it won’t activate.
- Don’t Overmix: Overmixing can lead to a tough challah. Mix until the dough comes together and is smooth, but don’t continue mixing beyond that point.
- The Windowpane Test: To check if the dough is kneaded enough, try the windowpane test. Take a small piece of dough and gently stretch it between your fingers. If you can stretch it thin enough to see light through it without tearing, it’s ready.
- Proofing in a Humid Environment: Create a humid environment during proofing by placing a pan of hot water on the bottom rack of your oven (with the oven turned off) along with the dough on the rack above. The moisture will help the dough rise evenly and prevent a dry crust from forming.
- Egg Wash Alternatives: For a vegan option, use a mixture of maple syrup and plant-based milk for glazing. It will provide a beautiful shine and subtle sweetness.
Serving & Storage Suggestions
Challah is best enjoyed fresh, still slightly warm from the oven. It’s perfect for slicing and serving with butter, honey, or jam. It’s also an essential part of a traditional Shabbat or holiday meal. Leftover challah can be used to make delicious French toast, bread pudding, or croutons.
To store challah, wrap it tightly in plastic wrap or place it in an airtight container. It will stay fresh at room temperature for 2-3 days. For longer storage, freeze the challah. Wrap it well to prevent freezer burn, and it can be stored in the freezer for up to 2-3 months. To reheat frozen challah, thaw it at room temperature and then warm it in a low oven (around 300°F or 150°C) for 10-15 minutes.
Nutritional Information
(Estimated per slice, assuming 16 slices per challah)
| Nutrient | Amount per Serving | % Daily Value |
|---|---|---|
| Calories | 250 kcal | 13% |
| Total Fat | 8g | 10% |
| Saturated Fat | 1g | 5% |
| Cholesterol | 25mg | 8% |
| Sodium | 200mg | 9% |
| Total Carbohydrate | 40g | 15% |
| Dietary Fiber | 2g | 8% |
| Sugars | 4g | |
| Protein | 6g | 12% |
Variations & Substitutions
- Whole Wheat Challah: Substitute up to half of the all-purpose flour with whole wheat flour for a nuttier flavor and increased fiber.
- Sweet Challah: Add 1/4 cup of honey or maple syrup to the dough for a sweeter challah. You can also incorporate raisins, dried cranberries, or chocolate chips.
- Savory Challah: Add herbs like rosemary, thyme, or garlic powder to the dough for a savory twist. Top with everything bagel seasoning before baking.
- Gluten-Free Challah: Use a gluten-free flour blend designed for bread making. Be sure to follow the blend’s instructions, as gluten-free flours often require different hydration levels.
- Vegan Challah: Replace the eggs with flax eggs (1 tablespoon ground flaxseed mixed with 3 tablespoons water per egg). Ensure your yeast is vegan-friendly (some brands contain dairy).
FAQs (Frequently Asked Questions)
Q: Why is my challah dense and not light and airy?
A: Several factors can contribute to dense challah, including using expired yeast, not proofing the dough long enough, or over-kneading the dough. Make sure your yeast is fresh, allow the dough to rise fully, and avoid overmixing.
Q: Can I make the dough ahead of time and bake it later?
A: Yes, you can make the dough ahead of time. After the first rise, punch down the dough, wrap it tightly, and refrigerate it for up to 24 hours. Let it come to room temperature for about 30 minutes before shaping and baking.
Q: My challah is browning too quickly in the oven. What should I do?
A: If the challah is browning too quickly, tent it loosely with aluminum foil during the last 5-10 minutes of baking. This will prevent it from burning while allowing the inside to cook through.
Q: Can I freeze challah dough before baking?
A: Yes, you can freeze challah dough after the first rise. Punch down the dough, wrap it tightly, and freeze it. When ready to bake, thaw the dough in the refrigerator overnight, then proceed with shaping and baking as directed.
Q: Why is my challah not rising properly?
A: The most common reason for challah not rising is inactive yeast. Always check the expiration date of your yeast and make sure the water is not too hot, as high temperatures can kill the yeast. A warm environment is also essential for proper rising.
Final Thoughts
Now, armed with my grandmother’s wisdom and the convenience of the KitchenAid, you too can create this beloved bread. Don’t be intimidated by the braiding; it’s simpler than it looks, and even imperfect braids add to the charm. Gather your ingredients, embrace the process, and prepare to fill your home with the irresistible aroma of freshly baked challah. I encourage you to share your creations, experiment with variations, and most importantly, enjoy the experience of connecting with tradition through this delicious bread. Serve it alongside a hearty stew or simply enjoy it with a smear of your favorite jam – either way, it’s sure to be a crowd-pleaser!