
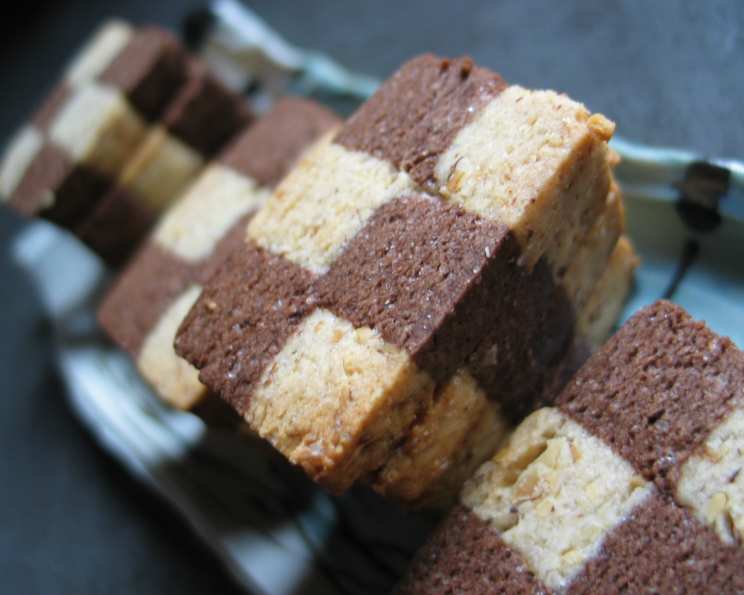
Checkerboard Cookies: A Timeless Classic
I remember being a kid, utterly mesmerized by these cookies. The way the dark and light squares danced together always seemed like a little magic trick. My grandmother, a woman whose hands could coax beauty out of anything, would carefully assemble them. It wasn’t just the taste of buttery shortbread with a hint of chocolate that made them special; it was the love and meticulous care that went into each perfect little square. Making checkerboard cookies always feels like a way to keep that magic alive.
Recipe Overview
- Prep Time: 45 minutes
- Cook Time: 5-7 minutes
- Total Time: 1 hour (plus chilling time)
- Yields: 3 dozen
- Dietary Type: Vegetarian
Ingredients
- 1/3 cup hazelnuts, toasted
- 2 tablespoons unsweetened cocoa powder
- 2 1/2 cups all-purpose flour
- 1/8 teaspoon salt
- 1 cup unsalted butter, room temperature
- 3/4 cup sugar
- 1 large egg
- 1 1/2 teaspoons pure vanilla extract
- 1 1/2 teaspoons orange zest
Equipment Needed
- Food processor
- Small bowl
- Hand mixer
- Parchment paper
- Baking sheet
- Plastic wrap
- Cutting board
- Sharp long knife
- Wire rack
Instructions
-
First, prepare the hazelnut-cocoa mixture. Place the toasted hazelnuts in your food processor along with the cocoa powder. Process until the hazelnuts are finely ground. Set aside this mixture for later.
-
Preheat your oven to 350 degrees F (175 degrees C). This ensures the oven is at the correct temperature when the cookies are ready to bake.
-
In a small bowl, whisk together the flour and salt. This ensures the salt is evenly distributed throughout the flour, which is crucial for even baking and flavor. Set this mixture aside.
-
In a large bowl, using a hand mixer, beat the butter and sugar until the mixture is light and fluffy. This step is important for creating a tender cookie. Make sure your butter is at room temperature for the best results.
-
Add the egg, vanilla extract, and orange zest to the butter mixture. Beat until everything is well blended. The vanilla extract and orange zest add depth of flavor to the cookies.
-
Gradually add the flour mixture to the wet ingredients. Beat just until everything is incorporated. Be careful not to overmix, as this can result in tough cookies.
-
Divide the dough in half. Place one half of the dough back into the bowl of your electric mixer.
-
Add the cocoa and hazelnut mixture to the dough remaining in the mixer bowl. Beat until the mixture is fully incorporated, creating the chocolate dough. Set aside both the plain and chocolate doughs.
-
Lay out two large sheets of parchment paper (about 10 x 12 inches each). On one sheet of parchment paper, roll out the plain dough into a 6 1/2 inch by 10 1/2 inch rectangle. Ensure both sides of the dough are smooth and even. Wrap the dough in the parchment paper and place it on a baking sheet in the freezer for about 15 minutes, or until the dough is firm.
-
Meanwhile, take the chocolate dough and remove 1/2 cup. Cover this reserved dough with plastic wrap and set it aside.
-
On the second sheet of parchment paper, roll out the remaining chocolate dough into a 6 1/2 inch by 10 1/2 inch rectangle. Make sure both sides of the dough are smooth. Wrap the dough in parchment paper and place it on a baking sheet in the freezer for about 15 minutes, or until firm.
-
Once both the plain and chocolate doughs are firm, remove them from the freezer. Lay the plain dough on a cutting board and remove the parchment paper.
-
Lightly brush the top of the plain dough with a little water. This will help the layers adhere to each other.
-
Remove the parchment paper from the chocolate dough and carefully place it evenly on top of the plain dough.
-
Trim the edges of the combined doughs so that the rectangle now measures 6 inches by 10 inches. Accurate trimming makes the checkerboard pattern sharper and more defined.
-
Take the chocolate dough trimmings and add them to the 1/2 cup of reserved chocolate dough. This ensures that all the chocolate dough is used.
-
Lengthwise, cut the layered rectangle into thirds, creating three strips that are each 2 inches by 10 inches.
-
Place one strip on a piece of plastic wrap. Brush the top of the dough with water. Place the second strip on top of the first, alternating colors to create a white, black, white, black pattern. Brush the top of the second layer with water and stack the third layer. Press down lightly on the top of the dough, then wrap it in plastic wrap and freeze for 15 minutes, or until firm. This step builds the first dimension of the checkerboard pattern.
-
When firm, remove the dough from the freezer and unwrap it. Place the dough on a cutting board. Using a sharp, long knife, cut the layers lengthwise into 1/2 inch wide and 10 inch long strips. You should end up with four strips.
-
Stack the layers, turning every other strip so the top faces down and the bottom faces up, to produce the checkerboard effect. Rewrap the stack and place it back in the freezer to firm up. This creates the final checkerboard pattern.
-
Meanwhile, take the reserved chocolate trimmings and 1/2 cup of chocolate dough and roll it out on a piece of parchment paper into approximately a 9 1/2 x 10 1/2 inch rectangle, ensuring the dough is smooth. Cover and refrigerate until slightly firm. This will be the outer wrapping for the checkerboard design.
-
Remove the stack of checkerboard dough from the freezer and place it in the center of the chocolate dough rectangle.
-
Wrap the chocolate dough around the checkerboard layers until you have a smooth surface that encloses the checkerboard design.
-
Wrap the assembled log in plastic wrap and freeze until firm. This is crucial for clean slicing.
-
Preheat your oven to 350 degrees F (175 degrees C).
-
Line a baking sheet with parchment paper.
-
Remove the dough from the freezer and place it on a cutting board. With a sharp knife, cut the block of dough into 1/4 inch thick slices.
-
Place the slices on the prepared baking sheet, spacing them about 1 inch apart.
-
Bake for about 5-7 minutes, or until the cookies just start to brown around the edges. Watch them carefully; they can burn quickly.
-
Remove the baking sheet from the oven and place the cookies on a wire rack to cool completely.
Expert Tips & Tricks
- Chilling is Key: Don’t skip the chilling steps! This makes the dough easier to handle and prevents the cookies from spreading too much in the oven.
- Sharp Knife: A sharp, thin knife is essential for clean cuts, especially when slicing the checkerboard log. A dull knife will squish the dough and distort the pattern.
- Even Layers: Aim for consistent thickness when rolling out the dough to ensure a uniform checkerboard pattern.
- Don’t Overbake: Overbaking will result in dry, crumbly cookies. Remove them from the oven when the edges are just beginning to brown.
Serving & Storage Suggestions
Serve these delightful checkerboard cookies with a glass of cold milk or a warm cup of tea. They make a beautiful addition to any dessert platter or gift basket. Store the cooled cookies in an airtight container at room temperature for up to a week. For longer storage, freeze them for up to two months. Thaw completely before serving.
Nutritional Information
| Nutrient | Amount per Serving | % Daily Value |
|---|---|---|
| Calories | 1249.1 kcal | N/A |
| Calories from Fat | 662 g | 53% |
| Total Fat | 73.7 g | 113% |
| Saturated Fat | 40.5 g | 202% |
| Cholesterol | 233.2 mg | 77% |
| Sodium | 131.6 mg | 5% |
| Total Carbohydrate | 134.6 g | 44% |
| Dietary Fiber | 5.6 g | 22% |
| Sugars | 51.4 g | N/A |
| Protein | 16.5 g | 32% |
Variations & Substitutions
- Gluten-Free: Substitute the all-purpose flour with a gluten-free blend for a gluten-free version. Ensure the blend contains xanthan gum or another binder.
- Different Flavors: Experiment with different extracts, such as almond or peppermint, to create unique flavor combinations.
- Colored Dough: Use food coloring to create different colored squares for a festive touch.
- Nut-Free: Omit the hazelnuts for a nut-free version. You can substitute with additional cocoa powder or other flavorings.
FAQs (Frequently Asked Questions)
Q: Why is my dough crumbly and difficult to work with?
A: The dough is likely too dry. Ensure your butter is at room temperature and that you haven’t overmixed the flour. If necessary, add a teaspoon of milk or water to bind the dough.
Q: How can I prevent the cookies from spreading too much during baking?
A: Make sure the dough is thoroughly chilled before slicing and baking. Also, ensure your oven temperature is accurate.
Q: Can I make the dough ahead of time?
A: Absolutely! The dough can be made ahead of time and stored in the refrigerator for up to 2 days or in the freezer for up to 2 months.
Q: What if I don’t have orange zest?
A: The orange zest adds a subtle citrus flavor but can be omitted if you don’t have it on hand. You can substitute with lemon zest or simply leave it out.
Q: How do I get the checkerboard pattern to be more defined?
A: Accurate measurements and precise cutting are key. Use a ruler when rolling out the dough and a sharp knife when slicing the strips. Ensure the dough is firm before cutting.
Final Thoughts
Checkerboard cookies are a labor of love, but the delightful pattern and delicious flavor make them well worth the effort. Don’t be intimidated by the steps – take your time, follow the instructions carefully, and enjoy the process of creating these charming treats. Whether you’re baking for a special occasion or simply want to add a touch of whimsy to your day, these cookies are sure to impress. I encourage you to try this recipe and share your creations with friends and family. They’ll definitely be back for more!