
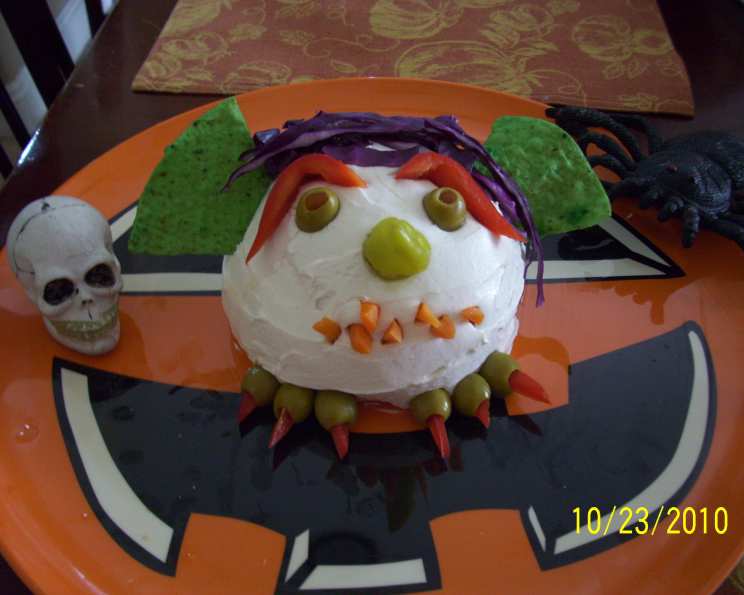
Cheese Ball Goblin (Paula Deen): A Spooktacularly Delicious Treat
Halloween was always a big deal at our house growing up. Not just the costumes and trick-or-treating, but the food! My mom, bless her heart, always went above and beyond. One year, she decided to tackle a cheese ball shaped like a pumpkin, adorned with pretzel stem and chive vines. It was a delicious monstrosity, a true testament to her love of cheesy goodness and spooky fun. The memory of that cheese ball, devoured with gusto by all the neighborhood kids, still brings a smile to my face. So, when I stumbled across Paula Deen’s Cheese Ball Goblin recipe, I knew I had to give it a try. It’s the perfect combination of nostalgia and culinary creativity!
Recipe Overview
- Prep Time: 44 minutes (includes chilling time)
- Servings: 20
- Dietary Type: Varies depending on accompanying crackers and vegetables
Ingredients
- 2 (8 ounce) packages cream cheese, room temperature
- 2 (8 ounce) packages whipped cream cheese
- 4 tablespoons butter, room temperature
- 1 tablespoon milk
- 2 cups shredded mixed cheeses, such as Mexican for tacos
- Green food coloring
- 2 large tortilla chips
- 1 whole pepperoncini pepper
- 2 pimento stuffed olives
- 1 red bell pepper, cut into 2 thin strips and 6 small triangles
- 6 pitted green olives
- Carrot, cut into 20 small sticks (matchstick size)
- 3 cups shredded red cabbage
- Toothpick
- Assorted crackers
- Assorted fresh vegetables
Equipment Needed
- Mixing bowl
- Electric mixer
- Plastic wrap
- Waxed paper
- Serving platter
- Spatula
- Small bowl
- Pastry brush
Instructions
- In a mixing bowl, combine the 2 packages of cream cheese, butter, and milk.
- Beat with an electric mixer until smooth and well combined. This is crucial for a creamy and spreadable cheese ball.
- Add the 2 cups of shredded cheese and mix until thoroughly incorporated. Make sure the cheese is evenly distributed for a consistent flavor.
- Cover the bowl with plastic wrap and chill in the refrigerator for at least 4 hours, or up to 24 hours. This chilling period is essential to allow the cheese ball to firm up and hold its shape.
- Remove the chilled cheese mixture from the refrigerator.
- Place the mixture on a piece of waxed paper and form the cheese ball into a head-like shape. Don’t worry about perfection; a slightly lumpy head adds to the goblin’s character!
- Place 3 pieces of waxed paper around the edges of a serving platter, leaving open space in the center. This will protect your platter from getting messy.
- Place the cheese “head” in the center of the platter so some of it is right on the platter, but the edges are on the waxed paper.
- In a medium bowl, stir the whipped cream cheese until totally smooth. This will be your goblin’s skin.
- With a spatula, spread the whipped cream cheese over the cheese “head”. It’s perfectly fine if it’s not completely smooth – this gives your goblin a spooky, textured skin. A few ridges and bumps only enhance the effect.
- Place a few drops of green food coloring in a small bowl.
- Add 1 tablespoon of water and mix well to dilute the food coloring. This prevents overly saturated color and allows for more even coverage.
- With a pastry brush, paint the tortilla chips with the diluted green food coloring until they are the desired color. Brush in light, even strokes to avoid streaking.
- Set the painted chips aside to dry for a few minutes.
- Once the chips are dry, press them into the sides of the cheese ball to form ears. Use gentle but firm pressure to secure them.
- Skewer the pepperoncini with a toothpick and then attach it to the center of the head to make a nose. Ensure the toothpick is securely in place but not protruding excessively.
- Press the pimento-stuffed olives into the head to form eyes. Position them for a suitably menacing or comical gaze.
- Use the 2 red bell pepper strips to make eyebrows. Angled eyebrows can add a lot of character!
- Take the pepper triangles and insert them into the holes in the pitted green olives. The green olives will serve as toes, and the red pepper triangles will be the scary toenails.
- Once the olives are assembled, press them into the bottom of the head to form toes. Secure them well to prevent them from falling off.
- Press the carrot sticks into the head to form teeth. Leave them sticking out a bit to make scary teeth. Don’t worry if your carrot sticks are different lengths and thicknesses; this adds to the goblin’s disheveled charm.
- Hold the head onto the platter with a spatula and gently pull away the waxed paper. This will reveal your goblin in all its cheesy glory.
- Finally, press the red cabbage into the top of the head to make hair. Use as much or as little as you like to create the desired hairstyle.
- Serve with assorted crackers and vegetables.
Expert Tips & Tricks
- For a spicier goblin, add a pinch of cayenne pepper to the cheese mixture.
- If you don’t have whipped cream cheese, you can whip regular cream cheese with a bit of heavy cream and powdered sugar until light and fluffy. Be careful not to overwhip.
- To make the goblin ahead of time, assemble it completely (except for the hair) and store it in the refrigerator. Add the cabbage hair just before serving to prevent it from wilting.
- If the cheese ball becomes too soft while you’re working with it, pop it back in the refrigerator for a few minutes to firm up.
- Consider using different colored bell peppers for the toenails to add even more visual interest.
- If you prefer a less messy approach, consider using pretzel sticks instead of carrot sticks for the teeth.
- The type of shredded cheese can be varied to your liking. Sharp cheddar, Monterey Jack, or a blend of Italian cheeses would all work well.
Serving & Storage Suggestions
Serve your Cheese Ball Goblin immediately with a variety of crackers, pretzels, and fresh vegetables like celery sticks, carrot sticks, cucumber slices, and bell pepper strips. Arrange the crackers and vegetables attractively around the goblin on the platter.
Leftovers can be stored in an airtight container in the refrigerator for up to 3 days. The texture may change slightly, but the flavor will remain delicious. It is not recommended to freeze the cheese ball.
Nutritional Information
| Nutrient | Amount per Serving | % Daily Value |
|---|---|---|
| Calories | 195.9 kcal | N/A |
| Total Fat | 18.6 g | 28% |
| Saturated Fat | 10.3 g | 51% |
| Cholesterol | 56.1 mg | 18% |
| Sodium | 235.8 mg | 9% |
| Total Carbohydrate | 4.9 g | 1% |
| Dietary Fiber | 0.6 g | 2% |
| Sugars | 2.3 g | N/A |
| Protein | 3.2 g | 6% |
Note: Nutritional information is an estimate and may vary based on specific ingredients used.
Variations & Substitutions
- Spicy Goblin: Add a dash of hot sauce or a pinch of cayenne pepper to the cream cheese mixture.
- Italian Goblin: Use a blend of Italian cheeses and add a sprinkle of dried oregano or basil.
- Smoked Goblin: Incorporate smoked paprika or a few drops of liquid smoke into the cream cheese mixture. You could even use smoked gouda in the cheese blend.
- Vegan Goblin: Substitute the cream cheese with a vegan cream cheese alternative. Many delicious vegan options are now available in most grocery stores. The other dairy ingredients will also need to be substituted appropriately.
- Gluten-Free Goblin: Serve with gluten-free crackers and vegetables for a completely gluten-free appetizer.
FAQs (Frequently Asked Questions)
Q: Can I make this cheese ball ahead of time?
A: Yes, you can prepare the cheese ball up to 24 hours in advance. Assemble the cheese ball and decorate it, but wait to add the red cabbage hair until just before serving to prevent it from wilting.
Q: Can I use a different type of cheese?
A: Absolutely! Feel free to experiment with different shredded cheeses such as cheddar, Monterey Jack, or a blend of Italian cheeses.
Q: How do I prevent the tortilla chip ears from falling off?
A: Make sure the tortilla chips are dry before attaching them to the cheese ball. Press them firmly into the cheese to secure them. If necessary, you can use a small amount of softened cream cheese as “glue.”
Q: What if I don’t have pepperoncini peppers?
A: You can substitute the pepperoncini with a small piece of red bell pepper or a pickled jalapeño for a spicier kick.
Q: Can I freeze the cheese ball?
A: It is not recommended to freeze the cheese ball, as the texture may change upon thawing. The cream cheese can become grainy.
Final Thoughts
This Cheese Ball Goblin is more than just a recipe; it’s a chance to unleash your inner artist and create a truly unique and memorable Halloween treat. Don’t be afraid to get creative with the decorations and add your own personal touch. Whether you’re hosting a spooky gathering or simply looking for a fun and festive appetizer, this goblin is sure to be a hit. So, gather your ingredients, put on some Halloween tunes, and get ready to conjure up some cheesy magic! And, of course, don’t forget to share your goblin creations with me – I can’t wait to see what you come up with!