
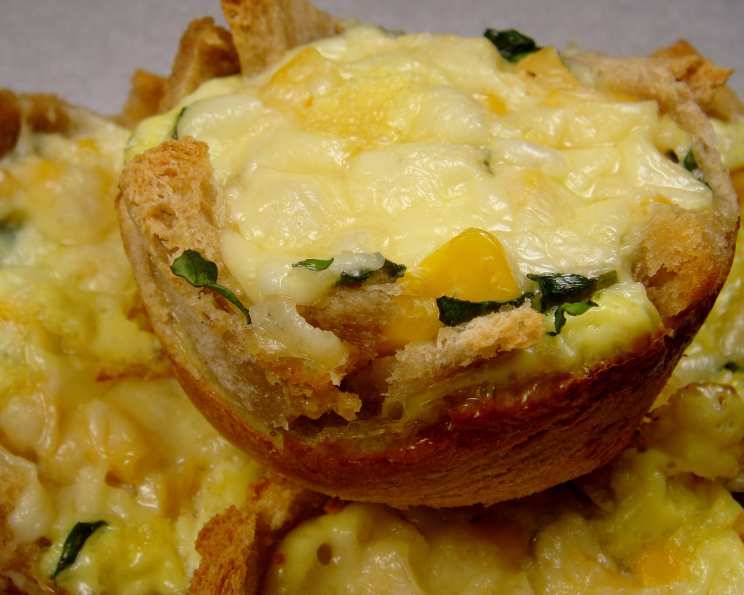
Cheese, Corn, and Spinach Mini Quiches: A Lunchbox Delight
The aroma of warm, cheesy baked goods always transports me back to my childhood. My grandmother, a firm believer in the power of a good, portable snack, would often whip up mini quiches for our family picnics. They were perfect – easy to hold, bursting with flavor, and always a hit with both kids and adults. Her recipe was a closely guarded secret, but the memory of those savory bites fueled my culinary curiosity and ultimately inspired this version – a healthier take on a classic, designed for modern lunchboxes and busy lives.
Recipe Overview:
- Prep Time: 20 minutes
- Cook Time: 35 minutes
- Total Time: 55 minutes
- Servings: 4
- Yield: 4 mini quiches
- Dietary Type: Vegetarian
Ingredients:
- Cooking spray
- 4 slices whole grain bread (crusts removed, rolled out until thin)
- 40 g (4 cups) baby spinach leaves
- 125 g (drained) corn kernels
- 4 eggs (approximately 50 grams each)
- 80 ml (1/3 cup) low-fat milk
- Fresh ground black pepper to taste
- 60 g (1/2 cup) reduced-fat cheese (30% reduced, grated)
- Extras (optional):
- 12 small strawberries (quartered)
- 1 kiwi fruit (chopped)
- Water for serving
Equipment Needed:
- Muffin pan (4 x 250ml/1 cup capacity)
- Baking paper or non-stick baking cases
- Rolling pin
- Medium bowl
- Whisk
- Wire rack
Instructions:
-
Preheat your oven to 190°C (375°F), or 170°C (340°F) if using a fan-forced oven. Getting the oven to the right temperature is essential for ensuring the crusts crisp up perfectly and the quiches cook evenly.
-
Prepare your muffin pan by spraying 4 x 250ml (1 cup) muffin pan holes generously with cooking spray. This will prevent the quiches from sticking. Alternatively, you can line the bases with a round of baking paper or use 4 non-stick baking cases for easier removal.
-
Prepare the bread crusts: Remove the crusts from the 4 slices of whole grain bread. Using a rolling pin, flatten each slice until it’s thin and pliable. This helps the bread conform to the shape of the muffin pan.
-
Carefully press 1 bread slice into each muffin pan hole, ensuring it covers the base and sides. Be gentle to avoid tearing the bread.
-
Bake the bread crusts for 5 minutes, or until they are lightly golden brown and set. Keep a close eye on them, as they can burn quickly. Remove from the oven and let them cool in the pan for 10 minutes. This pre-baking step helps the crusts maintain their shape and prevents them from becoming soggy.
-
Divide the baby spinach leaves and drained corn kernels evenly between the pre-baked bread cases. Ensure that the vegetables are distributed evenly for a consistent flavor in each quiche.
-
In a medium bowl, whisk together the eggs and low-fat milk. Season generously with fresh ground black pepper to taste. Don’t be shy with the pepper – it adds a lovely depth of flavor.
-
Pour the egg mixture carefully into the bread cases, filling them almost to the top. Be careful not to overfill, as the mixture will expand during baking.
-
Sprinkle the grated reduced-fat cheese evenly over the top of each quiche. The cheese will melt and create a delicious, golden-brown topping.
-
Bake the quiches for 25 to 30 minutes, or until they are set and golden brown. To check for doneness, gently insert a knife into the center of one of the quiches. If it comes out clean, they are ready. If not, bake for a few more minutes.
-
Remove the muffin pan from the oven and let it cool for 5 minutes before transferring the mini quiches to a wire rack to cool completely. This allows the quiches to set properly and prevents them from sticking to the pan.
-
If packing for a lunchbox, accompany one of the quiches with the fresh fruit (quartered strawberries and chopped kiwi) in a separate container and a bottle of water.
Expert Tips & Tricks:
- For extra flavor, sauté the spinach with a little garlic before adding it to the quiches.
- If you’re short on time, you can use pre-made mini pie crusts instead of the bread crusts.
- To prevent the crusts from browning too quickly, tent the muffin pan with foil during the last 10 minutes of baking.
- Don’t have reduced-fat cheese on hand? Feel free to use your favorite cheese like cheddar, mozzarella, or even a sprinkle of parmesan for a stronger flavor.
- The milk in the recipe can be substituted with cream for a richer taste, but remember that it will impact the nutritional value.
Serving & Storage Suggestions:
These mini quiches are delicious served warm, at room temperature, or even cold, making them perfect for lunchboxes, picnics, or quick breakfasts.
To store leftovers, allow the quiches to cool completely before placing them in an airtight container. They will keep in the refrigerator for up to 3 days. For longer storage, wrap them individually in plastic wrap, place them in a resealable plastic bag, and freeze for up to 3 months. Defrost in the fridge overnight before packing into a lunchbox.
To reheat, bake in a preheated oven at 175°C (350°F) for about 10 minutes, or until heated through. You can also microwave them, but the crust may become slightly soggy.
Nutritional Information:
| Nutrient | Amount per Serving | % Daily Value* |
|---|---|---|
| Calories | 236 kcal | 12% |
| Total Fat | 6.7 g | 9% |
| Saturated Fat | 2 g | 10% |
| Cholesterol | 187 mg | 62% |
| Sodium | 223.2 mg | 9% |
| Total Carbohydrate | 33.4 g | 12% |
| Dietary Fiber | 5.2 g | 19% |
| Sugars | 7.2 g | N/A |
| Protein | 13.3 g | 27% |
*Based on a 2000 calorie diet. Percent Daily Values may vary depending on individual needs.
Variations & Substitutions:
- Gluten-Free: Use gluten-free bread or pre-made gluten-free pie crusts.
- Dairy-Free: Substitute the low-fat milk with unsweetened almond milk or soy milk. You can also use a dairy-free cheese alternative.
- Vegetable Variations: Experiment with different vegetables such as mushrooms, bell peppers, or zucchini. Sauté them before adding them to the quiches.
- Herbaceous: Add fresh herbs like thyme, chives, or parsley to the egg mixture for a more aromatic flavor.
- Spicy Kick: Add a pinch of red pepper flakes or a dash of hot sauce to the egg mixture for a spicy kick.
FAQs (Frequently Asked Questions):
Q: Can I make these quiches ahead of time?
A: Absolutely! They’re perfect for meal prepping. Just bake them according to the instructions, let them cool completely, and store them in the fridge or freezer until ready to use.
Q: Can I use frozen spinach instead of fresh?
A: Yes, but make sure to thaw the spinach completely and squeeze out any excess water before adding it to the quiches. This will prevent the quiches from becoming soggy.
Q: What if I don’t have a muffin pan?
A: You can bake the quiches in individual ramekins or small baking dishes. Adjust the baking time accordingly.
Q: Can I add meat to these quiches?
A: Certainly! Cooked bacon, ham, or sausage would be delicious additions. Just make sure to chop them into small pieces and add them to the bread cases along with the spinach and corn.
Q: How can I prevent the crusts from getting soggy?
A: Pre-baking the crusts helps to prevent them from becoming soggy. Also, be sure to drain any excess water from the spinach and corn.
Final Thoughts:
These Cheese, Corn, and Spinach Mini Quiches are a delightful and nutritious addition to any lunchbox or a quick and easy snack any time of day. Don’t be afraid to experiment with different ingredients and flavor combinations to create your own signature version. I encourage you to give this recipe a try and share your feedback. These mini quiches pair perfectly with a light side salad or a cup of soup for a complete and satisfying meal. Happy baking!