
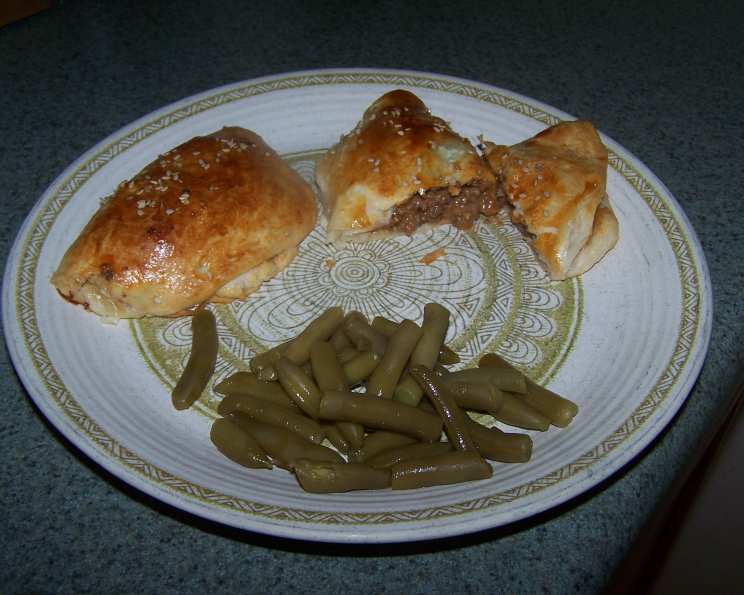
Cheeseburger Pockets: A Nostalgic Bite of Comfort
The aroma of browning ground beef always transports me back to my childhood kitchen. My mom, a master of quick and easy weeknight meals, often whipped up these cheeseburger pockets. I remember being fascinated by the way she transformed simple refrigerated biscuits into golden, savory envelopes filled with all the flavors of a classic cheeseburger. The anticipation as they baked, the satisfaction of that first warm, cheesy bite – it was pure comfort food magic. It’s a recipe I still turn to when I need a guaranteed crowd-pleaser and a little taste of home.
Recipe Overview
- Prep Time: 15 minutes
- Cook Time: 17-21 minutes
- Total Time: Approximately 35 minutes
- Yields: 8-10 pockets
- Serves: 8-10
- Dietary Type: Not specified (can be modified, see Variations)
Ingredients
- 1 lb lean ground beef
- 1 medium onion, chopped (approximately 1/2 cup)
- 1/4 cup ketchup
- 2 tablespoons yellow mustard
- 1 (16.3 ounce) can Pillsbury Grands refrigerated buttermilk biscuits
- 1 cup cheddar and American blend cheese, shredded (4 oz)
- 16 dill pickle slices
- 1 egg, beaten (optional)
- 1 teaspoon sesame seeds (optional)
Equipment Needed
- Large skillet
- Spatula
- Measuring cups and spoons
- Cutting board
- Knife
- Rolling pin or flat surface
- Large ungreased cookie sheet
Instructions
- Prepare the beef mixture: In a large skillet, brown the lean ground beef and chopped onion over medium-high heat. Use a spatula to break up the beef as it cooks. Continue cooking until the beef is fully browned and the onion is softened.
- Drain excess fat: Carefully drain off any excess grease from the skillet. This step is crucial to prevent soggy cheeseburger pockets.
- Add flavor: Stir in the ketchup and yellow mustard into the cooked beef mixture. Combine well, ensuring the beef is evenly coated with the condiments.
- Prepare the biscuits: On a clean, lightly floured surface, press or roll each Pillsbury Grands refrigerated buttermilk biscuit into a 6-inch round. If using smaller biscuits, you can combine two biscuits to create a larger circle for filling.
- Assemble the pockets: Place a rounded 1/4 cup of the beef mixture onto the center of each biscuit round.
- Add cheese and pickles: Top the beef mixture with 2 tablespoons of the shredded cheddar and American blend cheese, and then add 2 dill pickle slices on top of the cheese.
- Seal the pockets: Fold the dough over the filling to create a half-moon shape. Press the edges firmly to seal, ensuring the filling is completely enclosed. A fork can be used to crimp the edges for a decorative and extra-secure seal.
- Vent the pockets: Using a sharp knife, make 3 small slits in the top of each cheeseburger pocket. This allows steam to escape during baking, preventing the pockets from bursting.
- Arrange on baking sheet: Place the assembled cheeseburger pockets on a large, ungreased cookie sheet, leaving some space between each pocket.
- Add optional toppings (if desired): If desired, brush the tops of the pockets with the beaten egg for a golden sheen. Sprinkle the tops with sesame seeds for added flavor and texture.
- Bake: Bake in a preheated oven at 375°F (190°C) for 17 to 21 minutes, or until the cheeseburger pockets are deep golden brown. The internal temperature of the beef mixture should reach 160°F (71°C).
- Cool slightly: Remove the baked cheeseburger pockets from the oven and let them cool on the baking sheet for a few minutes before serving. This allows the filling to set slightly, preventing it from being too runny.
Expert Tips & Tricks
- Preventing soggy pockets: Draining the excess fat from the cooked beef is key to avoiding soggy pockets. You can also add a tablespoon of cornstarch to the beef mixture to help absorb any remaining moisture.
- Cheese variations: Feel free to experiment with different cheese blends, such as Monterey Jack, pepper jack, or even a sharp cheddar for a bolder flavor.
- Spice it up: Add a pinch of red pepper flakes to the beef mixture for a touch of heat.
- Make-ahead tip: The beef mixture can be prepared ahead of time and stored in the refrigerator for up to 2 days. This can save time on busy weeknights.
- Even browning: To ensure even browning, rotate the baking sheet halfway through the baking time.
- Doneness check: The pockets are done when they are deep golden brown and the biscuit dough is fully cooked. If the tops are browning too quickly, you can tent the baking sheet with aluminum foil.
Serving & Storage Suggestions
Serve the cheeseburger pockets warm, straight from the oven. They are delicious on their own or with a side of your favorite dipping sauce, such as ketchup, mustard, ranch dressing, or BBQ sauce.
Storage: Leftover cheeseburger pockets can be stored in an airtight container in the refrigerator for up to 3 days.
Reheating: To reheat, you can microwave them for about 30-60 seconds, or bake them in a preheated oven at 350°F (175°C) for about 10 minutes, or until heated through.
Freezing: For longer storage, you can freeze the baked cheeseburger pockets. Wrap them individually in plastic wrap and then place them in a freezer-safe bag or container. They can be frozen for up to 2 months. To reheat frozen pockets, thaw them overnight in the refrigerator and then reheat as described above.
Nutritional Information
| Nutrient | Amount per Serving | % Daily Value |
|---|---|---|
| Calories | 314.5 kcal | N/A |
| Calories from Fat | N/A | N/A |
| Total Fat | 14.6 g | 22% |
| Saturated Fat | 4.6 g | 22% |
| Cholesterol | 60.7 mg | 20% |
| Sodium | 874.7 mg | 36% |
| Total Carbohydrate | 28.9 g | 9% |
| Dietary Fiber | 1 g | 3% |
| Sugars | 6.8 g | N/A |
| Protein | 16.6 g | 33% |
Note: Nutritional information is an estimate and may vary based on specific ingredients and preparation methods.
Variations & Substitutions
- Vegetarian Option: Substitute the ground beef with plant-based ground meat alternative.
- Gluten-Free: Use gluten-free refrigerated biscuits.
- Dairy-Free: Use dairy-free cheese shreds.
- Different Meats: Try ground turkey, ground chicken, or even Italian sausage.
- Veggie Boost: Add finely chopped vegetables like bell peppers, mushrooms, or zucchini to the beef mixture.
- Pizza Pockets: Replace the ketchup and mustard with pizza sauce and add pepperoni or other pizza toppings.
- Spicy Kick: Add diced jalapenos or a dash of hot sauce to the beef mixture.
FAQs (Frequently Asked Questions)
Q: Can I use a different type of biscuit dough?
A: While Pillsbury Grands are recommended for their size and texture, you can experiment with other types of refrigerated biscuit dough. Just be sure to adjust the baking time accordingly.
Q: How do I prevent the filling from leaking out while baking?
A: Ensure the edges of the pockets are tightly sealed. Crimp the edges with a fork for extra security. Also, avoid overfilling the pockets.
Q: Can I make these ahead of time and bake them later?
A: Yes, you can assemble the pockets ahead of time and store them in the refrigerator for up to 24 hours before baking. Add a few minutes to the baking time if baking from cold.
Q: What dipping sauces go well with these cheeseburger pockets?
A: Ketchup, mustard, ranch dressing, BBQ sauce, or even a simple aioli are all great options.
Q: Can I freeze the unbaked cheeseburger pockets?
A: Yes, you can freeze the unbaked pockets. Place them on a baking sheet and freeze until solid, then transfer them to a freezer-safe bag or container. Bake from frozen, adding about 5-10 minutes to the baking time.
Final Thoughts
These cheeseburger pockets are more than just a quick and easy meal; they are a taste of comfort, a reminder of simple pleasures, and a guaranteed crowd-pleaser. Whether you’re making them for a weeknight dinner, a party snack, or a fun weekend lunch, I encourage you to give this recipe a try. Feel free to experiment with different fillings and toppings to create your own signature version. And don’t forget to share your creations and feedback – I’d love to hear what you think! Pair these pockets with a crisp side salad or some homemade coleslaw for a complete and satisfying meal.