
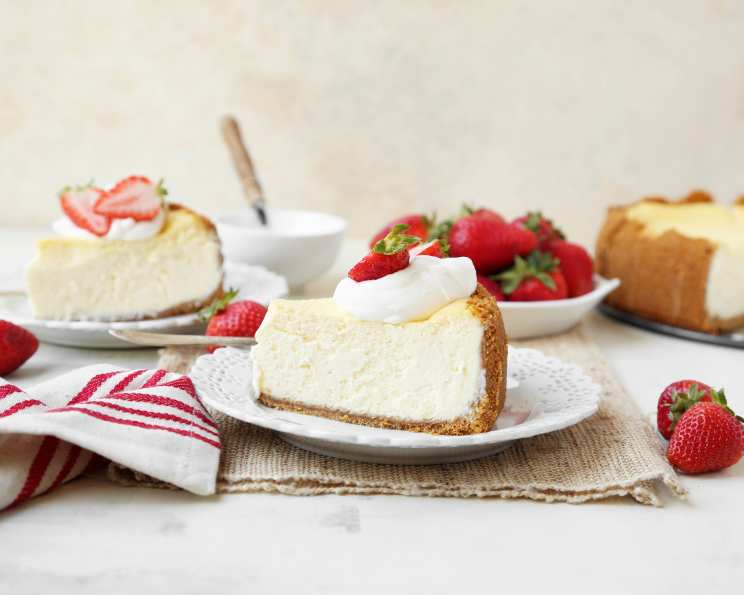
Decoding Decadence: The Cheesecake Factory Cheesecake at Home
The first time I tasted a slice of The Cheesecake Factory’s cheesecake, it was a revelation. I was in my early twenties, celebrating a milestone birthday, and the sheer size and richness of the dessert were both intimidating and incredibly enticing. The fork sank through layers of creamy filling and a surprisingly nutty crust, each bite a symphony of textures and flavors. To this day, I remember the feeling of pure indulgence, a moment of culinary bliss that set a new standard for what cheesecake could be.
Recipe Overview
- Prep Time: 30 minutes
- Cook Time: 1 hour 15 minutes
- In-Oven Rest Time: 1 hour
- Total Time: 2 hours 45 minutes + 24 hours refrigeration
- Servings: 8
- Yield: 1 cheesecake
- Dietary Type: Not Gluten-Free
Ingredients
For the Crust:
- 1/4 cup finely chopped pecans
- 1/4 cup finely chopped almonds
- 1/4 cup finely chopped walnuts
- 3/4 cup finely chopped vanilla wafer crumbs
- 2 tablespoons melted butter
For the Filling:
- 1 1/2 lbs (24 ounces) cream cheese, at room temperature
- 1 1/3 cups sugar
- 5 large eggs, at room temperature
- 16 ounces sour cream
- 1/4 cup flour
- 2 teaspoons vanilla extract
- 2 teaspoons lemon juice
Equipment Needed
- 9-inch springform pan
- Mixer (stand or hand mixer)
- Mixing bowls
Instructions
-
Prepare the Crust: In a mixing bowl, combine the finely chopped pecans, almonds, walnuts, and vanilla wafer crumbs. Add the melted butter and mix thoroughly until all the dry ingredients are moistened.
-
Press the Crust: Butter a 9-inch springform pan. Press the nut and wafer mixture into the bottom of the pan, extending it up the sides about 1 1/2 inches. Ensure the crust is firmly packed for a stable base. Set the prepared crust aside.
-
Cream the Cheese: In a large mixing bowl, beat the cream cheese until it is light and fluffy. It’s crucial that the cream cheese is at room temperature to avoid lumps. Keep the mixer on a low setting throughout the beating and mixing process.
-
Add Sugar Gradually: Gradually add the sugar to the creamed cheese, mixing on low speed until the mixture is smooth and creamy. Avoid overmixing, as this can incorporate too much air.
-
Incorporate the Eggs: Add the eggs one at a time, beating well after each addition. Make sure each egg is fully incorporated before adding the next.
-
Add Flour, Vanilla, and Lemon: Add the flour, vanilla extract, and lemon juice to the cream cheese mixture. Mix well until everything is combined. The lemon juice adds a subtle tang that balances the sweetness of the cheesecake.
-
Fold in Sour Cream: Gently fold in the sour cream until just combined. Be careful not to overmix at this stage, as it can make the cheesecake dense. The sour cream adds moisture and richness to the filling.
-
Pour into Crust: Carefully pour the cream cheese mixture into the prepared springform pan, ensuring it is evenly distributed over the crust.
-
Bake the Cheesecake: Place the springform pan on the top rack in the middle of a preheated oven at 325 degrees F (160 degrees C) for 1 hour and 15 minutes.
-
Oven Cooling: When the baking time is up, turn off the oven. Prop open the oven door slightly (you can use a wooden spoon) and leave the cheesecake in the oven for one hour. This gradual cooling helps prevent cracks from forming on the surface.
-
Cooling at Room Temperature: After one hour in the oven, remove the cheesecake and let it cool completely at room temperature. This allows the cheesecake to further set.
-
Refrigerate: Once the cheesecake has cooled, cover it loosely and refrigerate for at least 24 hours. This chilling period allows the flavors to meld and the texture to fully set. This “seasoning” process is essential for achieving the signature Cheesecake Factory taste.
Expert Tips & Tricks
- Room Temperature is Key: Ensure that the cream cheese and eggs are at room temperature for a smooth and creamy filling. Cold ingredients can cause lumps.
- Low and Slow: Bake the cheesecake at a low temperature to prevent cracking. The slow baking process ensures a creamy texture throughout.
- Water Bath (Optional): For an even creamier texture and to further prevent cracking, consider baking the cheesecake in a water bath. Wrap the springform pan tightly in foil, then place it in a larger pan. Fill the outer pan with hot water about halfway up the sides of the springform pan.
- Don’t Overmix: Overmixing the batter can incorporate too much air, which can cause the cheesecake to puff up and then collapse, leading to cracks. Mix until just combined.
- Patience is a Virtue: Resist the urge to cut into the cheesecake before it has had adequate time to chill. The 24-hour refrigeration period is crucial for optimal flavor and texture.
Serving & Storage Suggestions
To serve, carefully run a thin knife around the edge of the springform pan before releasing the sides. This will help prevent the cheesecake from sticking. Slice with a warm, damp knife for clean cuts. Garnish with fresh berries, whipped cream, chocolate shavings, or a drizzle of caramel sauce.
Leftover cheesecake should be stored in an airtight container in the refrigerator. It will keep for up to 5 days. For longer storage, you can freeze individual slices wrapped tightly in plastic wrap and then placed in a freezer bag. Frozen cheesecake can last for up to 2 months. Thaw in the refrigerator overnight before serving.
Nutritional Information
| Nutrient | Amount per Serving | % Daily Value |
|---|---|---|
| Calories | 696.5 kcal | N/A |
| Calories from Fat | 485 g | 70% |
| Total Fat | 53.9 g | 82% |
| Saturated Fat | 26.7 g | 133% |
| Cholesterol | 248.7 mg | 82% |
| Sodium | 406.3 mg | 16% |
| Total Carbohydrate | 43.8 g | 14% |
| Dietary Fiber | 1.1 g | 4% |
| Sugars | 38.8 g | N/A |
| Protein | 12.4 g | 24% |
Note: Nutritional information is an estimate and may vary based on specific ingredients and preparation methods.
Variations & Substitutions
- Gluten-Free Crust: Substitute the vanilla wafers with gluten-free graham crackers or a gluten-free cookie crumb for a gluten-free version.
- Different Nut Crust: Experiment with different combinations of nuts in the crust, such as macadamia nuts, hazelnuts, or Brazil nuts.
- Flavor Variations: Add extracts like almond, coconut, or peppermint to the filling for a unique twist. You could also swirl in fruit purees like raspberry or mango before baking.
- Chocolate Cheesecake: Melt unsweetened chocolate and add it to the cream cheese mixture for a rich chocolate cheesecake.
- Lower-Fat Version: Use Neufchatel cheese instead of cream cheese and light sour cream to reduce the fat content. Keep in mind that this will affect the texture and flavor.
FAQs (Frequently Asked Questions)
Q: Why is it important to use room temperature ingredients?
A: Room temperature ingredients, especially the cream cheese and eggs, blend together more smoothly, resulting in a creamier and more even texture in the finished cheesecake.
Q: How do I prevent cracks from forming on the surface of the cheesecake?
A: Bake the cheesecake at a low temperature (325°F), avoid overmixing the batter, use a water bath, and allow the cheesecake to cool gradually in the oven after baking.
Q: Can I make this cheesecake ahead of time?
A: Absolutely! In fact, it’s recommended. The cheesecake needs to chill for at least 24 hours, so making it a day or two in advance is ideal.
Q: Can I freeze this cheesecake?
A: Yes, you can freeze individual slices of cheesecake. Wrap them tightly in plastic wrap and then place them in a freezer bag. Thaw in the refrigerator overnight before serving.
Q: What if my cheesecake still jiggles in the center after baking?
A: A slight jiggle is okay; it will firm up as it cools. However, if it’s very jiggly, it may need a bit more baking time. Bake in 5-minute increments until the edges are set and the center has a slight wobble.
Final Thoughts
This Cheesecake Factory-inspired cheesecake is more than just a dessert; it’s an experience. The combination of the nutty crust and the creamy, decadent filling is a symphony of flavors and textures that will impress your family and friends. Don’t be intimidated by the seemingly long process – each step is crucial to achieving that perfect cheesecake texture and taste. So, gather your ingredients, preheat your oven, and embark on this culinary adventure. The rich, creamy reward is well worth the effort. Share your creations with me and let me know what flavor variations you tried!