
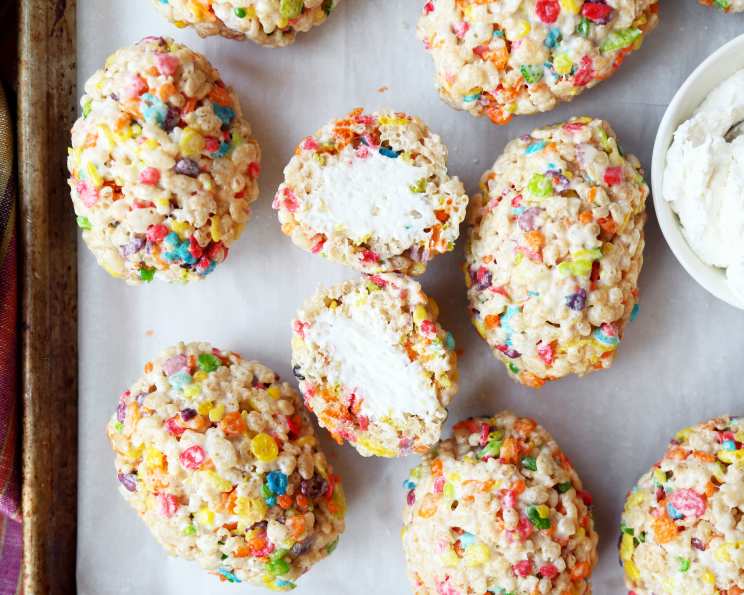
Cheesecake Filled Krispie Treats: A Nostalgic Remix
My grandmother, Nana Rose, had a magic touch with desserts. Her sugar cookies were legendary, her apple pie induced sighs of contentment, but it was her simple Rice Krispie Treats that truly captured my childhood. They were always perfectly gooey, slightly crisp, and utterly comforting. I remember one rainy afternoon, attempting to “improve” upon Nana’s classic by adding a swirl of cream cheese frosting (a misguided attempt, I now admit). These Cheesecake Filled Krispie Treats are my redemptive act, a sophisticated yet playful homage to those childhood memories. This recipe honors the spirit of those simple treats but elevates them with a tangy cheesecake surprise in the center.
Recipe Overview
- Prep Time: 20 minutes
- Cook Time: 5 minutes
- Total Time: 6 hours 25 minutes (includes chilling time)
- Yields: 12 Krispie treats
- Dietary Type: Not specified (contains dairy)
Ingredients
- 16 ounces cream cheese, room temperature
- 1/3 cup sour cream
- 3/4 cup confectioners’ sugar
- 2 teaspoons vanilla extract
- 1 1/2 cups fat-free Cool Whip
- Nonstick cooking spray
- 3 cups Rice Krispies
- 2 cups Fruity Pebbles
- 4 tablespoons unsalted butter
- 8 cups mini marshmallows
Equipment Needed
- Stand mixer with paddle attachment
- 2 Baking sheets
- Parchment paper
- Large bowl
- Large pot
- 1-inch ice cream scoop (optional, but recommended)
Instructions
- Prepare the Cheesecake Filling: In the bowl of a stand mixer fitted with the paddle attachment, beat the cream cheese and sour cream together on medium-low speed until smooth and light. This step is crucial for a lump-free filling, so take your time. Don’t overbeat, though, or you’ll end up with a runny filling.
- Sweeten the Filling: Reduce the mixer speed to low and gradually add the confectioners’ sugar, about 1/4 cup at a time, until completely smooth and combined. Again, be patient to avoid a cloud of powdered sugar erupting from your bowl.
- Flavor the Filling: Stir in the vanilla extract. Remove the bowl from the stand.
- Fold in Cool Whip: Gently fold the Cool Whip into the mixture until well combined. Be careful not to deflate the Cool Whip; we want to keep it light and airy.
- Chill the Filling: Place the cheesecake filling in a clean bowl, cover, and refrigerate for 4-6 hours. This chilling time allows the filling to firm up and develop its flavor. Don’t skip this step!
- Prepare Baking Sheets: Spray two small baking sheets with nonstick cooking spray and line them with parchment paper. Lightly spray the parchment paper as well. This ensures the treats won’t stick.
- Combine Cereals: In a large bowl, combine the Rice Krispies and Fruity Pebbles. This colorful combination provides both texture and flavor. Set aside.
- Melt Butter and Marshmallows: In a large pot, melt the butter over low heat. Once melted, stir in the mini marshmallows.
- Cook Marshmallow Mixture: Cook, stirring constantly, until the marshmallows are completely melted and smooth. Be careful not to burn the marshmallows, or your treats will be hard. Low and slow is the way to go.
- Combine Cereal and Marshmallow: Remove the pot from the heat and pour the melted marshmallow mixture over the cereal mixture. Stir to coat the cereal thoroughly while the marshmallows are still hot. Ensure every piece is coated for a uniform texture.
- Press into Baking Sheet: Pour the mixture onto one of the prepared baking sheets and press gently into an even layer. Use a spatula or your hands (lightly sprayed with cooking spray) to avoid sticking. Let cool for 5 minutes. This slight cooling period allows the treats to firm up slightly, making them easier to handle.
- Cut and Shape: Cut the treats into 2-inch squares. Press the squares to ½-inch thick.
- Add Filling: Scoop a heaping teaspoon of the cheesecake filling into the center of each square. A 1-inch ice cream scoop is perfect for this task, ensuring consistent filling size.
- Enclose the Filling: Fold the edges of the cereal around the filling, enclosing it completely. Gently shape the treats into a circle. Don’t worry if they’re not perfect circles; the rustic look is part of their charm.
- Final Chill: Set the filled treats aside on the prepared baking sheet and repeat with the remaining ingredients. Once all the treats are assembled, place them in the freezer for 15 minutes. This final chill helps to set the cheesecake filling and prevents it from melting when serving.
- Serve: After chilling in the freezer, the cheesecake filled treats are ready to enjoy!
Expert Tips & Tricks
- Room Temperature Cream Cheese: Using room temperature cream cheese is essential for a smooth, lump-free filling. If you forget to take it out ahead of time, you can soften it in the microwave in short bursts (15-20 seconds), but be careful not to melt it.
- Marshmallow Consistency: If your marshmallows seem too stiff after melting, add a tablespoon of water to the pot and stir until smooth.
- Easy Shaping: Lightly spray your hands with nonstick cooking spray when shaping the treats to prevent sticking.
- Make-Ahead Tip: You can prepare the cheesecake filling up to 2 days in advance. Store it in an airtight container in the refrigerator.
- Level Up the Flavor: For a touch of sophistication, add a pinch of sea salt to the cheesecake filling. The salt enhances the sweetness and adds a lovely contrast.
Serving & Storage Suggestions
These Cheesecake Filled Krispie Treats are best served chilled, straight from the freezer (after their brief 15-minute chill). Arrange them on a platter for a colorful and whimsical presentation.
- Storage: Store leftover treats in an airtight container in the refrigerator for up to 3 days. While they can be stored at room temperature, the cheesecake filling will soften. For longer storage, freeze them for up to 1 month.
- Reheating: These treats are best enjoyed cold. If frozen, let them thaw in the refrigerator for a few hours before serving.
Nutritional Information
(Estimated per serving)
| Nutrient | Amount per Serving | % Daily Value |
|---|---|---|
| Calories | 340 kcal | – |
| Calories from Fat | – | – |
| Total Fat | 18.2 g | 27% |
| Saturated Fat | 10.5 g | 52% |
| Cholesterol | 55.1 mg | 18% |
| Sodium | 193.3 mg | 8% |
| Total Carbohydrate | 42.4 g | 14% |
| Dietary Fiber | 0.1 g | 0% |
| Sugars | 28.7 g | – |
| Protein | 3.5 g | 7% |
Variations & Substitutions
- Gluten-Free: Use gluten-free Rice Krispies to make this recipe gluten-free.
- Fruity Pebbles Substitute: Experiment with other colorful cereals like Trix or Apple Jacks.
- Flavor Variations: Add a teaspoon of lemon zest to the cheesecake filling for a brighter flavor. Or, swirl in some raspberry jam for a fruity twist.
- Chocolate Chips: Add 1/2 cup of mini chocolate chips to the cereal mixture for a richer treat.
- Vegan Version: This recipe is difficult to adapt for vegans because of the cream cheese, gelatin in marshmallows, and Cool Whip. However, there are vegan marshmallow brands available, and you could use vegan cream cheese alternative (taste may vary.)
FAQs (Frequently Asked Questions)
Q: Can I use regular Cool Whip instead of fat-free?
A: Yes, you can use regular Cool Whip. The fat-free version is used to slightly reduce the overall fat content, but the difference in taste is minimal.
Q: Can I make these treats ahead of time?
A: Absolutely! The cheesecake filling can be made up to 2 days in advance. Assemble the treats the day you plan to serve them.
Q: My cheesecake filling is too runny. What did I do wrong?
A: Overbeating the cream cheese or not chilling the filling long enough can cause it to be too runny. Ensure you beat the cream cheese only until smooth and chill the filling for the full 4-6 hours.
Q: My marshmallows burned while melting. What should I do?
A: Start over with a fresh batch of marshmallows, using low heat and stirring constantly. Burnt marshmallows will ruin the flavor of the entire batch.
Q: Can I use a different type of cereal besides Rice Krispies and Fruity Pebbles?
A: Yes, you can experiment with other cereals. Just be sure to choose cereals that hold their shape well and have a similar texture to Rice Krispies.
Final Thoughts
These Cheesecake Filled Krispie Treats are more than just a dessert; they’re a nostalgic journey with a delicious twist. The combination of the classic Krispie Treat texture and the tangy cheesecake filling is simply irresistible. So, gather your ingredients, put on some cheerful music, and create these delightful treats. They’re guaranteed to bring a smile to everyone’s face. And please, share your creations and feedback with me – I’d love to know if you and your family enjoyed them as much as mine did! Perhaps pair these with a cold glass of milk or a scoop of vanilla ice cream for an extra touch of indulgence. Happy baking!