
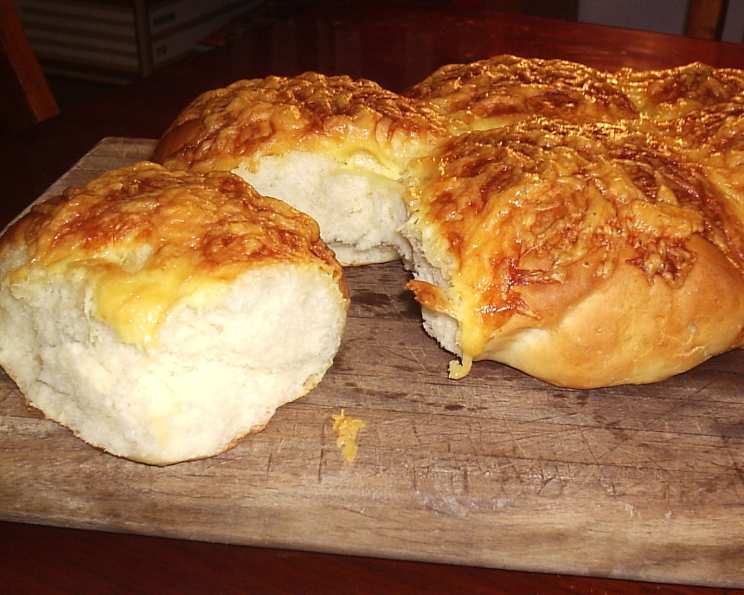
Cheesy Bread Rolls: A Taste of Home
The scent of baking bread, especially when laced with melted cheese, has always been my personal time machine. I remember coming home from school, the aroma of my grandmother’s freshly baked cheesy rolls greeting me at the door. Each bite was a comforting blend of soft dough and sharp, savory cheese, a perfect after-school treat that made the world feel a little brighter. This recipe is a tribute to those cherished memories, a way to share that simple joy with you.
Recipe Overview
- Prep Time: 25 minutes (including shaping)
- Rise Time: 1 hour 40 minutes (1 hour + 40 minutes)
- Cook Time: 35 minutes
- Total Time: 2 hours 40 minutes
- Yields: 6 rolls
- Dietary Type: Vegetarian
Ingredients
- 1 (7 g) packet dried yeast
- ¼ cup warm water
- 1 cup lukewarm milk
- 3 ½ cups flour
- 1 ½ tablespoons sugar
- 1 tablespoon soft butter or 1 tablespoon shortening
- 2 teaspoons salt
- ¾ cup tasty cheese (such as cheddar, Colby, or a blend)
Equipment Needed
- Large mixing bowl or stand mixer
- Measuring cups and spoons
- Greased baking tray
- Clean kitchen towel
- Pastry brush (optional)
Instructions
- Activate the yeast: In a small bowl, combine the dried yeast with the warm water. Let it stand for about 5-10 minutes until it becomes foamy. This step ensures that your yeast is active and will help the dough rise properly.
- Combine initial ingredients: In a large mixing bowl (or the bowl of your stand mixer), combine half of the flour, the lukewarm milk, sugar, and soft butter (or shortening).
- Add yeast mixture: Pour the activated yeast mixture into the bowl with the other ingredients.
- Incorporate remaining flour: Add the remaining flour to the bowl.
- Mix the dough: Work the dough until it becomes smooth and elastic. If using a stand mixer, use the dough hook attachment and knead for about 5-7 minutes. If kneading by hand, knead on a lightly floured surface for 8-10 minutes. The dough should be slightly tacky but not sticky.
- First Rise: Place the dough in a lightly oiled bowl, turning to coat. Cover the bowl with a clean cloth and let it rise in a warm place for about 1 hour, or until doubled in size. This is crucial for developing the flavor and texture of the rolls.
- Punch Down and Knead: After the first rise, punch down the dough to release the air. Knead it briefly until it’s smooth again. This helps redistribute the yeast and gluten.
- Divide the dough: Divide the dough into six equal portions.
- Shape the Rolls: Shape each portion into a round. A simple method is to gently pull the edges of the dough underneath to create a smooth top.
- Arrange on Baking Tray: Place the shaped rounds on a greased baking tray, positioning them so the rolls are just touching each other. This will help them rise together and create soft sides.
- Second Rise: Cover the rolls with a clean cloth and let them rise for about 40 minutes. They should puff up slightly.
- Preheat the Oven: While the rolls are rising for the second time, preheat your oven to 200°C (392°F).
- Prepare for Baking: Brush the tops and sides of the risen rolls lightly with milk. This will give them a beautiful golden-brown color.
- Add Cheese: Top the rolls generously with the tasty cheese. You can use grated cheese or thin slices, depending on your preference.
- Bake: Bake in the preheated oven for about 35 minutes, or until the rolls are golden brown and the cheese is melted and bubbly. Check the bottom of one of the rolls; it should sound hollow when tapped.
- Cool and Serve: Remove the rolls from the oven and let them cool slightly on the baking tray before serving. They are best enjoyed warm.
Expert Tips & Tricks
- Temperature Matters: Ensure that the water is warm (not hot) when activating the yeast. Hot water will kill the yeast. Similarly, the milk should be lukewarm to encourage the dough to rise properly.
- Dough Consistency: The dough should be soft and slightly tacky. If it’s too sticky, add a tablespoon of flour at a time until it reaches the desired consistency. If it’s too dry, add a tablespoon of milk at a time.
- Rising Environment: Create a warm and humid environment for the dough to rise. You can place the bowl in a slightly warmed oven (turned off) or near a warm stove.
- Cheese Variety: Experiment with different types of cheese for different flavor profiles. A mix of cheddar and mozzarella will provide a great balance of flavor and stretch.
- Garlic Butter Boost: For an extra layer of flavor, brush the baked rolls with garlic butter immediately after removing them from the oven.
Serving & Storage Suggestions
Serve the cheesy bread rolls warm as a side dish to soups, salads, or pasta. They’re also delicious on their own as a snack or light meal.
- Room Temperature: Leftover rolls can be stored at room temperature in an airtight container for up to 2 days.
- Refrigerator: For longer storage, keep them in the refrigerator for up to 5 days.
- Freezer: To freeze, wrap the rolls individually in plastic wrap and then place them in a freezer bag. They can be frozen for up to 2 months.
- Reheating: To reheat, wrap the rolls in foil and bake in a preheated oven at 175°C (350°F) for about 10-15 minutes, or until warmed through. You can also microwave them for a shorter time, but be careful not to overcook them.
Nutritional Information
Note: Nutritional information is an estimate and may vary based on specific ingredients and portion sizes.
| Nutrient | Amount per Serving | % Daily Value |
|---|---|---|
| Calories | 390.5 kcal | N/A |
| Calories from Fat | 86 g | 22% |
| Total Fat | 9.6 g | 14% |
| Saturated Fat | 5.7 g | 28% |
| Cholesterol | 28.1 mg | 9% |
| Sodium | 913.4 mg | 38% |
| Total Carbohydrate | 61.3 g | 20% |
| Dietary Fiber | 2.2 g | 8% |
| Sugars | 3.4 g | 13% |
| Protein | 13.4 g | 26% |
Variations & Substitutions
- Herb Infusion: Add 1-2 tablespoons of chopped fresh herbs, such as rosemary, thyme, or oregano, to the dough for an herbaceous twist.
- Spicy Kick: Mix a pinch of red pepper flakes into the dough or sprinkle them on top of the cheese for a little heat.
- Garlic Cheese Rolls: Add 1-2 cloves of minced garlic to the dough or mix it with the melted butter for a garlic-infused flavor.
- Whole Wheat Flour: Substitute up to half of the all-purpose flour with whole wheat flour for a nuttier flavor and added fiber.
- Vegan Option: Use plant-based milk, vegan butter or shortening, and vegan cheese to make these rolls vegan-friendly.
- Gluten-Free: While it requires a completely different dough recipe and gluten-free flour blend, you can adapt the cheesy topping to a gluten-free bread roll recipe of your choice.
FAQs (Frequently Asked Questions)
Q: Can I make the dough ahead of time?
A: Yes! After the first rise, you can refrigerate the dough for up to 24 hours. Punch it down before shaping and allow it to come to room temperature slightly before proceeding with the second rise.
Q: What if my yeast doesn’t foam?
A: It could be that your water was too hot or too cold, or that your yeast is expired. Try again with fresh yeast and ensure the water is warm (around 105-115°F).
Q: Can I use pre-shredded cheese?
A: Yes, you can. However, freshly grated cheese will melt more smoothly and provide a better texture.
Q: How do I prevent the rolls from drying out?
A: Brush the tops of the rolls with melted butter or milk after baking to keep them soft and moist.
Q: My rolls are browning too quickly. What should I do?
A: Tent the rolls loosely with aluminum foil during the last 10-15 minutes of baking to prevent them from over-browning.
Final Thoughts
I hope this recipe inspires you to create your own memories around these warm, comforting cheesy bread rolls. Don’t be afraid to experiment with different cheeses and herbs to create your perfect flavor combination. Whether you’re a seasoned baker or just starting out, the simple pleasure of homemade bread is something everyone can enjoy. I’d love to hear about your experiences with this recipe, so please share your feedback and photos. These rolls are also fantastic paired with a hearty tomato soup on a chilly evening!