
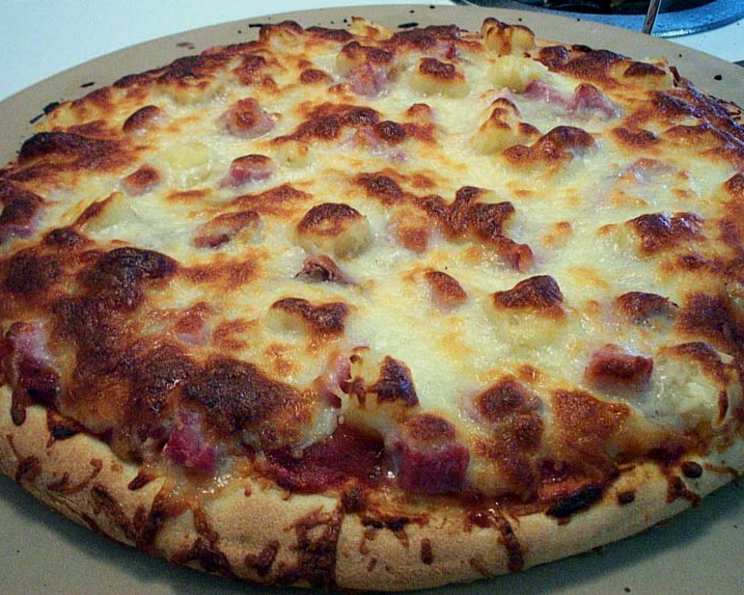
Cheesy Ham & Pineapple Pizza: A Culinary Throwback
Pizza night in our house was a sacred ritual. Growing up, Friday nights meant piling onto the worn floral couch, the aroma of bubbling cheese and simmering tomato sauce filling the air. My mom, ever the culinary adventurer, always let us customize our slices. While my brother went for the classic pepperoni, and my dad loved a simple mushroom, I always gravitated towards the slightly controversial, yet utterly delightful, combination of ham and pineapple. That sweet and savory dance on a crispy crust was, and still is, pure comfort food.
Recipe Overview
- Prep Time: 10 minutes
- Cook Time: 10 minutes
- Total Time: 20 minutes
- Servings: 4
- Yield: 1 pizza
- Dietary Type: Not specified
Ingredients
- 1 (10 ounce) Italian cheese-flavored thin pizza crust (such as Boboli)
- ½ cup commercial pizza sauce
- ½ cup julienne-cut cooked ham (2-inch)
- 1 (8 ounce) can pineapple chunks in juice, drained
- ¾ cup preshredded part-skim mozzarella cheese
- ¼ teaspoon crushed red pepper flakes
Equipment Needed
- Baking sheet
- Pizza cutter or large knife
Instructions
-
Begin by preheating your oven to 450°F (232°C). Ensuring the oven is fully preheated is crucial for achieving a crisp crust.
-
Place the pizza crust on a baking sheet. This will prevent the bottom from burning and makes it easier to transfer the pizza in and out of the oven.
-
Spread the pizza sauce evenly over the crust, leaving a ½-inch border. This border will form a delicious, slightly puffed edge. Don’t over-sauce; too much sauce can make the crust soggy.
-
Top with the julienne-cut ham, drained pineapple chunks, and preshredded mozzarella cheese. Distribute the toppings evenly to ensure every bite is balanced and flavorful.
-
Sprinkle with crushed red pepper flakes. This adds a subtle kick that complements the sweetness of the pineapple and the saltiness of the ham.
-
Bake at 450°F (232°C) for 10 minutes, or until the crust is crisp and the cheese is melted and bubbly. Keep a close eye on it during the last few minutes to prevent burning. The exact baking time may vary depending on your oven.
-
Remove from the oven and let it cool for a minute or two before slicing and serving. This allows the cheese to set slightly, making it easier to cut.
Expert Tips & Tricks
- Crispier Crust: For an extra crispy crust, place a pizza stone or baking steel in the oven while it preheats. This will provide a hot surface for the pizza to bake on.
- Fresh Pineapple: While canned pineapple is convenient, fresh pineapple will add a brighter, more vibrant flavor. Just be sure to grill or sauté it briefly to bring out its sweetness.
- Cheese Placement: Place a thin layer of cheese directly on the sauce before adding the other toppings. This will help to create a barrier and prevent the crust from getting soggy.
- Spice Level: Adjust the amount of crushed red pepper flakes to your preference. If you like it extra spicy, add a pinch of cayenne pepper as well.
- Make Ahead: You can assemble the pizza ahead of time and store it in the refrigerator for up to 24 hours before baking. Just be sure to cover it tightly to prevent the crust from drying out.
Serving & Storage Suggestions
Serve your Cheesy Ham & Pineapple Pizza immediately while it’s hot and the cheese is melted and gooey. It pairs perfectly with a simple green salad dressed with a light vinaigrette. Leftovers can be stored in an airtight container in the refrigerator for up to 3 days. To reheat, you can use the oven, a toaster oven, or even a skillet on the stovetop. Reheating in the oven will help to retain the crust’s crispness. Avoid leaving the pizza at room temperature for longer than two hours.
Nutritional Information
| Nutrient | Amount per Serving | % Daily Value |
|---|---|---|
| Calories | 211.4 kcal | N/A |
| Calories from Fat | 94 g | 45% |
| Total Fat | 10.5 g | 16% |
| Saturated Fat | 5.5 g | 27% |
| Cholesterol | 43.1 mg | 14% |
| Sodium | 424.3 mg | 17% |
| Total Carbohydrate | 13.6 g | 4% |
| Dietary Fiber | 0.6 g | 2% |
| Sugars | 11.5 g | N/A |
| Protein | 15.7 g | 31% |
Note: Nutritional information is an estimate and may vary based on specific ingredients used.
Variations & Substitutions
- Gluten-Free: Use a gluten-free pizza crust for a gluten-free version.
- Different Cheese: Experiment with different cheeses such as provolone, fontina, or even a sprinkle of parmesan for a richer flavor.
- Spicier: Add a drizzle of sriracha or a few slices of jalapeño for an extra kick.
- Hawaiian Pizza with a Twist: Add some bacon or Canadian bacon for a smoky flavor.
- Vegetarian Option: Skip the ham and add some roasted red peppers or mushrooms.
FAQs (Frequently Asked Questions)
Q: Can I use a different type of pizza crust?
A: Absolutely! While this recipe calls for a thin, Italian cheese-flavored crust, you can use any crust you prefer – thick crust, whole wheat, or even a homemade crust. Just adjust the baking time accordingly.
Q: Can I use fresh pineapple instead of canned?
A: Yes, fresh pineapple is a great option! Just be sure to drain it well and pat it dry before adding it to the pizza to prevent a soggy crust. Grilling the pineapple beforehand can also enhance its flavor.
Q: What if I don’t have mozzarella cheese?
A: Mozzarella is a classic pizza cheese, but you can substitute it with other cheeses like provolone, fontina, or a blend of Italian cheeses.
Q: Can I freeze this pizza?
A: While you can freeze the assembled pizza before baking, it’s best enjoyed fresh. Freezing can alter the texture of the crust and toppings. If you do freeze it, wrap it tightly in plastic wrap and then foil, and bake from frozen, adding a few extra minutes to the cooking time.
Q: Can I add other toppings?
A: Of course! Feel free to customize this pizza with your favorite toppings, such as bell peppers, onions, mushrooms, or olives.
Final Thoughts
This Cheesy Ham & Pineapple Pizza is a delicious and easy-to-make meal that’s perfect for a weeknight dinner or a casual gathering. The combination of sweet pineapple, savory ham, and melty cheese is a crowd-pleaser that’s sure to satisfy. So, gather your ingredients, preheat your oven, and get ready to enjoy a slice of pizza perfection! And if you’re feeling adventurous, don’t hesitate to put your own spin on it. I encourage you to share your creations and feedback—I’d love to hear how you’ve made this recipe your own! Perhaps a crisp arugula salad on the side, just like the original recipe suggests, would round out the meal perfectly. Enjoy!