
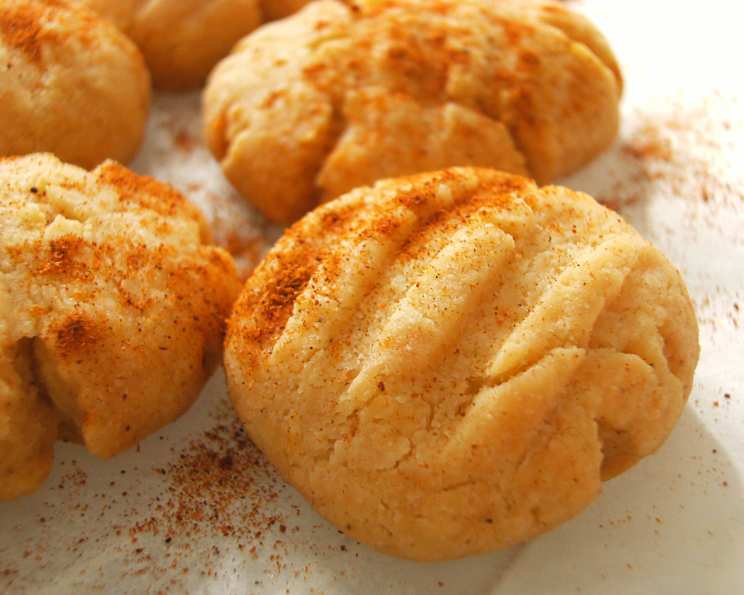
Cheesy Penny Wafers: A Savory Bite of Nostalgia
The aroma of baking cheese has a time-traveling effect on me. It instantly transports me back to my grandmother’s kitchen, a warm and inviting space filled with the comforting scents of home. I remember her pulling out a well-worn copy of a Reader’s Digest cookbook, her fingers tracing the faded ink of a recipe for these very cheesy wafers. They weren’t just a snack; they were a symbol of her love, a small, perfectly crisp token of her affection that she shared generously with everyone who walked through her door. Now, I carry on that tradition, filling my own kitchen with the same comforting aroma and sharing these savory treats with my loved ones.
Recipe Overview
- Prep Time: 20 minutes
- Cook Time: 15 minutes
- Total Time: 35 minutes
- Yields: 40 cheese appetizers
- Serves: 40
- Dietary Type: Vegetarian
Ingredients
- 1 cup reduced-fat cheddar cheese, shredded (4-oz)
- 3 tablespoons unsalted butter, softened
- 3 tablespoons vegetable oil
- 1 cup all-purpose flour
- ½ teaspoon dry mustard
- ¼ teaspoon ground red pepper (cayenne)
- Paprika (for dusting)
Equipment Needed
- Food Processor
- Plastic Wrap
- Flat Plate
- Oven
- Two Ungreased Baking Sheets
- Wire Rack
Instructions
-
Preheat your oven to 350°F (175°C). Have two ungreased baking sheets ready.
-
In the bowl of a food processor, combine the shredded reduced-fat cheddar cheese and softened unsalted butter. Process for about 30 seconds, or until the mixture is just combined. Avoid over-processing at this stage; you want to retain some texture for the best results.
-
With the food processor running, slowly pour the vegetable oil through the food chute. This gradual addition helps emulsify the mixture and create a smooth, cohesive dough.
-
Add the all-purpose flour, dry mustard, and ground red pepper (cayenne) to the food processor. Process again for about 30 seconds, or until the mixture resembles coarse crumbs. Be careful not to over-process the dough, as this can lead to tough wafers. The key is to work the dough until it just comes together.
-
Remove the dough from the food processor and gently press it into a ball. Wrap the ball tightly in plastic wrap and place it on a flat plate. Chill the dough in the refrigerator for at least 30 minutes. This chilling period is essential as it allows the gluten in the flour to relax, resulting in a more tender and flaky final product.
-
Once the dough has chilled, remove it from the refrigerator. Shape the dough into approximately 40 small balls, each about 1/2-inch in diameter. This step can be a little time-consuming, but uniformity is key to even baking.
-
Place the dough balls on the prepared baking sheets, spacing them about 2 inches apart. This spacing allows for proper air circulation and ensures that the wafers bake evenly without sticking together.
-
Using the back of a fork, lightly flatten each ball twice, creating a criss-cross pattern. Continue pressing until the dough resembles a coin about 1/8-inch thick. The fork pattern not only adds a decorative touch but also helps to create a slightly crispier texture.
-
Bake in the preheated oven for 15 minutes, or until the wafers are crisp but not browned. Keep a close eye on them towards the end of the baking time to prevent burning. Baking times can vary slightly depending on your oven, so trust your instincts and look for that golden-brown color.
-
Once baked, carefully transfer the cheesy penny wafers to a wire rack to cool completely. While they are still slightly warm, dust the tops lightly with paprika for a pop of color and an extra layer of flavor. The paprika complements the cheesy flavor beautifully.
-
Store the cooled cheesy penny wafers in an airtight container for up to 2 weeks. For longer storage, you can freeze them for up to 3 months. Thaw completely before serving.
Expert Tips & Tricks
- Cheese Choice: While the recipe calls for reduced-fat cheddar, feel free to experiment with other types of cheese, such as sharp cheddar, Monterey Jack, or even a blend of cheeses for a more complex flavor profile. Just be sure to shred the cheese finely for the best results.
- Spice it Up: Adjust the amount of ground red pepper (cayenne) to suit your taste. For a milder flavor, omit it altogether, or for a spicier kick, add a pinch more. Smoked paprika can also be used in addition to the regular paprika for a smoky flavor.
- Even Baking: Ensure even baking by rotating the baking sheets halfway through the baking time. This will help to compensate for any hot spots in your oven and ensure that all the wafers are cooked to perfection.
- Make-Ahead Magic: The dough can be made ahead of time and stored in the refrigerator for up to 2 days. This is a great option if you’re short on time. Just bring the dough to room temperature slightly before rolling it out.
Serving & Storage Suggestions
Serve these cheesy penny wafers as an appetizer, snack, or as part of a cheese board. They pair wonderfully with soups, salads, or a glass of wine. For an elegant presentation, arrange the wafers on a platter garnished with fresh herbs or a drizzle of balsamic glaze.
Store the cooled wafers in an airtight container at room temperature for up to 2 weeks. To freeze, place the wafers in a single layer on a baking sheet and freeze until solid. Then, transfer them to a freezer-safe bag or container for up to 3 months. Thaw completely before serving. You can also re-crisp them in a low oven (250°F/120°C) for a few minutes if they lose their crispness during storage.
Nutritional Information
| Nutrient | Amount per Serving | % Daily Value |
|---|---|---|
| Calories | 28.2 kcal | N/A |
| Calories from Fat | 17 g | 62% |
| Total Fat | 1.9 g | 2% |
| Saturated Fat | 0.7 g | 3% |
| Cholesterol | 2.3 mg | 0% |
| Sodium | 0.2 mg | 0% |
| Total Carbohydrate | 2.4 g | 0% |
| Dietary Fiber | 0.1 g | 0% |
| Sugars | 0 g | 0% |
| Protein | 0.3 g | 0% |
Note: Nutritional information is an estimate and may vary based on specific ingredients used.
Variations & Substitutions
- Gluten-Free: Substitute the all-purpose flour with a gluten-free all-purpose flour blend for a gluten-free version. You may need to add a little more liquid (water or milk) to bring the dough together.
- Vegan: This recipe is challenging to make vegan without significantly altering the texture and flavor. However, you could try using vegan butter and a good-quality vegan cheddar alternative. Be aware that the results may vary.
- Herb Infusion: Add fresh herbs such as rosemary, thyme, or oregano to the dough for an herbaceous twist. Finely chop the herbs and incorporate them into the flour mixture.
- Garlic Parmesan: Omit the cayenne pepper and add a teaspoon of garlic powder and a quarter cup of grated Parmesan cheese to the dough for a savory garlic Parmesan version.
FAQs (Frequently Asked Questions)
Q: Can I use pre-shredded cheese instead of shredding it myself?
A: While pre-shredded cheese is convenient, it often contains cellulose, which can prevent it from melting as smoothly. For the best results, shred your own cheese from a block.
Q: My dough is too dry and crumbly. What should I do?
A: If your dough is too dry, add a teaspoon of water or vegetable oil at a time until it comes together. Be careful not to add too much liquid, as this can make the dough sticky.
Q: How do I prevent the wafers from sticking to the baking sheet?
A: Using ungreased baking sheets should be sufficient, but you can also line them with parchment paper for added insurance.
Q: Can I freeze the baked cheesy penny wafers?
A: Yes, you can freeze the baked wafers. Allow them to cool completely, then arrange them in a single layer on a baking sheet and freeze until solid. Transfer them to a freezer-safe bag or container for up to 3 months. Thaw completely before serving.
Q: What if I don’t have a food processor?
A: You can make this recipe by hand. Grate the cheese finely and mix it with the softened butter using a fork or pastry blender. Then, gradually add the oil and dry ingredients, mixing until the dough comes together.
Final Thoughts
These cheesy penny wafers are more than just a recipe; they’re a taste of nostalgia, a connection to the past, and a delicious way to create new memories. Whether you’re serving them at a party, enjoying them as a snack, or simply craving a comforting bite, I encourage you to try this recipe and share it with your loved ones. Don’t be afraid to experiment with different cheeses, spices, and herbs to create your own unique version. And most importantly, enjoy the process! I would love to hear how your cheesy penny wafers turned out and any variations you tried. Happy baking!