
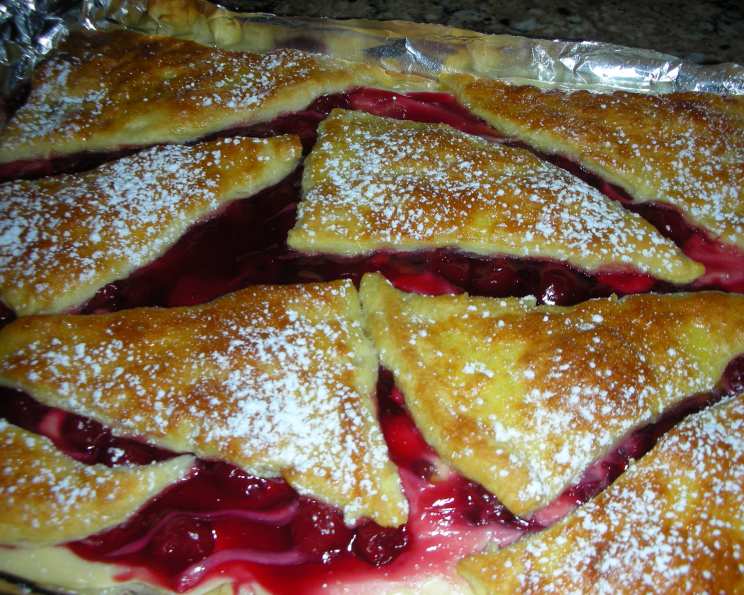
Cherry Cheese Danish for a Crowd: A Sweet Treat to Share
The memory still makes me smile. It was my grandmother’s birthday, and the family had gathered at her house. She wasn’t one for elaborate cakes, but she always had a soft spot for pastries. This Cherry Cheese Danish, warm from the oven with its sweet, tangy cherry filling and creamy cheese, was her absolute favorite. Watching her face light up with each bite, surrounded by loved ones, is a moment I’ll always treasure. This recipe brings that warmth and joy to any gathering.
Recipe Overview
- Prep Time: 15 minutes
- Cook Time: 24-34 minutes
- Total Time: 39-49 minutes
- Servings: 16
- Yield: 1 danish
- Dietary Type: Not specified (contains dairy, eggs, and gluten)
Ingredients
- For the Filling:
- 2 (8 ounce) packages cream cheese, room temperature
- ½ cup sugar
- 1 large egg
- 2 teaspoons vanilla extract
- For the Danish:
- 2 (8 ounce) tubes refrigerated crescent dinner rolls
- 1 (21 ounce) can cherry pie filling
- For the Glaze:
- 1 egg yolk, beaten with
- 1 teaspoon water
- For Garnish:
- Powdered sugar
Equipment Needed
- Large cookie sheet with sides (10″ x 13″ recommended) or jelly roll pan
- Medium-sized bowl
- Electric mixer or whisk
- Wire rack
- Pastry brush (optional, for glaze)
Instructions
-
Preheat your oven to 350°F (175°C). It’s crucial to have the oven at the correct temperature for even baking.
-
Prepare the baking sheet. Lightly grease a large cookie sheet with sides, or a jelly roll pan. A 10″ x 13″ cookie sheet tends to work best, providing the ideal surface area for even cooking. A light spray with cooking spray or a thin coating of butter will prevent sticking.
-
Make the cheese filling. In a medium-sized bowl, combine the softened cream cheese, sugar, egg, and vanilla extract. Beat with an electric mixer or whisk until the mixture is smooth and creamy. Ensure the cream cheese is at room temperature to avoid lumps.
-
Prepare the bottom crust. Remove the dough from one tube of refrigerated crescent dinner rolls. Unroll the dough and place it in the middle of the prepared pan.
-
Shape the bottom crust. Use your fingers to pat out the dough, pressing the perforations together. Continue until the dough completely covers the bottom of the pan. Aim for a uniform thickness to ensure even baking.
-
Pre-bake the crust. Warm the crust in the preheated oven for 4 minutes until it’s slightly dry. This step sets the bottom crust and prevents it from becoming soggy from the filling.
-
Cool the crust slightly. Remove the pan from the oven and let the bottom crust cool for a few minutes. This allows the crust to firm up before adding the fillings.
-
Add the cheese filling. Spread the cream cheese mixture evenly over the bottom crust, extending it to the edges. A smooth, even layer of cheese ensures each bite is perfectly balanced.
-
Add the cherry filling. Scatter the cherry pie filling evenly over the cheese layer. Distribute the cherries generously, ensuring each part of the Danish has its fair share of sweet and tangy fruit.
-
Prepare the top crust. Unroll the remaining sheet of crescent roll dough. Separate it into 8 triangles. Arrange the triangles on top of the cherry filling, spacing them evenly. The triangles shouldn’t completely cover the surface; the aim is to create a decorative topping. Alternatively, for a rustic look, tear the 8 triangles into small 1″ pieces and randomly scatter them over the top of the pie filling.
-
Brush with egg glaze. In a small bowl, whisk together the egg yolk and water until well combined. Brush the egg glaze over the triangles or small pieces of dough on top. The glaze will give the crust a beautiful golden-brown color and a glossy finish.
-
Bake the Danish. Bake in the preheated oven for 20-30 minutes, or until the top crust is golden brown and the cheese mixture is set. The baking time may vary depending on your oven, so keep a close eye on it. Check for doneness by gently shaking the pan; the cheese filling should not jiggle excessively.
-
Cool and garnish. Remove the Danish from the oven and let it cool in the pan on a wire rack before dusting it generously with powdered sugar. The powdered sugar adds a touch of sweetness and a lovely visual appeal.
Expert Tips & Tricks
- Softening Cream Cheese: To quickly soften cream cheese, remove it from its packaging and microwave it for 15-20 seconds. Be careful not to overheat it, or it will melt.
- Preventing a Soggy Crust: Pre-baking the bottom crust is key to preventing a soggy bottom. You can also lightly dust the pre-baked crust with a thin layer of flour before adding the filling.
- Customizing the Filling: Feel free to experiment with different pie fillings, such as blueberry, apple, or even chocolate. You can also add a touch of almond extract to the cheese filling for a richer flavor.
- Making Ahead: This Danish can be assembled ahead of time and stored in the refrigerator for up to 24 hours before baking. Add the egg wash just before placing it in the oven.
Serving & Storage Suggestions
Serve the Cherry Cheese Danish at room temperature, dusted with powdered sugar. It’s perfect as a dessert, brunch item, or afternoon treat. Leftovers can be stored at room temperature for up to 1 day, or in the refrigerator for up to 3 days. To reheat, simply warm individual slices in the microwave for a few seconds. For longer storage, wrap individual slices tightly and freeze them for up to 2 months. Thaw in the refrigerator overnight before reheating.
Nutritional Information
These values are estimates and may vary based on specific ingredients and portion sizes.
| Nutrient | Amount per Serving | % Daily Value |
|---|---|---|
| Calories | 260 kcal | – |
| Calories from Fat | 109 kcal | – |
| Total Fat | 12.1 g | 18% |
| Saturated Fat | 6.1 g | 30% |
| Cholesterol | 67.4 mg | 22% |
| Sodium | 233.2 mg | 9% |
| Total Carbohydrate | 32.7 g | 10% |
| Dietary Fiber | 1.3 g | 5% |
| Sugars | 8.4 g | – |
| Protein | 5.1 g | 10% |
Variations & Substitutions
- Different Fruit Filling: Experiment with other fruit fillings like blueberry, apple, or even a mixed berry blend.
- Lemon Zest: Add a teaspoon of lemon zest to the cheese filling for a brighter, more citrusy flavor.
- Gluten-Free: While crescent roll dough is not naturally gluten-free, you could attempt to make a homemade gluten-free crust or look for gluten-free puff pastry sheets as a substitute, though the result may vary slightly.
- Vegan Version: While challenging, a vegan version could be attempted by substituting the cream cheese with a plant-based alternative, using a flax egg replacer, and ensuring the crescent roll dough is vegan-friendly. The taste and texture would differ significantly.
FAQs (Frequently Asked Questions)
Q: Can I make this the day before?
A: Yes, you can assemble the Danish the day before and store it in the refrigerator. Add the egg wash just before baking.
Q: What if I don’t have crescent roll dough?
A: Puff pastry can be used as a substitute for crescent roll dough, although the texture will be slightly different.
Q: How do I prevent the cheese filling from cracking?
A: Avoid overbaking the Danish. Also, ensure the cream cheese is at room temperature before mixing the filling.
Q: Can I freeze the Cherry Cheese Danish?
A: Yes, you can freeze it after baking. Wrap it tightly in plastic wrap and then in foil. Thaw in the refrigerator overnight.
Q: My crust is browning too quickly. What should I do?
A: Tent the Danish with foil during the last few minutes of baking to prevent the crust from burning.
Final Thoughts
This Cherry Cheese Danish is a delightful treat that’s perfect for sharing with friends and family. Its creamy filling, sweet cherries, and flaky crust make it an irresistible dessert that’s sure to impress. Don’t be afraid to get creative with the fillings and garnishes to make it your own. So go ahead, bake up a batch and spread some joy! I’d love to hear your experiences and variations in the comments below. Consider serving it with a scoop of vanilla ice cream or a warm cup of coffee for the ultimate indulgence. Happy baking!