
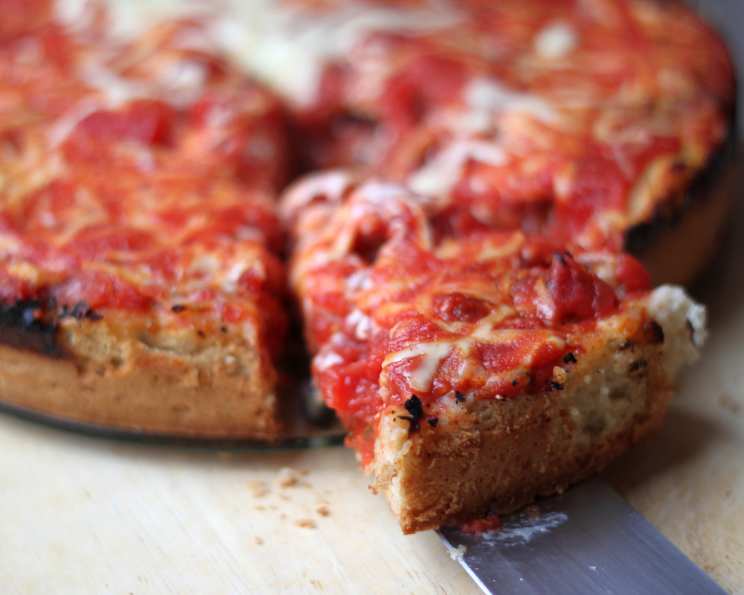
Chicago Style Deep Dish Sausage Pizza – Real Deep Dish
The scent alone transports me back. Stepping into my favorite Chicago pizzeria as a kid, the aroma of yeasty dough, tangy tomatoes, and savory sausage was intoxicating. The anticipation built as the server placed that first, glorious deep-dish slice on my plate. The crust, a buttery fortress, held a molten lake of cheese and chunky tomato sauce. That first bite, the explosion of flavor and texture, was pure pizza nirvana. Now, recreating that magic at home feels like sharing a beloved piece of my childhood.
Recipe Overview:
- Prep Time: 1 hour 30 minutes
- Cook Time: 35 minutes
- Total Time: 2 hours 5 minutes
- Servings: 6
- Yield: 1 (12-inch) pizza
- Dietary Type: Not specified
Ingredients:
For the Crust:
- ¾ cup lukewarm water (110 degrees F)
- ¼ teaspoon granulated sugar
- ¼ teaspoon sea salt or table salt
- ½ teaspoon active dry yeast
- ¼ cup corn oil
- 2 ¼ cups all-purpose flour
- Nonstick cooking spray (for greasing your pan)
For the Filling:
- 12 ounces mozzarella cheese, sliced (low moisture, approximately 15 slices)
- ¾ lb Italian sausage, raw
- 16 ounces crushed tomatoes, lightly drained
- ⅛ cup Romano cheese, grated or ⅛ cup Parmesan cheese
Equipment Needed:
- 1 round deep-dish pizza/cake pan – 12” diameter by 2” in height
- Pizza Stone (optional, but recommended)
- Fine mesh Strainer and Bowl
- Large Spoon or Ladle
- Sturdy mixing spoon
- Stainless Steel/Plastic Bowl
- Food service gloves (optional, for kneading)
- Wide roll of heavy duty aluminum foil
- Pan Gripper and/or Pot Holders
- Serving/Cutting Spatula
- Extra bowl
- Cooking spray
- Plastic wrap
Instructions:
-
MAKING THE DOUGH: In a mixing bowl, dissolve the sugar and salt into the lukewarm water. Ensure the water is not too hot, or it will kill the yeast.
-
Add the yeast, corn oil, and a small amount of the flour.
-
Mix until you have a thick batter, then add the rest of the flour and continue mixing until combined.
-
Knead until the dough comes together into a smooth ball, then STOP. DON’T OVER-KNEAD. Total mixing/kneading time should be no more than 2 – 3 minutes. (This step can also be done in a mixer with a dough hook in 1 – 2 minutes. If it looks smooth but doesn’t form a ball, just take it off the hook and form it into a ball). Over-kneading will result in a tough crust.
-
Place the dough in a bowl (or keep it in your mixing bowl), lightly oil/spray the dough ball.
-
Cover the bowl with plastic wrap and place it in a warm place. Let the dough rise for 1 to 2 hours (or until the dough has doubled). A warm oven (turned off!) or a sunny spot works well.
-
After the rise, you can use the dough immediately OR punch down the dough and let it rise again until you’re ready to use the dough OR place it into a plastic zip-top bag and into the refrigerator for 6 to 24 hours. Refrigerating the dough will develop more complex flavors.
-
ASSEMBLING YOUR PIZZA AND BAKING: Place a pizza stone in the bottom rack of your oven and place a sheet of heavy-duty aluminum foil across the top rack. Preheat your oven to 500 degrees (F). It should take about 40 minutes to an hour to preheat your stone, so you may want to do this while your dough is rising. If you refrigerated your dough, take it out of the fridge while your oven is preheating.
-
Using a fine mesh strainer over a bowl, drain any excess liquid from your crushed tomatoes, if necessary. This step is crucial to prevent a soggy pizza.
-
Lightly grease the bottom (not the sides) of your pan with oil or high-heat cooking spray. Grease only the bottom to allow the crust to grip the sides and rise properly.
-
Press out the dough in the pan from the center to the edge, as flat and even as possible. Pinch up the sides into a paper-thin lip about 1 to 1-1/2 inches high. This forms the characteristic deep-dish crust walls. Aim for an even thickness to ensure uniform baking.
-
Lightly press sliced mozzarella cheese into the dough, overlapping the slices until the entire bottom is covered. This creates a barrier between the dough and the sauce, preventing sogginess. (If making an all-cheese pizza, you can add extra cheese if you want, then skip to the part where you add the tomatoes).
-
Add the Italian sausage: For traditional patty, add small bits of sausage on top of the cheese, connecting the bits together into a loose web, until the entire bottom is covered. Use raw sausage, as it will cook during baking. Distribute evenly for consistent flavor.
-
Add any other ingredient that you want to protect from burning.
-
THE PART WHERE YOU ADD THE TOMATOES: With a large spoon or ladle, top the pizza with the crushed tomatoes, spreading the sauce from the center out to the edge until the other ingredients are completely covered with sauce. You should need between 14 and 16 oz of tomatoes. Don’t be shy with the sauce! It’s a defining characteristic of deep-dish pizza.
-
Sprinkle grated Romano (and/or Parmesan) Cheese over the top of the sauce.
-
Turn oven down to 450 degrees F and place the pizza pan directly on top of the pizza stone on the lower rack.
-
Bake for approximately 35 minutes. If your crust or toppings start to char on top, place a loose sheet of aluminum foil over the top of the pizza for the remaining baking time. Keep a close eye on the pizza during the last 10-15 minutes of baking.
-
Remove from oven, let the pizza rest for 5 minutes, then cut & serve on a real plate with a knife & fork. The resting period allows the cheese and sauce to set slightly, making it easier to slice and serve.
Expert Tips & Tricks:
- Dough Temperature: For optimal rising, ensure your water is lukewarm (around 110°F). Too hot, and you risk killing the yeast; too cold, and it won’t activate properly.
- Cheese Placement: Don’t skimp on the cheese layer at the bottom. It acts as a crucial barrier preventing the crust from becoming soggy.
- Sausage Strategy: Using raw sausage might seem unconventional, but it ensures the sausage cooks perfectly in the deep-dish environment without becoming dry.
- Tomato Drain: Always drain excess liquid from the crushed tomatoes. Nobody wants a watery pizza!
- Baking Time Adjustment: Oven temperatures can vary. Keep a close watch on your pizza during baking, adjusting the time or covering it with foil if needed to prevent burning.
Serving & Storage Suggestions:
Serve the deep-dish pizza hot, straight from the oven. Its molten interior and sturdy crust require a knife and fork for proper enjoyment. Leftovers can be stored in the refrigerator for up to 3 days. To reheat, preheat your oven to 350°F and bake slices on a baking sheet until warmed through. You can also microwave slices, but the crust may become slightly softer. For longer storage, freeze individual slices wrapped tightly in plastic wrap and aluminum foil. Reheat from frozen in the oven.
Nutritional Information:
| Nutrient | Amount per Serving | % Daily Value |
|---|---|---|
| Calories | 649.4 kcal | N/A |
| Calories from Fat | 346 g | 53% |
| Total Fat | 38.5 g | 59% |
| Saturated Fat | 14.5 g | 72% |
| Cholesterol | 79.1 mg | 26% |
| Sodium | 1261.1 mg | 52% |
| Total Carbohydrate | 45.3 g | 15% |
| Dietary Fiber | 2.9 g | 11% |
| Sugars | 1.4 g | 5% |
| Protein | 30.2 g | 60% |
Variations & Substitutions:
- Vegetarian Delight: Skip the sausage and load up on vegetables like mushrooms, bell peppers, onions, and spinach.
- Spicy Kick: Add a pinch of red pepper flakes to the tomato sauce or use spicy Italian sausage.
- Different Cheese: Experiment with other cheeses like provolone, fontina, or a blend of Italian cheeses.
- Crust Experiment: Infuse the dough with herbs like oregano or basil for added flavor.
- Gluten-Free: While challenging, a gluten-free deep-dish is possible using a high-quality gluten-free flour blend designed for pizza. Be prepared to adjust the hydration and baking time.
FAQs (Frequently Asked Questions):
Q: Why is it important to grease only the bottom of the pan?
A: Greasing only the bottom allows the crust to grip the sides of the pan, aiding in its rise and preventing it from sliding down during baking.
Q: Can I use pre-cooked sausage instead of raw?
A: While you can, using raw sausage is recommended for optimal texture and flavor, as it cooks alongside the other ingredients in the deep-dish environment.
Q: What if my crust starts to brown too quickly?
A: If the crust or toppings begin to char excessively, loosely cover the pizza with aluminum foil for the remainder of the baking time to shield it from direct heat.
Q: Can I make the dough ahead of time?
A: Absolutely! Making the dough a day in advance and refrigerating it allows the flavors to develop further, resulting in a more complex and delicious crust.
Q: Is a pizza stone really necessary?
A: While not essential, a pizza stone helps to distribute heat evenly and create a crispier crust, mimicking the results of a professional pizza oven.
Final Thoughts:
Don’t be intimidated by the depth of this dish! Making Chicago-style deep-dish pizza at home is a rewarding culinary adventure. The combination of the buttery, crispy crust, the layers of cheese and sausage, and the chunky tomato sauce creates a symphony of flavors and textures that’s simply irresistible. So, gather your ingredients, preheat your oven, and get ready to experience pizza perfection. And be sure to share your creations and any creative twists you discover along the way!