
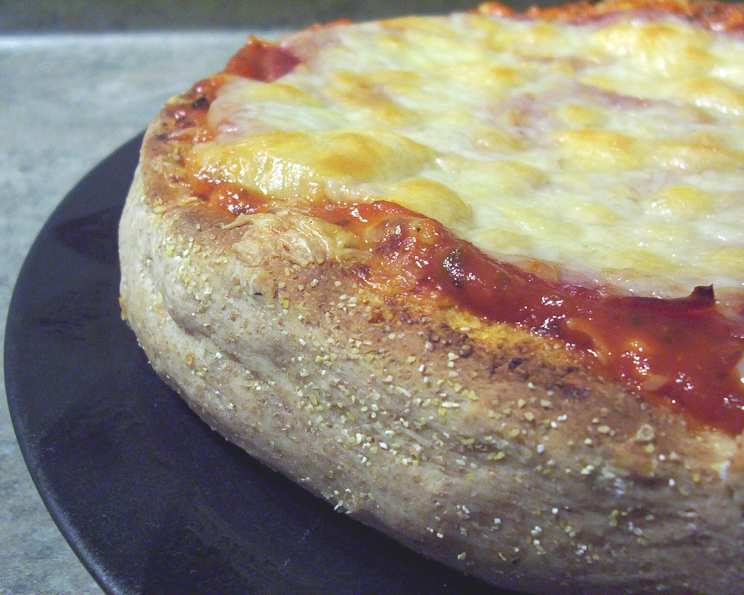
Mastering the Art of Chicago-Style Deep Dish Pizza Crust
The scent of warm, yeasty dough baking in a scorching hot oven… it instantly transports me back to my childhood. I remember visiting my aunt in Chicago and the sheer excitement of walking into a pizzeria, the aroma of melted mozzarella and simmering tomato sauce hanging heavy in the air. But the real magic was the deep-dish pizza – a symphony of flavors held within a sturdy, buttery, and surprisingly delicate crust. Today, I’m excited to share a recipe that brings that same experience into your kitchen.
Recipe Overview
- Prep Time: 4 hours 30 minutes
- Cook Time: 30-40 minutes
- Total Time: 5 hours
- Yield: 2 10-inch pizzas
- Dietary Type: Vegetarian
Ingredients
- 2 cups water
- 0.5 (1/4 ounce) packet yeast (1 1/8 tsp or 1/8 oz)
- 2 teaspoons salt (1/2 oz)
- 7 cups bread flour (2 lb)
- 1⁄4 cup olive oil
- 1⁄4 cup cornmeal
Equipment Needed
- Stand mixer with dough hook
- Large bowl
- Two 10-inch springform pans (or deep baking dishes)
- Measuring cups and spoons
Instructions
-
In the bowl of a stand mixer, pour in the water and sprinkle the yeast over the surface. Allow the yeast to dissolve for about 5 minutes, or until it starts to foam. This step ensures that your yeast is active and ready to create a beautifully risen crust.
-
Add the salt, bread flour, and olive oil to the mixer bowl. Attach the dough hook to your mixer.
-
Begin mixing the dough on low speed. As the ingredients come together, a shaggy dough will form.
-
Once a ball has formed, increase the mixer speed to medium and continue mixing for 1 to 2 minutes. The dough should become elastic and smooth. This kneading process develops the gluten, giving the crust its characteristic chewiness and structure.
-
Remove the dough from the mixer and place it in a large bowl that has been lightly coated with olive oil. Turn the dough to coat all sides with the oil, preventing it from drying out during its long rest.
-
Cover the bowl with plastic wrap or a clean kitchen towel and allow the dough to rest at room temperature for approximately 4 hours. This long fermentation period is crucial for developing the complex flavors and airy texture of the deep-dish crust. The dough should at least double in size.
-
After the resting period, gently deflate the dough and divide it into two equal portions.
-
Place each portion on a lightly floured surface. The flour prevents the dough from sticking as you shape it.
-
Preheat your oven to 425°F (220°C). Make sure your oven rack is positioned in the middle.
-
Sprinkle the bottoms of your two 10-inch springform pans (or deep baking dishes) generously with cornmeal. The cornmeal adds a subtle crunch to the crust and helps prevent it from sticking to the pan.
-
Take one portion of dough and begin to spread it evenly across the bottom of one of the prepared pans. Use your fingertips to gently press the dough outwards, making sure to press it up the sides of the pan to create a raised edge, about 1/2 inch high. The higher the edge, the more room for fillings!
-
Repeat step 11 with the remaining portion of dough and the second pan.
-
Now it’s time to add your favorite pizza toppings. Traditionally, Chicago-style deep-dish pizza is layered in reverse order compared to thin-crust pizzas: first, a generous layer of mozzarella cheese, followed by your chosen toppings (such as pepperoni, sausage, mushrooms, and peppers), and finally, a thick layer of tomato sauce. This layering helps prevent the crust from becoming soggy.
-
Bake the pizzas for 30 to 40 minutes, or until the crust is golden brown and crispy and the cheese is melted and bubbly. Keep a close eye on them during the last few minutes of baking to prevent the crust from burning.
-
Once baked, remove the pizzas from the oven and let them cool in the pans for a few minutes before carefully removing them from the springform pans (if using). Slice and serve immediately.
Expert Tips & Tricks
- Don’t rush the resting time. The long fermentation is key to developing the characteristic flavor and texture of the deep-dish crust. If you’re short on time, you can refrigerate the dough for up to 24 hours after the initial kneading. Just bring it back to room temperature before shaping.
- Use high-quality ingredients. The better the ingredients, the better the flavor of your pizza. Look for good-quality bread flour, olive oil, and canned tomatoes.
- Get the oven hot! A high oven temperature is essential for creating a crispy, golden-brown crust. Make sure your oven is fully preheated before baking the pizzas.
- Adjust baking time as needed. Ovens vary, so keep an eye on the pizzas and adjust the baking time accordingly. If the crust is browning too quickly, you can tent the pizzas with foil.
- Experiment with toppings. While traditional Chicago-style deep-dish pizza features a simple tomato sauce, mozzarella cheese, and Italian sausage, feel free to experiment with your favorite toppings.
Serving & Storage Suggestions
Serve your freshly baked Chicago-style deep-dish pizza immediately while it’s hot and the cheese is melted and gooey. It’s best enjoyed with a knife and fork, as the slices can be quite hefty.
Leftover pizza can be stored in the refrigerator for up to 3 days. To reheat, preheat your oven to 350°F (175°C) and bake the pizza slices for about 10-15 minutes, or until heated through. You can also reheat individual slices in a microwave, but the crust won’t be as crispy. Freezing is possible, wrap individual slices tightly in plastic wrap and then place in a freezer bag for up to 2 months. Reheat directly from frozen in a preheated oven.
Nutritional Information
(Estimated, per slice – based on 8 slices per pizza, plain cheese pizza)
| Nutrient | Amount per Serving | % Daily Value |
|---|---|---|
| Calories | 473 kcal | 24% |
| Total Fat | 23g | 35% |
| Saturated Fat | 9g | 45% |
| Cholesterol | 27mg | 9% |
| Sodium | 720mg | 30% |
| Carbohydrates | 49g | 16% |
| Fiber | 3g | 12% |
| Sugar | 2g | 4% |
| Protein | 18g | 36% |
Variations & Substitutions
- Gluten-Free: Substitute the bread flour with a gluten-free pizza flour blend. You may need to adjust the amount of liquid slightly to achieve the right consistency.
- Vegan: Use vegan mozzarella cheese and a plant-based sausage alternative. Ensure your yeast is vegan-friendly (some may contain animal-derived ingredients).
- Whole Wheat: Replace up to half of the bread flour with whole wheat flour for a nuttier flavor and added fiber.
- Spicy: Add a pinch of red pepper flakes to the dough or sauce for a touch of heat.
- Seasonal: Use seasonal vegetables for your toppings, such as roasted butternut squash in the fall or fresh basil in the summer.
FAQs (Frequently Asked Questions)
Q: Can I make the dough ahead of time?
A: Yes! The dough can be refrigerated for up to 24 hours after kneading. Just let it come to room temperature before shaping.
Q: Why do I need to use bread flour?
A: Bread flour has a higher protein content than all-purpose flour, which helps develop the gluten and create a chewy, sturdy crust.
Q: Can I use a different type of pan?
A: While springform pans are ideal, you can use any deep baking dish. Just make sure to grease it well to prevent sticking.
Q: Why is the sauce on top?
A: The sauce is placed on top to prevent the crust from becoming soggy due to the moisture from the cheese and toppings. It’s a hallmark of Chicago-style deep-dish pizza.
Q: My crust is browning too quickly. What should I do?
A: Tent the pizza with aluminum foil during the last 10-15 minutes of baking to prevent the crust from burning.
Final Thoughts
Creating a Chicago-style deep-dish pizza crust may seem like a labor of love, but the reward is a truly unforgettable culinary experience. The combination of the buttery, crispy crust, the gooey mozzarella, and the rich tomato sauce is simply irresistible. So, gather your ingredients, roll up your sleeves, and embark on this delicious adventure. Don’t be afraid to experiment with your favorite toppings and make it your own. I’d love to hear how it turns out, so please share your feedback and photos! Enjoy!