
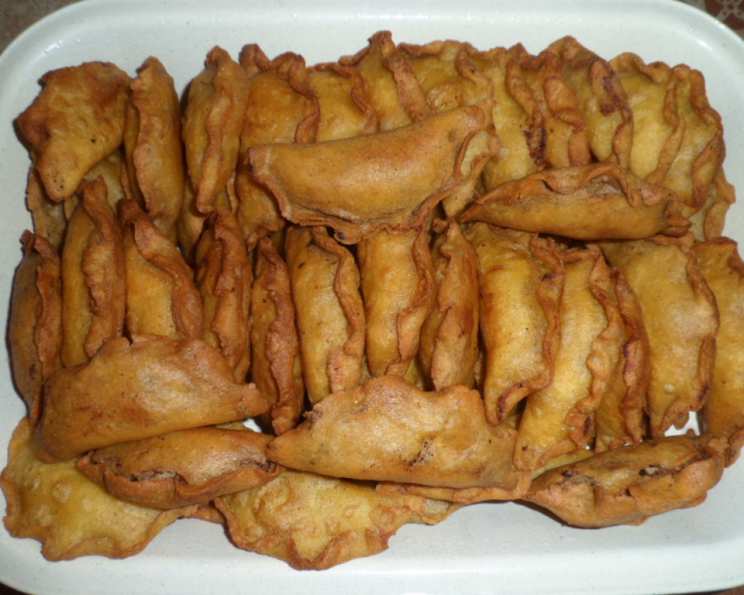
Colombian Chicken Empanadas: A Taste of Home
The aroma of warm cornmeal and savory chicken always brings me back to Abuela’s kitchen. As a child, I’d sit perched on a stool, watching her nimble fingers work the masa, expertly shaping each empanada with a practiced flick of the wrist. The sizzle of the empanadas hitting the hot oil, the laughter filling the air – it was more than just cooking; it was a celebration of family, of heritage, and of the simple joy of sharing good food. These Colombian Chicken Empanadas aren’t just a recipe; they’re a warm hug from my childhood, a taste of home I’m excited to share with you.
Recipe Overview
- Prep Time: 2 hours
- Cook Time: 1 hour
- Total Time: 3 hours
- Servings: 50
- Yield: 50 empanadas
- Dietary Type: Not Gluten-Free
Ingredients
For the Chicken:
- 6 large chicken thighs (skin on for flavor)
- 2 celery stalks (cut in half)
- 1 white onion (cut into large chunks)
- 6 garlic cloves (peeled, whole)
- 1 carrot (cut into 4-inch chunks)
- 1 tablespoon kosher salt
- 1 tablespoon ground cumin
For the Dough (Masa):
- 2 lbs cornmeal (Yellow or white, preferably Goya brand)
- 3-4 cups chicken broth (reserved from cooking the chicken)
- 2 tablespoons dark brown sugar
- 2 tablespoons cassava meal (yuca starch)
- 1 tablespoon ground cumin (optional)
For the Filling:
- 2 bunches green onions, cut into 1/4-inch bits
- 2 medium tomatoes, chopped into small chunks
- 1 bunch fresh cilantro, finely chopped
- 1/4 cup margarine or 4 tablespoons your favorite cooking oil
- 3 medium potatoes (cut into 1/2-inch chunks and boiled until tender)
- 1 teaspoon garlic powder
- 1 teaspoon ground black pepper
Equipment Needed
- Large pot
- Slotted spoon
- Bowls
- Kitchen towel
- Sieve
- Large bowl for the dough
- Frying pan
- Tortilla press (optional)
- Plastic wrap
- Deep-fat fryer or oven
- Cookie sheet
- Paper towels
Instructions
The Chicken
- Place the chicken thighs in a large pot with 8 cups of boiling water.
- Add the celery, onion, garlic, kosher salt, and cumin.
- Boil over medium heat for approximately 1 hour, or until the chicken is cooked through.
- Carefully remove the chicken from the pot with a slotted spoon, place it in a bowl, and cover with a kitchen towel. Allow it to cool until safe to handle.
- Cover the pot and continue to cook the stock on low heat.
- Once the chicken has cooled, remove the skin and the bones. Drop the bones and skin into the stock pot, cover, and continue to cook.
- Using your fingers, pull the chicken meat apart so it resembles shredded meat. Put it into a bowl, cover, and refrigerate.
- Allow the chicken stock to boil on low heat for another hour.
- Using a sieve, separate the broth from all the rest of the ingredients and allow it to cool for about 30 minutes. Discard the solids remaining in the sieve.
The Dough (Masa)
- In a large bowl, mix all the dry ingredients together: cornmeal, brown sugar, yuca starch, and the optional cumin.
- Begin to add the chicken broth until you have a smooth, humid, easy-to-work dough. Start by adding two cups and working the dough with your hands. Then, add the chicken stock 1/2 cup at a time until you get the consistency you need. The dough should be moist enough to hold together but not sticky.
- Cover the bowl and let the masa rest for about one hour in the refrigerator. This allows the cornmeal to fully absorb the liquid, resulting in a more pliable dough.
The Filling
- In a frying pan, heat the margarine (or oil) over medium heat and sauté the onions and tomatoes. Here you can add cumin to taste for extra flavor. Cook until the onions are translucent and the tomatoes have softened.
- In a large bowl, combine the shredded chicken, boiled potatoes, chopped cilantro, garlic powder, and black pepper.
- Add the sautéed onion-tomato mixture to the chicken mixture and stir until well blended.
- Check for salt and adjust spices to your liking. A pinch of smoked paprika can add a lovely depth of flavor to the filling.
The Empanada
- If you have a tortilla press, you’re in good shape for the next step. If you don’t have one, two pieces of 1-inch wood about 8 inches square will do just fine. Lacking that, anything flat and a counter top will work. Or, if you feel adventurous, you can use your own two hands!
- Roll the masa (dough) into little balls about 1 inch in diameter.
- Cover the bottom part of the tortilla press with a piece of plastic wrap. Place a masa ball on top of the plastic wrap. Cover with another piece of plastic and press it into a flat circle (depending on the size of the original masa ball, the flat circle will turn out to be about 3 to 4 inches in diameter).
- Remove the top piece of plastic. Now add about one rounded tablespoon of the chicken filling to the middle of the circle, leaving about 1/2 inch of space on the sides.
- Using the plastic, fold the circle in half and press the edges together so it forms a half-moon.
- While still in the plastic, press the edges firmly together between your thumb and middle finger so the empanada is sealed.
- To make them look pretty, after the empanada is sealed, remove it from the plastic and use the tip of your finger to fold the edges at small intervals so that the empanada has a “scalloped” look to the edges.
Cooking
- Cook them in batches, but don’t prepare too many at a time and let them sit while the others cook since this tends to dry out the masa too much. Also, as you are cooking, keep the bowl of masa covered with a humid towel to keep it from getting too dry.
- The traditional method, of course, is to fry the empanadas in a large, iron cauldron (approximately 50 years old), on top of a wood fire, outdoors, in about twenty pounds of pork lard that was used to fry the empanadas for the last month and a half. But that’s impractical for most home cooks!
- I use a deep-fat fryer filled with canola or peanut oil. Heat the oil to 350 degrees F (175 degrees C). Fry the empanadas in batches until golden brown and crispy, about 5-7 minutes per side.
- For even healthier empanadas, they can be baked in the oven at 350 degrees F (175 degrees C) on a greased cookie sheet. Baking them, of course, takes longer and you will have to turn the empanadas once. Bake until golden brown, about 20-25 minutes, flipping halfway through.
- If you fry them (the best method because they turn out nice and crunchy), make sure you place the finished empanadas on a cookie sheet whose bottom you have lined with a thick layer of paper towels. This will allow the excess oil to drain.
Expert Tips & Tricks
- For a richer flavor: Use chicken stock made from roasted chicken bones.
- To prevent the dough from cracking: Keep the masa covered with a damp towel.
- Make-ahead tip: The filling can be made a day in advance and stored in the refrigerator.
- For a crisper crust: Fry the empanadas in small batches to avoid overcrowding the fryer.
- Spice it up: Add a pinch of cayenne pepper to the filling for a little heat.
Serving & Storage Suggestions
The tradition in Colombia is to have an empanada in one hand and a wedge of lemon in the other. As you take a bite, you squeeze a few drops of lemon juice inside. A bowl of your favorite salsa and a teaspoon will also do the job quite well. Serve them warm as an appetizer, snack, or part of a larger meal.
- Storage: Leftover empanadas can be stored in an airtight container in the refrigerator for up to 3 days.
- Reheating: Reheat in the oven at 350°F (175°C) for about 10-15 minutes, or until heated through and crispy. You can also reheat them in an air fryer for a quick and easy option.
- Freezing: For longer storage, freeze the empanadas after they have cooled completely. Place them in a single layer on a baking sheet and freeze for about 2 hours, or until solid. Then, transfer them to a freezer bag or container. They can be stored in the freezer for up to 2 months. Reheat directly from frozen in the oven or air fryer until heated through.
Nutritional Information
| Nutrient | Amount per Serving | % Daily Value |
|---|---|---|
| Calories | 117.5 kcal | N/A |
| Calories from Fat | N/A | 26% |
| Total Fat | 3.5 g | 5% |
| Saturated Fat | 1.2 g | 5% |
| Cholesterol | 11.9 mg | 3% |
| Sodium | 212.1 mg | 8% |
| Total Carbohydrate | 18 g | 5% |
| Dietary Fiber | 1.9 g | 7% |
| Sugars | 1.2 g | 4% |
| Protein | 4.2 g | 8% |
Note: Nutritional information is an estimate and may vary depending on specific ingredients and cooking methods.
Variations & Substitutions
- Gluten-Free: While traditionally made with cornmeal, you can experiment with gluten-free flour blends for the masa.
- Vegetarian: Substitute the chicken with black beans, lentils, or crumbled tofu for a vegetarian option. Add some diced bell peppers for extra flavor and texture.
- Spicy: Add a pinch of cayenne pepper or a finely chopped jalapeño to the filling for a spicy kick.
- Regional: Try using different types of potatoes, such as sweet potatoes or Yukon gold potatoes, for a unique flavor.
FAQs (Frequently Asked Questions)
Q: Can I make the empanadas ahead of time?
A: Yes! You can assemble the empanadas and store them in the refrigerator for up to 24 hours before frying or baking.
Q: Can I use a different type of meat?
A: Absolutely! Ground beef, shredded pork, or even seafood can be used as a substitute for chicken.
Q: How do I prevent the empanadas from sticking to the plastic wrap?
A: Make sure the plastic wrap is lightly oiled or sprayed with cooking spray to prevent sticking.
Q: What is cassava meal?
A: Cassava meal, also known as yuca starch or tapioca flour, is a starch extracted from the cassava root. It helps bind the masa together and gives it a smoother texture.
Q: Can I bake the empanadas instead of frying them?
A: Yes, you can! Baking them will result in a slightly less crispy crust, but it’s a healthier option. Bake at 350°F (175°C) for about 20-25 minutes, or until golden brown, flipping halfway through.
Final Thoughts
I hope this recipe brings you as much joy as it brings me. Don’t be afraid to experiment with different fillings and spices to create your own unique version of these delicious Colombian Chicken Empanadas. Gather your loved ones, share a plate of warm empanadas, and create your own unforgettable memories around the table. And please, let me know how they turn out! I’d love to hear about your empanada adventures. These empanadas pair perfectly with a refreshing glass of agua de panela or a cold Colombian beer. ¡Buen provecho!