
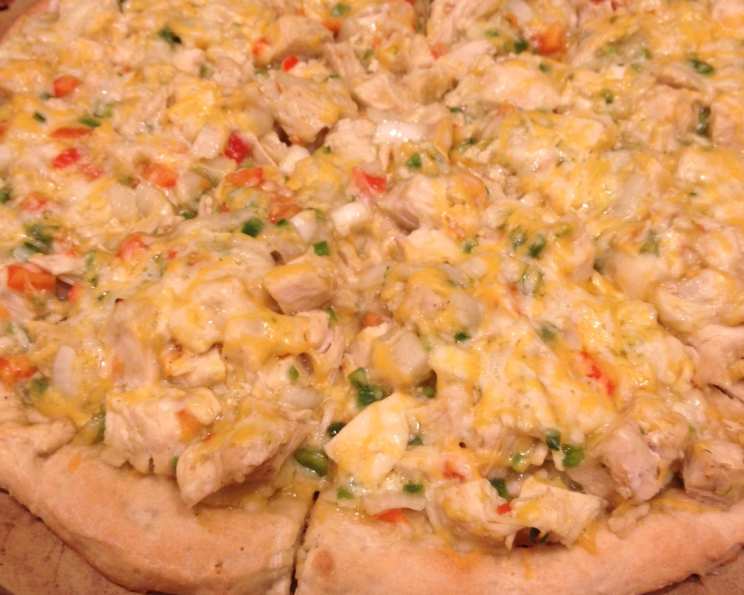
Chicken Enchilada Pizza: A Fusion Fiesta!
I’ll never forget the first time I tasted this Chicken Enchilada Pizza. It was at a friend’s casual summer barbecue, and amidst the burgers and potato salad, this unconventional pizza reigned supreme. The vibrant blend of familiar enchilada flavors atop a crispy crust sparked an instant craving. It was the perfect marriage of comfort food and bold Tex-Mex flair – a culinary collision I immediately knew I had to recreate in my own kitchen, and now, share with you.
Recipe Overview
- Prep Time: 15 minutes
- Cook Time: 15-21 minutes
- Total Time: 30-36 minutes
- Servings: 6
- Yield: 1 pizza
- Dietary Type: Adaptable (See Variations)
Ingredients
- 1/2 cup green taco sauce
- 3 cloves garlic, minced
- 1/2 cup grape tomatoes
- 1/2 cup cilantro, loosely packed
- 1 (13 7/8 ounce) can Pillsbury refrigerated classic pizza crust
- 1/2 medium onion
- 1 jalapeno pepper
- 1 1/2 cups Kraft Shredded Monterey Jack Cheese
- 2 cups cooked chicken breasts, cubed (I prefer boiled chicken breast, but a store-bought rotisserie chicken works perfectly too!)
Equipment Needed
- 9×13 inch metal baking pan or large round pizza pan
- Medium mixing bowl
- Knife
- Cutting board
Instructions
- Preheat your oven to 425°F (220°C).
- Unroll the Pillsbury refrigerated classic pizza crust onto a greased 9×13 inch metal baking pan or a large round pizza pan.
- Gently press and stretch the dough to cover the entire pan. Aim for an even thickness to ensure consistent baking.
- Bake the pan with the pizza dough for 10-14 minutes, or until the crust is golden brown. Keep a close eye on it to prevent burning, as oven temperatures can vary.
- While the dough is baking, prepare the toppings. Coarsely chop the onion and jalapeno pepper. Remember to remove the seeds from the jalapeno if you prefer a milder flavor.
- In a medium bowl, combine the chopped jalapeno, onion, 1/2 of the Monterey Jack cheese (that’s 3/4 cup), the cubed chicken, green taco sauce, and minced garlic. Mix everything together thoroughly. If the mixture seems a little dry, don’t hesitate to add a bit more taco sauce to achieve your desired consistency.
- Once the pizza dough is done baking (after the initial 10-14 minutes), remove it from the oven.
- Sprinkle the remaining 1/2 of the Monterey Jack cheese (the other 3/4 cup) evenly over the baked crust. This layer of cheese will help the chicken mixture adhere to the crust.
- Spread the chicken and cheese mixture evenly over the layer of cheese on the crust. If desired, sprinkle a bit of additional cheese over the top of the chicken mixture for an extra cheesy experience.
- Return the pizza to the oven and bake for another 5-7 minutes, or until the cheese is melted and bubbly, and the crust is a deep golden brown. Again, watch carefully to avoid burning the crust.
- While the pizza is finishing in the oven, slice the grape tomatoes lengthwise into quarters and chop the cilantro.
- Once the pizza is out of the oven, sprinkle the quartered grape tomatoes and chopped cilantro over the finished pizza to your liking. This adds a fresh, vibrant touch to the dish.
- Let the pizza cool slightly before cutting and serving.
Expert Tips & Tricks
- Spice Level Control: Adjust the amount of jalapeno (or omit it entirely) to control the spiciness of the pizza. You can also add a dash of cayenne pepper to the chicken mixture for an extra kick.
- Pre-Shredded Cheese Tip: Pre-shredded cheese often contains cellulose, which can prevent it from melting as smoothly. For the best melt, consider shredding your own Monterey Jack cheese from a block.
- Crispy Crust Secret: For an extra crispy crust, preheat the baking sheet in the oven before placing the pizza dough on it. The initial shock of heat helps crisp the crust from the bottom.
- Rotisserie Chicken Shortcut: Using a store-bought rotisserie chicken is a fantastic time-saver. Just shred or cube the chicken and you’re ready to go! Be sure to remove the skin if you prefer a leaner option.
- Don’t Overcrowd: Avoid overcrowding the pizza with toppings. Too many toppings can result in a soggy crust.
- Prevent a Soggy Crust: Brushing the baked crust with a little olive oil before adding the toppings can help create a barrier against moisture, preventing a soggy crust.
Serving & Storage Suggestions
Serve the Chicken Enchilada Pizza hot, fresh from the oven, garnished with extra cilantro and a dollop of sour cream or guacamole on the side, if desired. Leftovers should be stored in an airtight container in the refrigerator for up to 3 days. Reheat in the oven at 350°F (175°C) until warmed through, or use a microwave for quicker reheating. For longer storage, you can freeze individual slices. Wrap them tightly in plastic wrap and then foil, and freeze for up to 2 months. Thaw in the refrigerator overnight before reheating. Room temperature storage is not recommended due to the dairy and meat ingredients.
Nutritional Information
| Nutrient | Amount per Serving | % Daily Value* |
|---|---|---|
| Calories | ~320 kcal | ~16% |
| Total Fat | ~18g | ~28% |
| Saturated Fat | ~8g | ~40% |
| Cholesterol | ~70mg | ~23% |
| Sodium | ~600mg | ~25% |
| Total Carbohydrate | ~25g | ~8% |
| Dietary Fiber | ~2g | ~8% |
| Sugars | ~4g | – |
| Protein | ~20g | ~40% |
*Percent Daily Values are based on a 2,000 calorie diet. Your daily values may be higher or lower depending on your calorie needs. These are estimations and may vary based on specific ingredients used.
Variations & Substitutions
- Gluten-Free: Use a gluten-free pizza crust instead of the regular crust. There are many great store-bought options available.
- Vegetarian: Substitute the chicken with black beans, pinto beans, or a combination of both. You can also add other vegetables like corn, bell peppers, or zucchini.
- Spicier Version: Use a spicier taco sauce or add a pinch of cayenne pepper to the chicken mixture. You could also use a hotter variety of pepper than a jalapeno, such as a serrano pepper.
- Cheese Variations: Experiment with different cheeses, such as cheddar, pepper jack, or a Mexican cheese blend.
- Crust Variations: For a thinner crust, use a flatbread or pita bread as the base.
- Dairy-Free: Use a dairy-free cheese alternative. Many brands offer shredded dairy-free cheese that melts well.
- Enchilada Sauce Swap: While this recipe uses green taco sauce, you can easily substitute it with red enchilada sauce for a richer, slightly smokier flavor.
FAQs (Frequently Asked Questions)
Q: Can I make this pizza ahead of time?
A: You can prepare the chicken and cheese mixture ahead of time and store it in the refrigerator for up to 24 hours. However, it’s best to assemble and bake the pizza right before serving to prevent the crust from becoming soggy.
Q: How do I prevent the crust from becoming soggy?
A: Pre-baking the crust before adding the toppings helps create a barrier against moisture. Also, avoid using too much sauce, as this can also lead to a soggy crust. Brushing the baked crust with a little olive oil also helps.
Q: Can I use a different type of meat instead of chicken?
A: Absolutely! Ground beef, shredded pork, or even turkey would work well in this recipe.
Q: Can I freeze the leftovers?
A: Yes, you can freeze individual slices of the pizza. Wrap them tightly in plastic wrap and then foil to prevent freezer burn. Thaw in the refrigerator overnight before reheating.
Q: What can I serve with this pizza?
A: This pizza is delicious on its own, but you can also serve it with a side of Mexican rice, black beans, or a simple salad. A refreshing margarita or a cold Mexican beer would also be a great accompaniment.
Final Thoughts
So, there you have it – a Chicken Enchilada Pizza recipe that’s both incredibly easy to make and bursting with flavor. Don’t be afraid to get creative with your toppings and customize it to your liking. Whether you’re hosting a casual get-together or simply craving a comforting meal, this pizza is guaranteed to be a crowd-pleaser. I highly encourage you to give it a try, and please, let me know what you think! I’d love to hear about your own variations and experiences with this recipe. Happy cooking!