
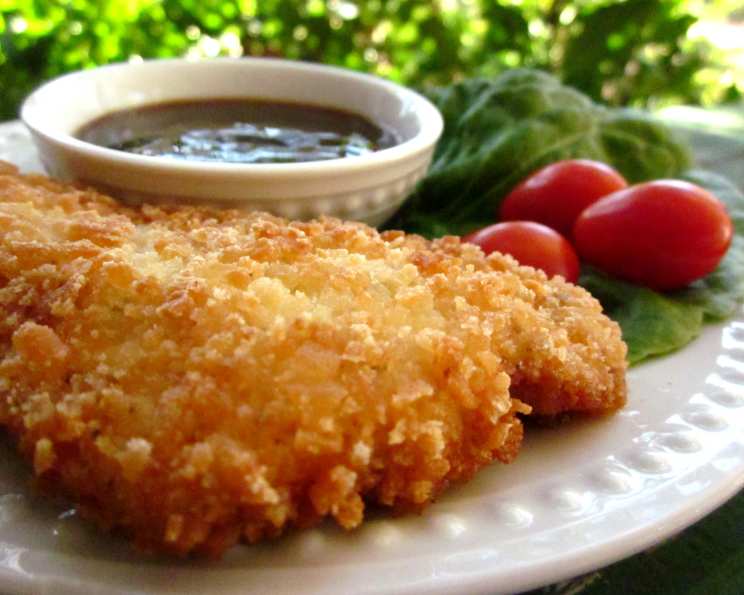
Golden Crispy Chicken Katsu: A Culinary Journey to Japan and Hawaii
My first taste of chicken katsu was a revelation. I was a young culinary student working a summer job at a bustling Hawaiian plate lunch restaurant. The rhythmic thump-thump-thump of the meat mallet, the sizzle of the fryer, and the sweet-savory aroma of the katsu sauce filled the air. It was more than just a meal; it was an experience – a perfect harmony of textures and flavors that transported me from the sunny shores of Honolulu to the bustling streets of Tokyo. This humble, yet unforgettable dish sparked my lifelong passion for exploring the diverse world of culinary arts.
Recipe Overview
- Prep Time: 30 minutes
- Cook Time: 35 minutes
- Total Time: 1 hour 5 minutes
- Servings: 6
- Yield: 6 servings
- Dietary Type: Not Gluten-Free (can be adapted)
Ingredients
- 2 lbs boneless skinless chicken breasts
- 2 tablespoons garlic salt
- 1/2 cup flour
- 2 eggs, beaten
- 2 cups panko breadcrumbs (Japanese bread crumbs)
- 1 quart oil (for frying)
For the Katsu Sauce:
- 1/3 cup catsup
- 1/4 cup soy sauce
- 1/4 cup sugar
- 1 1/2 teaspoons Worcestershire sauce
- 1/8 teaspoon ground red pepper
Equipment Needed
- Cutting board
- Meat mallet or rolling pin
- Shallow dishes or pans for dredging
- Large skillet or deep fryer
- Paper towels
- Small bowl
Instructions
-
First, prepare the katsu sauce. In a small bowl, thoroughly combine the catsup, soy sauce, sugar, Worcestershire sauce, and ground red pepper. Set aside the sauce to allow the flavors to meld while you prepare the chicken.
-
Next, prepare the chicken breasts. Place each chicken breast between two sheets of plastic wrap or in a resealable bag. Use a meat mallet or rolling pin to flatten the chicken to about 1/4 inch thickness. This ensures even cooking and tenderizes the meat.
-
Once the chicken is flattened, generously season both sides with garlic salt. The garlic salt not only adds flavor but also helps to tenderize the chicken further. Allow the seasoned chicken to stand for 15 to 30 minutes. This resting period allows the flavors to penetrate the meat.
-
Set up your dredging station. In three separate shallow dishes or pans, place the flour, the beaten eggs, and the panko breadcrumbs. Ensure that each dish is large enough to easily dredge the chicken pieces.
-
Heat the oil in a large skillet or deep fryer to 350 degrees Fahrenheit (175 degrees Celsius). Use a thermometer to ensure the oil reaches the correct temperature. Maintaining the right temperature is crucial for achieving a crispy, golden-brown crust without overcooking the chicken. About 2 inches of oil in the skillet should be enough.
-
Now, begin the dredging process. Take a piece of chicken and dredge it thoroughly in the flour, ensuring all surfaces are coated. Shake off any excess flour.
-
Next, dip the floured chicken into the beaten eggs, making sure it is fully submerged. Allow any excess egg to drip off.
-
Finally, coat the chicken completely with the panko breadcrumbs, pressing gently to ensure the breadcrumbs adhere well. The panko breadcrumbs are what give the katsu its signature crispy texture.
-
Carefully place the breaded chicken into the heated oil in batches, being careful not to overcrowd the skillet. Overcrowding can lower the oil temperature and result in soggy katsu.
-
Fry the chicken for approximately 3-5 minutes per side, or until golden brown and cooked through. The internal temperature of the chicken should reach 165 degrees Fahrenheit (74 degrees Celsius).
-
Once the chicken is cooked, remove it from the skillet and place it on a plate lined with paper towels to drain any excess oil.
-
Allow the chicken to cool slightly, then cut it into one-inch slices. This makes it easier to eat and allows for better sauce distribution.
-
Serve the Chicken Katsu hot with the prepared katsu sauce on the side for dipping.
Expert Tips & Tricks
- Panko Power: Don’t skimp on the panko. Its larger, airier flakes create the perfect crispy crust. If you can’t find panko, you can use regular breadcrumbs, but the texture won’t be quite the same. Pulse regular breadcrumbs in a food processor to make them coarser.
- Temperature is Key: Maintaining the oil temperature is crucial. If the oil is too hot, the katsu will burn on the outside before it’s cooked through. If the oil is too cold, the katsu will absorb too much oil and become greasy.
- Double Dredge: For an extra-crispy crust, you can double dredge the chicken: flour, egg, panko, then egg and panko again.
- Make Ahead: You can bread the chicken ahead of time and store it in the refrigerator for up to 24 hours. This is a great time-saver when preparing for a larger gathering.
- Pound it Out: Thoroughly pounding the chicken to an even thickness not only tenderizes it, but also ensures even cooking, preventing some parts from being overcooked while others are undercooked.
- Katsu Sauce Shortcut: While homemade katsu sauce is delicious, you can use store-bought tonkatsu sauce as a convenient alternative.
Serving & Storage Suggestions
Serve the Chicken Katsu immediately while it’s hot and crispy. It’s traditionally served with a side of steamed rice and shredded cabbage. A dollop of Japanese mayonnaise adds a nice touch.
Leftover katsu can be stored in an airtight container in the refrigerator for up to 3 days. Reheat in the oven or air fryer for the best results. Microwaving is not recommended, as it can make the katsu soggy. You can freeze cooked katsu for up to 2 months. Wrap each piece individually in plastic wrap before placing them in a freezer bag. Reheat directly from frozen in the oven or air fryer.
Nutritional Information
| Nutrient | Amount per Serving | % Daily Value |
|---|---|---|
| Calories | 1725.5 kcal | N/A |
| Calories from Fat | 1376 g | 80% |
| Total Fat | 152.9 g | 235% |
| Saturated Fat | 20.7 g | 103% |
| Cholesterol | 158.8 mg | 52% |
| Sodium | 1297.6 mg | 54% |
| Total Carbohydrate | 49 g | 16% |
| Dietary Fiber | 2.3 g | 9% |
| Sugars | 14.1 g | 56% |
| Protein | 42.1 g | 84% |
Note: Nutritional information is an estimate and may vary based on specific ingredients and portion sizes.
Variations & Substitutions
- Pork Katsu (Tonkatsu): As noted in the original recipe, substitute pork cutlets for the chicken breasts to make tonkatsu.
- Gluten-Free Katsu: Use gluten-free flour and gluten-free panko breadcrumbs. Ensure the Worcestershire sauce is also gluten-free (many brands contain gluten).
- Spicy Katsu: Add a pinch of cayenne pepper to the flour mixture or a dash of sriracha to the katsu sauce.
- Baked Katsu: For a healthier option, bake the breaded chicken instead of frying it. Place the breaded chicken on a baking sheet and bake at 400 degrees Fahrenheit (200 degrees Celsius) for 20-25 minutes, or until golden brown and cooked through.
- Vegetarian Katsu: Use thick slices of firm tofu or eggplant in place of the chicken. Press the tofu to remove excess moisture before breading.
FAQs (Frequently Asked Questions)
Q: Can I use regular breadcrumbs instead of panko?
A: While panko breadcrumbs are recommended for their superior crispiness, you can use regular breadcrumbs if necessary. Pulse them in a food processor to create a coarser texture similar to panko.
Q: How do I keep the katsu from getting soggy?
A: Ensure the oil is at the correct temperature (350°F) and don’t overcrowd the skillet. Drain the fried katsu on paper towels to remove excess oil.
Q: Can I make the katsu sauce ahead of time?
A: Yes, the katsu sauce can be made several days in advance and stored in the refrigerator. In fact, the flavors often meld together even better over time.
Q: How do I know when the chicken is cooked through?
A: The internal temperature of the chicken should reach 165 degrees Fahrenheit (74 degrees Celsius). Use a meat thermometer to check for doneness.
Q: What is the best oil to use for frying?
A: Canola oil, vegetable oil, or peanut oil are all good choices for frying katsu due to their high smoke points.
Final Thoughts
Chicken Katsu is more than just a recipe; it’s an invitation to experience a unique blend of Japanese and Hawaiian culinary traditions. The crispy, golden-brown crust, the tender, juicy chicken, and the tangy-sweet katsu sauce create a symphony of flavors that will tantalize your taste buds. So, gather your ingredients, roll up your sleeves, and embark on this culinary adventure. Don’t be afraid to experiment with variations and substitutions to create your own signature katsu. And most importantly, share your creation with friends and family and savor the joy of cooking and eating together. Serve with a side of miso soup and a cold Japanese beer for the full experience!