
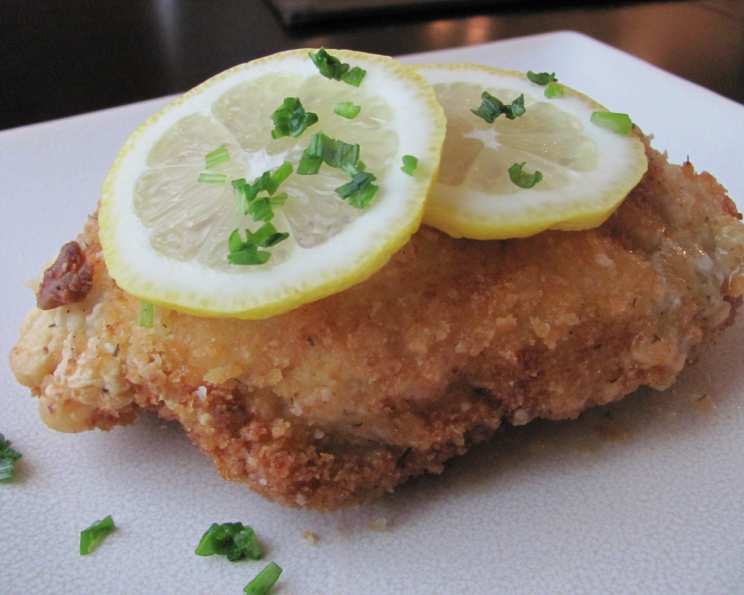
Chicken Kiev: A Culinary Classic Reimagined
The first time I tasted Chicken Kiev, I was a wide-eyed culinary student, intimidated by the sheer artistry of it. The crisp, golden crust yielding to tender chicken, and then… that fragrant, molten butter exploding onto the plate. It was a revelation – a masterclass in texture and flavor. To this day, the aroma of garlic and dill transports me back to that bustling kitchen, sparking a desire to recreate that moment of pure culinary joy. It’s a dish that demands respect, a little patience, but rewards the effort tenfold with a symphony of simple, perfect flavors.
Recipe Overview
- Prep Time: 45 minutes (including freezing time)
- Cook Time: 10 minutes
- Total Time: 55 minutes
- Servings: 6
- Yield: 6 Chicken Kievs
- Dietary Type: Not Gluten-Free, Not Dairy-Free
Ingredients
- 1/3 cup butter, softened
- 1/2 teaspoon ground black pepper
- 1 teaspoon garlic powder
- 2 lbs boneless, skinless chicken breast halves
- 2 eggs
- 3 tablespoons water
- 1/4 teaspoon ground black pepper
- 1/2 teaspoon garlic powder
- 1 teaspoon dried dill weed
- 3/4 cup all-purpose flour
- 3/4 cup dry breadcrumbs
- 2 cups vegetable oil, for frying
- 1/2 lemon, sliced
- 1/4 cup chopped fresh parsley
Equipment Needed
- Aluminum foil
- Waxed paper
- Meat mallet
- Mixing bowls
- Deep frying pan
- Shallow tray
- Skewers or toothpicks
Instructions
- First, prepare the butter mixture. In a bowl, thoroughly combine 1/3 cup of softened butter, 1/2 teaspoon of ground black pepper, and 1 teaspoon of garlic powder.
- On a 6×6 inch piece of aluminum foil, spread the butter mixture to approximately 2×3 inches.
- Place this foil-wrapped butter mixture in the coldest section of your freezer and freeze until firm. This step is crucial and can be done well in advance. Aim for at least 30 minutes.
- While the butter is freezing, prepare the chicken breasts. Remove any excess fat from the chicken. If using whole chicken breasts, carefully cut them in half horizontally to create thinner cutlets.
- Place each chicken breast half between two pieces of waxed paper. Using a meat mallet, pound the chicken carefully to about 1/4 inch thickness or less. Be gentle; you want to flatten the chicken without tearing it.
- Once the butter mixture is firm, remove it from the freezer and carefully cut it into 6 equal pieces.
- Place one piece of the frozen butter on each pounded chicken breast.
- Fold in the edges of the chicken over the butter. Then, carefully roll the chicken to completely encase the butter, forming a tight roll.
- Secure each chicken roll with small skewers or toothpicks to prevent the butter from escaping during frying.
- In a mixing bowl, beat the eggs with water until light and fluffy. This creates the egg wash.
- In a separate bowl, combine 1/4 teaspoon black pepper, 1/2 teaspoon garlic powder, 1 teaspoon dried dill weed, and 3/4 cup all-purpose flour. This is your seasoned flour.
- Coat the chicken rolls thoroughly with the seasoned flour mixture, ensuring they are completely covered.
- Dip the floured chicken into the egg mixture, ensuring it’s fully coated.
- Immediately roll the egg-washed chicken in the dry breadcrumbs, pressing gently to help them adhere.
- Place the coated chicken on a shallow tray and chill in the refrigerator for at least 30 minutes. This helps the coating set and prevents the butter from melting too quickly during frying.
- In a medium-sized deep frying pan, heat 2 cups of vegetable oil to medium-high heat. The oil should be hot enough to quickly brown the chicken but not so hot that it burns the breadcrumbs before the chicken is cooked through. A temperature of around 350°F (175°C) is ideal.
- Carefully fry the chicken for about 5 minutes on one side, then turn it over and fry for another 5 minutes or until the chicken is golden brown and cooked through.
- To test for doneness, carefully cut into one of the rolled chicken breasts to ensure the interior is no longer pink and the juices run clear. The internal temperature should reach 165°F (74°C).
- Remove the chicken Kiev from the frying pan and place on a wire rack to drain excess oil.
- Remove the skewers or toothpicks before serving.
- Serve immediately, garnished with a slice of lemon and a sprinkling of fresh parsley.
Expert Tips & Tricks
- Frozen Butter is Key: The secret to a perfect Chicken Kiev is keeping the butter frozen solid. If the butter melts too quickly during frying, it will leak out, leaving you with a dry chicken breast.
- Pounding for Tenderness: Pounding the chicken to an even thickness ensures it cooks evenly and quickly. Be careful not to tear the chicken.
- Double Coating: For an extra-crispy crust, consider double-dipping the chicken in the egg and breadcrumb mixture.
- Don’t Overcrowd the Pan: Fry the chicken in batches to prevent the oil temperature from dropping, which can result in soggy chicken.
- Resting is Important: Allow the fried chicken to rest on a wire rack for a few minutes before serving. This allows the juices to redistribute, resulting in a more tender and flavorful chicken.
Serving & Storage Suggestions
Chicken Kiev is best served immediately while the crust is crisp and the butter is molten. Garnish with a lemon slice and fresh parsley for a burst of freshness. It pairs well with mashed potatoes, roasted vegetables, or a light salad.
Leftovers can be stored in an airtight container in the refrigerator for up to 3 days. To reheat, bake in a preheated oven at 350°F (175°C) until warmed through and the crust is crispy, about 15-20 minutes. Microwaving is not recommended as it can make the crust soggy. While freezing is possible, the texture of the crust may suffer.
Nutritional Information
| Nutrient | Amount per Serving | % Daily Value |
|---|---|---|
| Calories | 1045.3 kcal | N/A |
| Calories from Fat | 803 g | 77% |
| Total Fat | 89.3 g | 137% |
| Saturated Fat | 17.5 g | 87% |
| Cholesterol | 185.9 mg | 61% |
| Sodium | 390.9 mg | 16% |
| Total Carbohydrate | 23.2 g | 7% |
| Dietary Fiber | 1.4 g | 5% |
| Sugars | 1.1 g | 4% |
| Protein | 38.1 g | 76% |
Variations & Substitutions
- Gluten-Free: Use gluten-free all-purpose flour and gluten-free breadcrumbs.
- Herb Butter: Experiment with different herbs in the butter mixture, such as tarragon, chives, or rosemary.
- Cheese-Filled: Add a small cube of mozzarella or provolone cheese to the butter mixture for a cheesy surprise.
- Spicy Kiev: Add a pinch of red pepper flakes to the butter mixture for a little heat.
- Air Fryer Chicken Kiev: While traditionally fried, Chicken Kiev can also be cooked in an air fryer. Preheat your air fryer to 375°F (190°C) and cook for about 15-20 minutes, flipping halfway through, until golden brown and cooked through.
FAQs (Frequently Asked Questions)
Q: Why is the butter leaking out when I fry the chicken?
A: The most common reason is that the butter wasn’t frozen solid enough. Ensure the butter is thoroughly frozen before wrapping it in the chicken. Also, make sure the chicken is tightly sealed and secured with skewers.
Q: Can I prepare the Chicken Kiev ahead of time?
A: Yes, you can assemble the chicken Kievs and keep them chilled in the refrigerator for up to 24 hours before frying. Just make sure they are well-covered to prevent the breadcrumbs from drying out.
Q: How can I tell if the chicken is cooked through?
A: The best way is to use a meat thermometer. The internal temperature should reach 165°F (74°C). If you don’t have a thermometer, cut into one of the rolls to ensure the interior is no longer pink and the juices run clear.
Q: Can I bake the Chicken Kiev instead of frying it?
A: Baking is an option, but the crust won’t be as crispy. Bake at 375°F (190°C) for about 25-30 minutes, or until the chicken is cooked through and the crust is golden brown.
Q: What can I serve with Chicken Kiev?
A: Chicken Kiev pairs well with creamy mashed potatoes, roasted asparagus, a simple green salad, or rice pilaf.
Final Thoughts
Chicken Kiev might seem intimidating, but with a little patience and attention to detail, you can create a restaurant-worthy dish in your own kitchen. Don’t be afraid to experiment with different herbs and seasonings to customize the flavor to your liking. So, roll up your sleeves, grab those ingredients, and embark on this culinary adventure. I guarantee the satisfying crunch and the burst of flavorful butter will make it all worthwhile. And when you do, please share your experiences! I’d love to hear about your successes and any creative twists you add to this classic dish.