
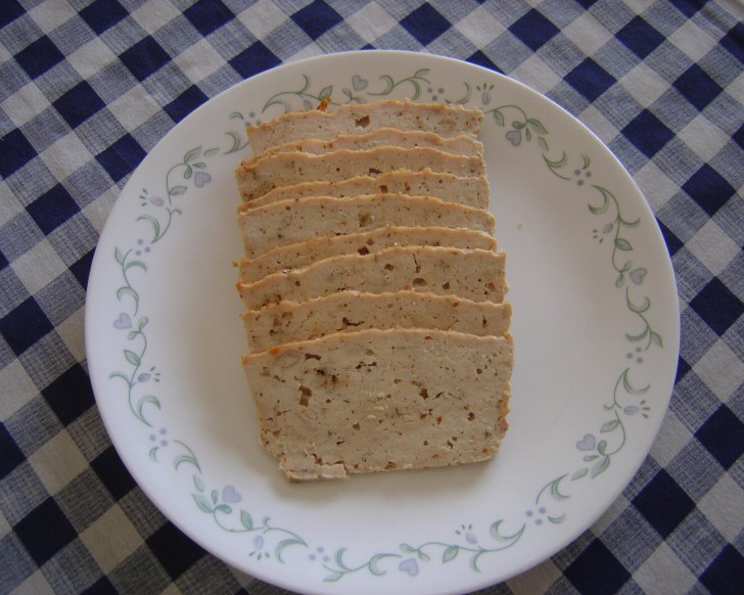
Homemade Chicken or Turkey Breast Lunchmeat: A Healthier, Tastier Alternative
When I was a kid, there was nothing quite like coming home from school to a simple sandwich made with sliced turkey breast. But even then, my mom, always health-conscious, would scrutinize the ingredient lists of store-bought lunchmeat. Her concerns stuck with me. Years later, as a chef, I understand even better the desire to control what goes into our food. That’s why I started making my own lunchmeat—and it’s surprisingly easy and undeniably delicious. This recipe lets you create wholesome, flavorful chicken or turkey breast lunchmeat right in your own kitchen.
Recipe Overview
- Prep Time: 15 minutes
- Cook Time: 45-60 minutes (depending on loaf pan size)
- Total Time: 1 hour – 1 hour 15 minutes (plus chilling time)
- Servings: Varies based on slicing thickness, approximately 15-20 servings
- Yields: Approximately 3 pounds
- Dietary Type: High Protein, Gluten-Free, Dairy-Free
Ingredients
- 3 lbs raw chicken breasts or 3 lbs turkey breast
- 2 egg whites, slightly beaten
- Salt, to taste
- White pepper, to taste
- Other seasoning, of your choice to taste (optional, such as garlic powder, onion powder, smoked paprika, Italian seasoning)
Equipment Needed
- Food processor
- Small loaf pan
- Aluminum foil
- Cooking oil or non-stick spray
- Knife or meat slicer
Instructions
-
Begin by preparing the chicken or turkey breast. Cut the raw meat into approximately 1-inch cubes. This will help ensure even processing in the next step.
-
Place the raw meat cubes into a food processor. Pulse the food processor until the meat is broken down into small bits. The texture should resemble ground meat, but be careful not to over-process into a mushy consistency. You want a slightly coarse texture for a better “bite” in the final product.
-
In a large bowl, combine the processed meat with egg whites, salt, and white pepper. The egg whites act as a binder, helping the meat hold its shape during cooking.
-
Add any other seasonings you desire at this stage. Consider garlic powder or onion powder for a savory flavor, smoked paprika for a hint of smokiness, or Italian seasoning for an herbaceous note. Adjust the amount of seasoning to your preference.
-
Line a small loaf pan with aluminum foil, leaving an overhang on the sides for easy removal later. Lightly oil the foil with cooking oil or spray it with non-stick spray. This prevents the meat from sticking to the foil during baking.
-
Pack the meat mixture firmly into the prepared loaf pan. Ensure it’s evenly distributed and press down gently to eliminate any air pockets. This will result in a more uniform texture.
-
(Optional step): At this point, you can add additional seasonings to the top of the loaf for extra flavor. Freshly ground black pepper or a sprinkle of cayenne pepper can add a peppery kick. Alternatively, a dry BBQ rub creates a BBQ-flavored lunchmeat. Press the added seasonings gently into the surface of the meat.
-
Bake in a preheated oven at 325-350°F (160-175°C) until the meat is cooked through. The exact cooking time will depend on the size of your loaf pan and the thickness of the meat loaf. Start checking for doneness after 45 minutes.
-
To check for doneness, insert a meat thermometer into the center of the loaf. The internal temperature should reach 165°F (74°C). If you don’t have a meat thermometer, you can also check by inserting a fork into the center. The juices should run clear, not pink.
-
Once cooked, remove the loaf pan from the oven and let it cool to room temperature.
-
Refrigerate the meat loaf for at least a couple of hours, or preferably overnight, before slicing. This allows the meat to firm up, making it easier to slice thinly and neatly.
-
Once chilled, lift the meat loaf out of the loaf pan using the foil overhang. Slice the lunchmeat thinly using a sharp knife or a meat slicer.
Expert Tips & Tricks
- Achieving a Smooth Texture: For the smoothest texture, you can process the chicken or turkey in batches in the food processor. Avoid over-processing, as this can make the meat tough.
- Flavor Infusion: Experiment with different seasonings to create unique flavor profiles. Consider adding chopped herbs, sun-dried tomatoes, or roasted garlic to the meat mixture.
- Preventing Dryness: Adding a tablespoon or two of olive oil or chicken broth to the meat mixture can help keep the lunchmeat moist.
- Even Cooking: To ensure even cooking, use a water bath. Place the loaf pan inside a larger baking dish and add hot water to the larger dish until it reaches halfway up the sides of the loaf pan.
- Clean Slicing: A meat slicer will give you the most consistent and professional-looking slices. If using a knife, chill the meat thoroughly and use a long, sharp carving knife.
- Slicing a warm breast can result in a lot of fall apart slices.
Serving & Storage Suggestions
Serve your homemade chicken or turkey breast lunchmeat in sandwiches, wraps, salads, or on charcuterie boards. It pairs well with a variety of cheeses, vegetables, and condiments.
To store leftovers, wrap the sliced lunchmeat tightly in plastic wrap or place it in an airtight container. Store in the refrigerator for up to 5 days.
For longer storage, you can freeze the sliced lunchmeat. Separate the slices with double layers of wax paper or parchment paper to prevent them from sticking together. Place the slices in a freezer-safe bag or container and freeze for up to 2-3 months. Thaw in the refrigerator overnight before using.
Nutritional Information
(Estimated, per 2 oz serving – will vary based on ingredients and portion size)
| Nutrient | Amount per Serving | % Daily Value |
|---|---|---|
| Calories | 70-90 kcal | 4-5% |
| Total Fat | 1-3g | 2-5% |
| Saturated Fat | 0-1g | 0-5% |
| Cholesterol | 50-60mg | 17-20% |
| Sodium | 100-200mg | 4-8% |
| Total Carbohydrate | 0g | 0% |
| Dietary Fiber | 0g | 0% |
| Sugars | 0g | 0% |
| Protein | 15-18g | 30-36% |
Variations & Substitutions
- Spicy Chicken/Turkey: Add a pinch of cayenne pepper or some chopped jalapenos to the meat mixture.
- Herb-Infused: Incorporate fresh herbs like rosemary, thyme, or oregano for a fragrant lunchmeat.
- Smoked Turkey: Use smoked turkey breast as the base for a smoky and flavorful variation.
- Mediterranean Style: Add sun-dried tomatoes, Kalamata olives, and feta cheese crumbles to the meat mixture.
- Lower Sodium: Reduce the amount of salt or use a salt substitute.
- Garlic Herb: A teaspoon of garlic powder and a teaspoon of dried Italian herbs.
FAQs (Frequently Asked Questions)
Q: Can I use ground chicken or turkey instead of processing the breasts myself?
A: While you can, the texture will be different. Using whole chicken or turkey breasts and processing them in a food processor allows for a coarser, more desirable texture in the final product. Ground meat can sometimes result in a mushier texture.
Q: How can I prevent the lunchmeat from being too dry?
A: Adding a tablespoon or two of olive oil or chicken broth to the meat mixture helps to retain moisture during baking. Be sure not to overcook the lunchmeat.
Q: Can I bake this in a muffin tin to make individual lunchmeat portions?
A: Yes, you can! Line the muffin tin with foil or use silicone muffin liners. Reduce the baking time accordingly, checking for doneness after about 20-25 minutes.
Q: How long does the lunchmeat last in the freezer?
A: Properly stored, homemade chicken or turkey breast lunchmeat can last in the freezer for up to 2-3 months. Ensure it is well-wrapped to prevent freezer burn.
Q: Is it necessary to chill the lunchmeat before slicing?
A: Yes, chilling is essential. Chilling firms up the meat, making it much easier to slice thinly and evenly. Slicing warm lunchmeat can result in crumbly and uneven slices.
Final Thoughts
Making your own chicken or turkey breast lunchmeat is a simple and rewarding way to control the ingredients in your food and create a healthier, tastier alternative to store-bought options. The possibilities for flavor variations are endless, so don’t be afraid to experiment with different seasonings and herbs to create your own signature lunchmeat. Give this recipe a try, and let me know what you think. I’m confident you’ll never go back to store-bought again! Perhaps serve it with a homemade dill pickle for the full experience!