
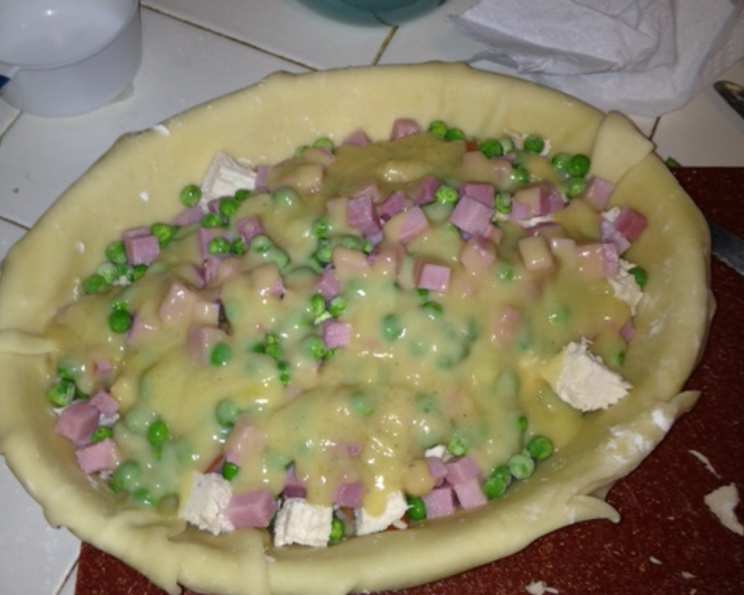
Dairy-Free Chicken Pot Pie Filling: Comfort Food Reimagined
The aroma of chicken pot pie always transports me back to my grandmother’s kitchen. I can almost feel the warmth radiating from the oven, the anticipation building with each passing minute. While her recipe was a classic, filled with creamy dairy goodness, I’ve always been up for a culinary challenge. And what bigger challenge than recreating that comforting, nostalgic flavor profile without a drop of milk or butter? This dairy-free chicken pot pie filling does just that, offering a delicious and inclusive option for everyone to enjoy a slice of homey goodness.
Recipe Overview:
- Prep Time: 25 minutes
- Cook Time: 1 hour 30 minutes
- Total Time: 1 hour 55 minutes
- Servings: 4
- Yield: 1 pie filling
- Dietary Type: Dairy-Free
Ingredients:
- 2 large chicken breasts
- 1 1/2 cups chicken stock
- 3 sprigs parsley
- 2 sprigs celery leaves
- 1 bay leaf
- 2 carrots, sliced
- 8 small white pearl onions
- 1 cup ham, cubed (optional, can be omitted or substituted with more chicken)
- 1 cup frozen peas
- 2 tablespoons flour (all-purpose or gluten-free blend)
- 2 tablespoons butter (or margarine, or dairy-free butter alternative)
- Salt and pepper, to taste
- 1 pie crust, premade (check for dairy-free ingredients, or use your favorite homemade recipe)
Equipment Needed:
- Deep skillet
- 1.5-liter casserole dish
- Small dish
- Oven
- Knife
- Cutting board
- Measuring cups and spoons
Instructions:
- In a deep skillet, combine the chicken breasts, chicken stock, parsley sprigs, celery leaves, and bay leaf. Bring the mixture to a simmer over medium heat.
- Cover the skillet and cook for 20 minutes on medium-low heat, allowing the chicken to gently poach in the flavorful broth.
- Add the sliced carrots and pearl onions to the skillet. Continue to cook for approximately 10 minutes, or until the vegetables are cooked but still retain a slight firmness. You don’t want them to become mushy!
- Carefully remove the chicken breasts from the skillet and set them aside to cool slightly.
- Transfer the cooked carrots and onions to a 1.5-liter casserole dish.
- Discard the parsley sprigs, celery leaves, and bay leaf from the skillet; they have imparted their flavor and are no longer needed.
- Once the chicken breasts have cooled enough to handle, cut them into 1 1/2-inch chunks.
- Add the cut chicken, cubed ham (if using), and frozen peas to the casserole dish with the carrots and onions.
- In a small dish, thoroughly blend the flour with the butter (or margarine/dairy-free alternative) until a smooth paste forms. This is your roux, which will help to thicken the sauce.
- Stir in a few tablespoons of the chicken stock from the skillet into the flour-butter paste, creating a smooth slurry. This helps to prevent lumps when adding the roux to the hot liquid.
- Pour the flour-butter slurry back into the remaining chicken stock in the skillet. Bring the mixture to a simmer over medium heat, stirring constantly.
- Cook until the sauce has thickened to your desired consistency, about 3-4 minutes, stirring constantly to prevent scorching. The sauce should coat the back of a spoon.
- Pour the thickened sauce into the casserole dish, coating all the chicken and vegetables. Allow the filling to cool slightly before proceeding.
- Fit the pie crust over the casserole dish, ensuring it covers the entire top. Seal the edges of the crust to the dish, crimping or fluting them for a decorative finish.
- Cut several slits in the top of the crust to allow steam to escape during baking, preventing the crust from becoming soggy.
- Bake the pot pie in a preheated oven at 425°F (220°C) for 10 minutes.
- Reduce the oven temperature to 350°F (175°C) and continue to bake for another 50-60 minutes, or until the crust is golden brown and the filling is bubbly.
- If the pastry begins to brown too quickly during baking, cover it loosely with aluminum foil to prevent burning.
- Let cool slightly before serving.
Freezing Instructions: For freezing for later use, you can either freeze the filling separately and make the crust fresh when ready to bake, or assemble the entire pie but freeze it before baking. To bake from frozen, add approximately 15-20 minutes to the baking time.
Expert Tips & Tricks:
- For extra flavor, try using bone-in chicken thighs instead of chicken breasts. They will add a richer depth to the broth.
- Don’t overcook the vegetables! Slightly firm vegetables provide a pleasant texture contrast to the creamy filling.
- Adjust the sauce thickness to your liking. If you prefer a thicker sauce, use a bit more flour in the roux. For a thinner sauce, use less.
- Use a dairy-free milk alternative (like unsweetened almond milk or cashew cream) to make the sauce richer and creamier if desired. Add it to the sauce after thickening with the roux.
Serving & Storage Suggestions:
Serve the dairy-free chicken pot pie warm, straight from the oven. A sprinkle of fresh parsley adds a touch of freshness and visual appeal. Leftovers can be stored in an airtight container in the refrigerator for up to 3-4 days. To reheat, cover the pot pie with foil and bake in a preheated oven at 350°F (175°C) until heated through. You can also reheat individual portions in the microwave. The filling can be stored in the freezer for up to 2-3 months in an airtight container. Thaw completely before reheating.
Nutritional Information:
| Nutrient | Amount per Serving | % Daily Value |
|---|---|---|
| Calories | 450 kcal | 23% |
| Total Fat | 20g | 31% |
| Saturated Fat | 8g | 40% |
| Cholesterol | 75mg | 25% |
| Sodium | 800mg | 33% |
| Total Carbohydrate | 35g | 12% |
| Dietary Fiber | 5g | 20% |
| Sugars | 7g | N/A |
| Protein | 30g | 60% |
Nutritional information is an estimate and may vary based on specific ingredients and brands used.
Variations & Substitutions:
- Gluten-Free: Use a gluten-free pie crust and a gluten-free flour blend for the roux.
- Vegetarian: Substitute the chicken with mushrooms or lentils for a hearty vegetarian option.
- Vegan: Replace the chicken and ham with plant-based alternatives and use a vegan butter substitute. Ensure your pie crust is also vegan-friendly.
- Different Vegetables: Feel free to add or substitute other vegetables like potatoes, celery, or green beans.
- Herbs: Experiment with different herbs like thyme, rosemary, or sage for a unique flavor profile.
FAQs (Frequently Asked Questions):
Q: Can I use pre-cooked chicken to save time?
A: Yes, you can use pre-cooked rotisserie chicken or leftover cooked chicken. Simply skip the first few steps and add the cooked chicken to the casserole dish with the other ingredients.
Q: How do I prevent the bottom crust from becoming soggy?
A: Blind bake the bottom crust before adding the filling to help prevent sogginess. You can also place the pie on a baking sheet in the lower third of the oven.
Q: Can I make this pot pie in individual ramekins?
A: Absolutely! Divide the filling among ramekins and top with smaller crusts. Adjust the baking time accordingly, as the individual pot pies will likely cook faster.
Q: What is the best way to store leftover pot pie?
A: Store leftover pot pie in an airtight container in the refrigerator for up to 3-4 days.
Q: My pie crust is getting too brown. What should I do?
A: If the pie crust is browning too quickly, cover it loosely with aluminum foil for the remainder of the baking time.
Final Thoughts:
This dairy-free chicken pot pie filling is a testament to how classic comfort foods can be reimagined to suit different dietary needs without sacrificing flavor. Don’t be intimidated by the ingredient list; the process is straightforward, and the result is a warm, satisfying dish that everyone can enjoy. Gather your ingredients, preheat your oven, and prepare to create a memorable meal that will bring smiles to your table. I encourage you to try this recipe and share your feedback. Pair it with a simple green salad for a complete and wholesome meal.