
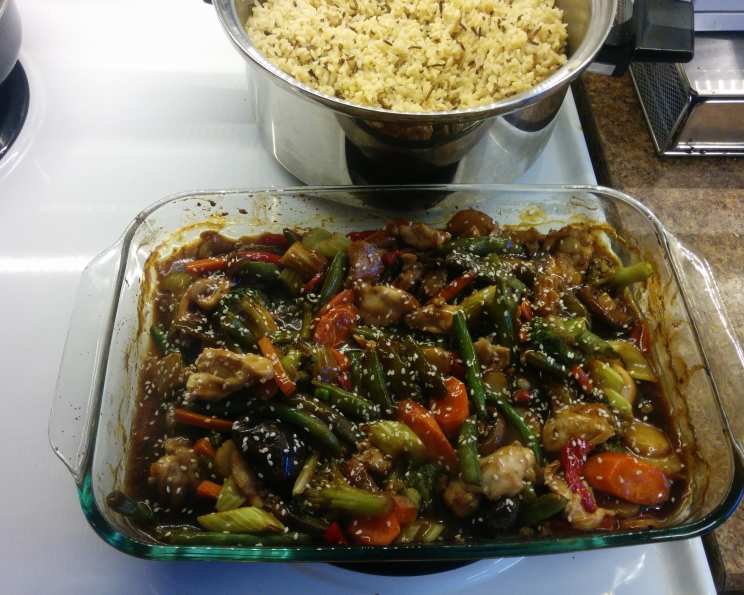
Chinese Chicken Oven “Stir-Fry”: Effortless Weeknight Delight
The scent of soy sauce, ginger, and garlic always transports me back to my grandmother’s small apartment. She wasn’t a chef, but she was a wizard with flavors, especially when it came to her version of “stir-fry.” Of course, her kitchen was tiny and she had to improvise. Instead of a wok, she’d use a baking pan in the oven. The result wasn’t exactly stir-fry, but it was packed with tender chicken, colorful vegetables, and that unmistakable sweet and savory sauce that I craved. Now, I’ve refined her technique to bring you this unbelievably simple and delicious Chinese Chicken Oven “Stir-Fry.” It’s weeknight comfort food at its finest.
Recipe Overview
- Prep Time: 15 minutes
- Cook Time: 45 minutes
- Total Time: 60 minutes
- Servings: 4
- Yield: 1 pan
- Dietary Type: Adaptable
Ingredients
- 1 boneless chicken breast, cubed
- 3 boneless chicken thighs, cubed
- 1/3 cup carrot, thinly sliced
- 1/3 cup celery, thinly sliced
- 1/3 cup red bell pepper, sliced
- 8 ounces water chestnuts, sliced
- 8 ounces baby sweet corn cobs
Sauce:
- 1/4 cup brown sugar
- 1/2 cup low sodium soy sauce
- 1/4 cup water
- 1 tablespoon Worcestershire sauce
- Garlic, minced (to taste)
- Ginger, minced (to taste)
- Pepper (to taste)
- 3 scallions, sliced
- 2 tablespoons cornstarch
- 1/4 cup water
- 1 teaspoon sesame oil
Equipment Needed
- 9 x 13 inch baking pan
- Mixing bowls
- Measuring cups and spoons
Instructions
-
Preheat your oven to 400°F (200°C). Lightly spray a 9×13 inch baking pan with cooking spray. This prevents sticking and makes cleanup a breeze.
-
In the prepared baking pan, combine the cubed chicken breast, cubed chicken thighs, thinly sliced carrot, thinly sliced celery, sliced red bell pepper, sliced water chestnuts, and baby sweet corn cobs.
-
In a separate mixing bowl, prepare the sauce. Combine the brown sugar, low sodium soy sauce, water, and Worcestershire sauce. Now, this is where you can customize things to your liking. Add minced garlic, minced ginger, and pepper to taste. Remember, you can always add more, but you can’t take it away! I usually start with about a tablespoon of minced garlic and a teaspoon of minced ginger and then adjust from there. The sweetness is also something you can play with. If you prefer a less sweet dish, start with a smaller amount of brown sugar and add more as needed.
-
Pour the sauce over the chicken and vegetables in the baking pan. Toss gently to coat everything evenly. Make sure all the chicken and veggies are nicely coated in the sauce. This will ensure everything bakes evenly and develops a delicious flavor.
-
Bake uncovered for approximately 45 minutes, or until the chicken and vegetables are cooked through. At around the 30-minute mark, stir the mixture once to ensure even cooking. Check for doneness by using a meat thermometer; the internal temperature of the chicken should reach 165°F (74°C). If the vegetables are browning too quickly, you can loosely cover the pan with foil for the remaining baking time.
-
While the chicken is baking, prepare the thickening mixture. In a small bowl, whisk together the cornstarch and water until smooth. This will prevent lumps from forming when you add it to the hot sauce. Stir in the sesame oil.
-
About 10 minutes before the end of the baking time, pour the cornstarch mixture over the chicken and vegetables. Stir to combine. The sauce will begin to thicken as it bakes. Continue baking for the remaining 10 minutes, or until the sauce has reached your desired consistency.
-
Remove from oven and stir in the sliced scallions. Let the dish rest for a few minutes before serving. This allows the flavors to meld together.
Expert Tips & Tricks
- Make-Ahead Tip: You can prep all the ingredients ahead of time! Simply combine the chicken and vegetables in a gallon-size zip-top bag. Mix the sauce ingredients separately and store in an airtight container in the refrigerator. When you’re ready to bake, pour the contents of the bag into the prepared pan, pour the sauce over it, and bake as directed.
- Vegetable Swaps: Feel free to substitute your favorite vegetables! Broccoli florets, snow peas, snap peas, mushrooms, or zucchini would all work well in this dish.
- Chicken Substitutions: You can use just chicken breasts or just chicken thighs, or even substitute with tofu for a vegetarian option.
- Adjusting Sweetness: If you find the sauce too sweet, add a splash of rice vinegar or a squeeze of lemon juice to balance the flavors.
- Thickening the Sauce: If the sauce is not thickening to your liking, you can mix a bit more cornstarch with water and add it to the pan during the last few minutes of baking.
Serving & Storage Suggestions
Serve your Chinese Chicken Oven “Stir-Fry” hot over a bed of fluffy rice or lo mein noodles. Garnish with extra sliced scallions or a sprinkle of sesame seeds for added flavor and visual appeal. For a complete meal, pair it with some takeout egg rolls or fortune cookies.
Leftovers can be stored in an airtight container in the refrigerator for up to 3-4 days. To reheat, microwave until heated through, or reheat in a skillet over medium heat, stirring occasionally. You can also freeze leftovers for up to 2 months. Thaw completely in the refrigerator before reheating.
Nutritional Information
| Nutrient | Amount per Serving | % Daily Value |
|---|---|---|
| Calories | 376.9 kcal | N/A |
| Calories from Fat | 138 g | 37% |
| Total Fat | 15.4 g | 23% |
| Saturated Fat | 4.2 g | 20% |
| Cholesterol | 82.4 mg | 27% |
| Sodium | 1209.9 mg | 50% |
| Total Carbohydrate | 37.1 g | 12% |
| Dietary Fiber | 3 g | 11% |
| Sugars | 18.5 g | 73% |
| Protein | 22.7 g | 45% |
Note: Nutritional information is an estimate and may vary based on specific ingredients and preparation methods.
Variations & Substitutions
- Gluten-Free: To make this dish gluten-free, use tamari instead of soy sauce. Tamari is a type of soy sauce that is made without wheat.
- Spicy Kick: Add a pinch of red pepper flakes or a drizzle of sriracha to the sauce for a spicy kick.
- Honey Garlic: Substitute honey for the brown sugar for a honey garlic version.
- Vegetarian Version: Substitute the chicken with firm or extra-firm tofu, pressed to remove excess water and cubed.
- Seasonal Vegetables: Adapt the vegetables to what’s in season. In the fall, try adding butternut squash or sweet potatoes. In the spring, asparagus or sugar snap peas would be a delicious addition.
FAQs (Frequently Asked Questions)
Q: Can I use frozen vegetables?
A: Yes, you can use frozen vegetables. Just be sure to thaw them completely and pat them dry before adding them to the pan to prevent the dish from becoming too watery.
Q: Can I add pineapple to this dish?
A: Absolutely! Pineapple adds a touch of sweetness and acidity that complements the other flavors beautifully. Add it during the last 15 minutes of baking.
Q: What kind of rice is best to serve with this?
A: Long-grain white rice, jasmine rice, or brown rice are all great options.
Q: Can I use a different type of sweetener instead of brown sugar?
A: Yes, you can substitute honey, maple syrup, or coconut sugar for the brown sugar. Keep in mind that the flavor will change slightly depending on the sweetener you use.
Q: Can I make this in a slow cooker?
A: While this recipe is designed for the oven, it can be adapted for a slow cooker. Combine all the ingredients except the cornstarch slurry and scallions in the slow cooker. Cook on low for 6-8 hours or on high for 3-4 hours. During the last 30 minutes, stir in the cornstarch slurry and cook until thickened. Stir in scallions before serving.
Final Thoughts
This Chinese Chicken Oven “Stir-Fry” is a recipe that’s as adaptable as it is delicious. Whether you’re craving a taste of comfort or need a quick and easy weeknight meal, this dish is sure to satisfy. Don’t be afraid to experiment with different vegetables, sauces, and spices to create your own personalized version. I hope this recipe becomes a staple in your kitchen, just like it has in mine. I can’t wait to hear about your creations and any delicious twists you add!