
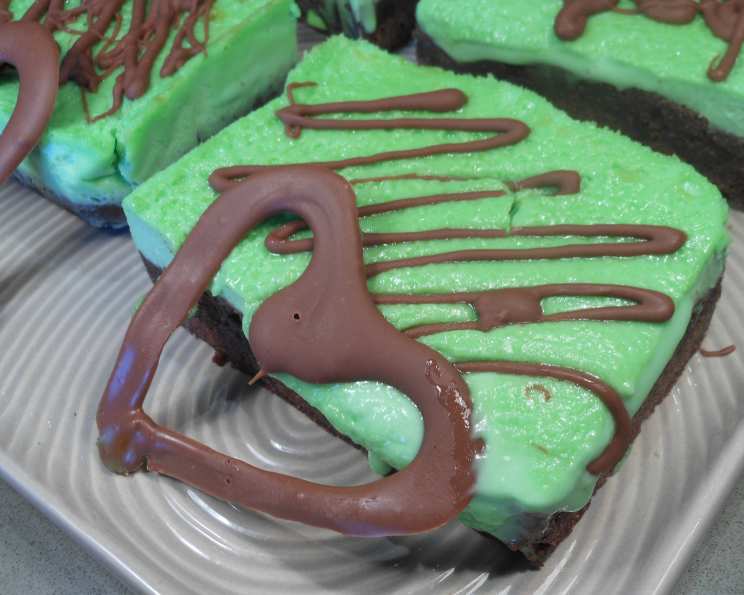
Choc Mint Cheesecake Slice: A Refreshing Indulgence
The first time I tasted a choc mint cheesecake was at a little café tucked away on a rainy street corner in Melbourne. The aroma of coffee mingled with the cool, sharp scent of mint, and the first bite was pure bliss. The combination of rich chocolate, creamy cheesecake, and refreshing mint was an unexpected delight that instantly brightened the dreary day. Ever since, I’ve been on a quest to recreate that perfect balance of flavors, and this recipe captures the essence of that delightful memory.
Recipe Overview
- Prep Time: 25 minutes
- Cook Time: 40 minutes
- Total Time: 2 hours 55 minutes (including cooling and chilling)
- Servings: 6-8 slices
- Dietary Type: Not suitable for Vegans, Vegetarians only
Ingredients
For the Chocolate Base:
- 185g unsalted butter, melted
- 1/4 cup cocoa, sifted
- 1 cup caster sugar
- 2 eggs
- 1 cup plain flour, sifted
- 50g dark chocolate, melted and cooled
For the Mint Topping:
- 1/3 cup caster sugar
- 1 bunch mint, leaves picked
- 250g cream cheese
- 3 eggs
- 1/2 teaspoon peppermint extract
- 100ml thickened cream
- 2-3 drops green food coloring (optional)
Equipment Needed
- 20cm square loose-bottomed cake pan
- Baking paper
- Mixing bowl
- Saucepan
- Jug
- Food processor
- Deep baking dish
- Foil
Instructions
-
Preheat your oven to 160°C (320°F). Grease and line a 20cm square loose-bottomed cake pan with baking paper. This ensures easy removal and prevents sticking. The loose bottom is key for getting those clean, professional-looking slices.
-
In a large bowl, combine the melted butter, sifted cocoa, caster sugar, eggs, and sifted plain flour. Mix everything together until well combined. Be careful not to overmix; just ensure all ingredients are incorporated.
-
Press the chocolate mixture firmly into the base of the prepared pan. Use the back of a spoon or your fingers to create an even layer. This forms the foundation of our decadent cheesecake.
-
Bake the base for 15 minutes, or until it is set. You’ll know it’s ready when it springs back slightly to the touch. Allow the base to cool completely in the pan before adding the mint topping.
-
While the base is baking and cooling, prepare the mint topping. In a saucepan, combine the caster sugar, mint leaves, and 1/2 cup (125ml) water. Place the saucepan over low heat and stir until the sugar dissolves completely. This creates a vibrant mint syrup.
-
Increase the heat to medium and simmer the mint mixture for 3 minutes. This allows the mint flavor to fully infuse into the syrup.
-
Remove the saucepan from the heat and set aside to cool completely. This is crucial for preventing the heat from cooking the eggs in the cheesecake filling.
-
Once the mint syrup is cooled, strain it into a jug, discarding the solids. The strained syrup will be the base of our minty cheesecake filling.
-
Place the cream cheese in a food processor and whiz for a few seconds to soften. This will ensure a smooth and creamy texture in the final product.
-
Add the cooled sugar syrup, eggs, peppermint extract, thickened cream, and green food coloring (if using) to the food processor. Process until the mixture is completely smooth and well combined. Avoid over-processing, which can lead to a less creamy texture.
-
Pour the cheesecake mixture into the cake pan, over the cooled chocolate base.
-
Tightly wrap the base of the pan with foil to make it watertight. This is essential for the water bath technique, which ensures even cooking and prevents cracking.
-
Place the cheesecake in a deep baking dish and fill the dish with enough boiling water to come halfway up the sides of the cake pan. This creates a gentle, moist cooking environment.
-
Bake the cheesecake for 25 minutes, or until the topping is just set. The cake may still have a slight wobble in the center, but it will firm up as it cools.
-
Remove the cheesecake from the oven and allow it to cool completely in the water bath. This gradual cooling process helps prevent cracking.
-
Once cooled, chill the cheesecake in the refrigerator for at least 2 hours, or until firm. This allows the flavors to meld together and the texture to set completely.
-
Before serving, cut the cheesecake into slices. Drizzle the cooled, melted dark chocolate over the slices.
Expert Tips & Tricks
- For an extra-intense mint flavor, consider steeping the mint leaves in the sugar syrup overnight in the refrigerator before straining.
- If you don’t have a food processor, you can use an electric mixer to combine the cream cheese filling ingredients, but make sure the cream cheese is very soft to avoid lumps.
- To prevent the chocolate from cracking when slicing, warm a long, sharp knife under hot water and dry it before each cut.
- If your cheesecake cracks despite using a water bath, don’t worry! It will still taste delicious. You can cover the cracks with extra chocolate drizzle or whipped cream for a visually appealing fix.
- Make-ahead tip: You can bake the chocolate base a day ahead and store it in an airtight container at room temperature. The mint topping can also be made a day in advance and stored in the refrigerator. Assemble the cheesecake just before baking.
Serving & Storage Suggestions
Serve the choc mint cheesecake chilled, garnished with fresh mint sprigs or a dusting of cocoa powder. It pairs perfectly with a cup of coffee or a glass of chilled milk.
Store leftover cheesecake in an airtight container in the refrigerator for up to 3 days. For longer storage, you can freeze the cheesecake. Wrap individual slices tightly in plastic wrap and then place them in a freezer-safe container. Frozen cheesecake can be stored for up to 2 months. Thaw in the refrigerator overnight before serving.
Nutritional Information
| Nutrient | Amount per Serving | % Daily Value |
|---|---|---|
| Calories | 785.6 kcal | N/A |
| Calories from Fat | 489 g | 62% |
| Total Fat | 54.4 g | 83% |
| Saturated Fat | 31.8 g | 159% |
| Cholesterol | 290.4 mg | 96% |
| Sodium | 205.9 mg | 8% |
| Total Carbohydrate | 67.3 g | 22% |
| Dietary Fiber | 2.6 g | 10% |
| Sugars | 46 g | 184% |
| Protein | 12.2 g | 24% |
Note: Nutritional information is an estimate and may vary based on specific ingredients and portion sizes.
Variations & Substitutions
- Gluten-free: Substitute the plain flour in the base with a gluten-free flour blend. You can also use a pre-made gluten-free cookie crust.
- Dairy-free: While challenging, you can experiment with dairy-free cream cheese alternatives. Be aware that the texture and flavor may differ slightly. Look for high-quality plant-based options. Replace the thickened cream with canned coconut cream (refrigerate the can overnight and use only the thick cream at the top).
- Different Chocolate: Try using milk chocolate for a sweeter base, or white chocolate for a different flavor profile.
- Seasonal Twist: Add a layer of crushed Oreos or chocolate cookies to the base for added crunch. For a festive touch, incorporate crushed candy canes into the mint topping during the holidays.
- Less Sugar: Reduce the amount of caster sugar in both the base and the topping to adjust the sweetness level to your preference. You can also use a sugar substitute, but be mindful of any textural changes.
FAQs (Frequently Asked Questions)
Q: Why do I need to use a water bath for this cheesecake?
A: A water bath provides gentle, even heat, preventing the cheesecake from cracking and ensuring a creamy, smooth texture.
Q: Can I skip the chilling time?
A: While tempting, chilling is crucial! It allows the cheesecake to set properly and for the flavors to meld together. The cheesecake will be too soft and unstable if you skip this step.
Q: What if I don’t have a loose-bottomed cake pan?
A: You can use a regular cake pan, but line it thoroughly with baking paper, leaving an overhang on all sides. This will allow you to lift the cheesecake out easily.
Q: My cheesecake is browning too quickly on top. What should I do?
A: Tent the cheesecake with aluminum foil during the last 10-15 minutes of baking to prevent excessive browning.
Q: Can I use dried mint instead of fresh mint?
A: Fresh mint is highly recommended for the best flavor. Dried mint will not provide the same refreshing and vibrant taste.
Final Thoughts
I truly hope you’ll try this recipe for Choc Mint Cheesecake Slice. It’s a delightful combination of flavors and textures that’s perfect for any occasion, and it’s sure to bring a smile to your face, just like it did for me on that rainy day in Melbourne. Don’t be afraid to experiment with variations and substitutions to make it your own. And most importantly, enjoy the process of creating something delicious! Let me know in the comments how your cheesecake turns out – I’d love to hear about your experience. Perhaps pair it with a strong espresso or a light and fruity white wine for the perfect dessert experience.