
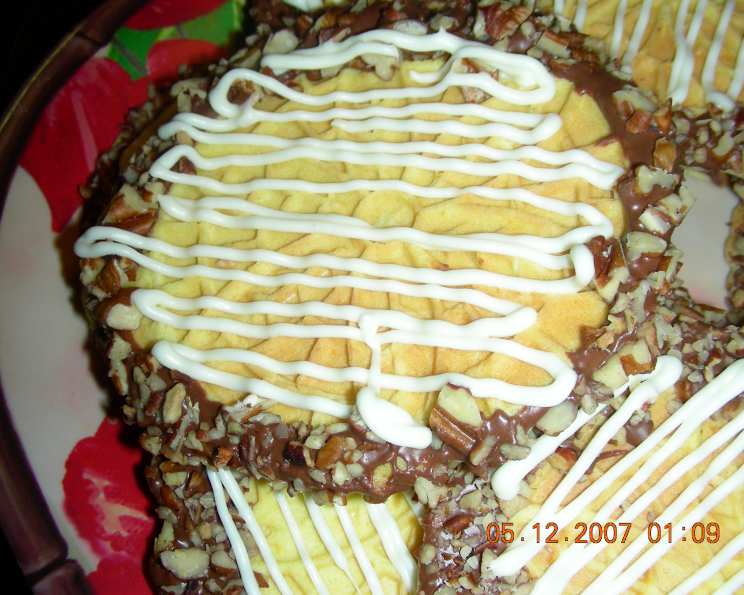
Choco-Nutty Banana Pizzelles: A Sweet Symphony
The memory of my grandmother’s kitchen is forever etched in my mind. The aroma of freshly baked cookies, the warmth of the oven, and her gentle hands guiding me through the steps of her cherished recipes. I remember one particular baking competition, a local event where I wanted to make something new, something bold, yet rooted in the comforting flavors of my childhood. I wanted to honor my grandmother’s legacy, infusing her classic techniques with a touch of my own creativity. That’s how the Choco-Nutty Banana Pizzelles were born—a delightful combination of crispy pizzelle cookies, rich chocolate, and the subtle sweetness of banana, inspired by those cherished moments in her kitchen. These pizzelles claimed second place, but more importantly, they secured a special place in my heart.
Recipe Overview
- Prep Time: 20 minutes
- Cook Time: 25 minutes
- Total Time: 45 minutes
- Servings: 36
- Yield: 36 pizzelles
- Dietary Type: Vegetarian
Ingredients
- 3 eggs
- ¾ cup sugar
- ½ cup butter, melted
- 1 ounce banana extract
- 1 ¾ cups flour
- 2 teaspoons baking powder
- 1 (12 ounce) package milk chocolate chips
- 1 ½ cups pecans, coarsely chopped
- 1 cup white chocolate chips (optional)
Equipment Needed
- Pizzelle iron
- Mixing bowls
- Measuring cups and spoons
- Microwave-safe bowl
- Sifter
- Spatula or spoon
Instructions
-
In a large mixing bowl, beat the eggs and sugar together until the mixture becomes thick and pale yellow. This step is crucial for creating a light and airy pizzelle. Using an electric mixer will speed up this process.
-
Stir in the melted butter and banana extract. Ensure the butter has cooled slightly before adding it to the egg mixture to prevent cooking the eggs. The banana extract provides a distinct flavor that perfectly complements the chocolate and nuts.
-
In a separate bowl, sift together the flour and baking powder. Sifting ensures that the baking powder is evenly distributed throughout the flour, which is essential for a good rise.
-
Gradually mix the flour mixture into the egg mixture. The batter will be thick, almost like a cookie dough. Don’t overmix; mix just until the flour is incorporated.
-
Preheat your pizzelle griddle. Lightly grease the griddle as needed. Some pizzelle irons are non-stick, but a light coating of cooking spray or butter ensures easy removal and prevents sticking.
-
Carefully drop 1 tablespoon of batter onto each circle of the preheated pizzelle iron. Avoid overfilling, as the batter will spread during cooking.
-
Cook for approximately 25 seconds, or until the pizzelles are golden brown. Cooking time may vary slightly depending on your pizzelle iron, so keep a close eye on them.
-
Once the pizzelles are done, gently remove them from the iron and set them aside to cool on a wire rack.
-
Melt the milk chocolate chips in a microwave-safe bowl on medium setting for approximately 1 ½ minutes. Stir the chocolate until it is smooth and glossy. If the chocolate is not fully melted, continue microwaving in 15-second intervals, stirring in between, until smooth.
-
Spread the melted chocolate in about a ½-inch strip around the edge of each pizzelle. This creates a beautiful and delicious chocolate border.
-
Sprinkle the chopped pecans over the melted chocolate before it hardens. Press the pecans gently into the chocolate to ensure they adhere properly.
-
Set aside the decorated pizzelles to cool and harden. This will allow the chocolate to set and the pecans to adhere firmly.
-
(Optional) If you desire a more elegant presentation, drizzle the tops of the pizzelles with melted white chocolate. This adds a touch of visual appeal and a contrasting flavor that complements the milk chocolate and banana. To melt the white chocolate, follow the same procedure as with the milk chocolate.
Expert Tips & Tricks
- For extra banana flavor, you can add a mashed ripe banana to the batter. This will, however, slightly alter the texture and make the pizzelles a little softer.
- Ensure your butter is melted but not hot when adding it to the egg mixture. Hot butter can cook the eggs and result in a lumpy batter.
- If your pizzelles are sticking to the iron, try using a non-stick cooking spray or lightly brushing the iron with melted butter between batches.
- To prevent the chocolate from seizing while melting, avoid getting any water in the bowl.
- You can easily adjust the level of sweetness by using semi-sweet or dark chocolate chips instead of milk chocolate.
- Experiment with different nuts, such as walnuts, almonds, or hazelnuts, to create unique flavor combinations.
- If you don’t have banana extract, you can substitute it with vanilla extract or almond extract. However, keep in mind that the flavor will be different.
Serving & Storage Suggestions
These Choco-Nutty Banana Pizzelles are perfect for serving as a dessert, snack, or party treat. They can be attractively arranged on a platter, stacked in a tower, or presented in individual gift bags.
To store leftovers, place the pizzelles in an airtight container at room temperature. They will stay fresh for up to 3-4 days. For longer storage, you can freeze them for up to 2 months. Thaw at room temperature before serving. If the chocolate has bloomed (developed a whitish coating), don’t worry; it’s still perfectly safe to eat. The bloom is simply a separation of the cocoa butter and sugars.
Nutritional Information
| Nutrient | Amount per Serving | % Daily Value |
|---|---|---|
| Calories | 109 kcal | N/A |
| Total Fat | 6.8g | 10% |
| Saturated Fat | 2.3g | 11% |
| Cholesterol | 24.8mg | 8% |
| Sodium | 45.6mg | 1% |
| Total Carbohydrate | 10.6g | 3% |
| Dietary Fiber | 0.7g | 2% |
| Sugars | 5.3g | N/A |
| Protein | 1.7g | 3% |
Variations & Substitutions
- Gluten-Free: Substitute the all-purpose flour with a gluten-free blend. Ensure the blend contains xanthan gum or another binding agent to provide structure.
- Vegan: Replace the eggs with flax eggs (1 tablespoon ground flaxseed mixed with 3 tablespoons water, let sit for 5 minutes). Use vegan butter and dairy-free chocolate chips.
- Different Extracts: Try using other extracts like almond, vanilla, or coconut extract to alter the flavor profile.
- Seasonal Variations: During the holidays, add a dash of cinnamon or nutmeg to the batter for a festive twist.
- Nut-Free: Replace the pecans with sunflower seeds or chopped dried cranberries.
FAQs (Frequently Asked Questions)
Q: Can I use a different type of nut other than pecans?
A: Absolutely! Walnuts, almonds, or hazelnuts would all work well. Just make sure they are coarsely chopped for the best texture.
Q: My pizzelles are too soft. What am I doing wrong?
A: Make sure your pizzelle iron is hot enough. Also, avoid overfilling the iron with batter. If the batter is too wet, add a tablespoon or two of flour until you reach the desired consistency.
Q: Can I make the batter ahead of time?
A: Yes, you can make the batter up to 24 hours in advance. Store it in the refrigerator and bring it to room temperature before using.
Q: How do I prevent the chocolate from seizing when melting?
A: The key is to avoid getting any water or steam into the chocolate. Use a dry bowl and stir gently while microwaving.
Q: Can I freeze the pizzelles after they are decorated?
A: Yes, you can freeze them for up to 2 months. Place them in a single layer on a baking sheet until frozen, then transfer them to an airtight container. This prevents them from sticking together.
Final Thoughts
Choco-Nutty Banana Pizzelles are more than just a dessert; they’re a delightful experience that brings together the warmth of tradition and the excitement of innovation. I wholeheartedly encourage you to try this recipe, experiment with your own variations, and share your creations with loved ones. These pizzelles are perfect with a cup of coffee or a scoop of vanilla ice cream. Don’t hesitate to let me know how they turn out – your feedback is always welcome! Happy baking!