
Chocolate and Peanut Butter Swirl Cheesecake (Vegan Version)
There’s something truly magical about the combination of chocolate and peanut butter. Growing up, my absolute favorite treat was a peanut butter cup, and the memory of that first bite—the sweet, creamy peanut butter melding with the rich, dark chocolate—still brings a smile to my face. When I transitioned to a vegan lifestyle, I was determined to recreate that blissful flavor combination in a plant-based dessert. This Chocolate and Peanut Butter Swirl Cheesecake is the culmination of that quest, a truly decadent and satisfying treat that I’m excited to share with you.
Recipe Overview
- Prep Time: 25 minutes
- Cook Time: 55 minutes
- Total Time: 2 hours (plus chilling time)
- Servings: 8-10
- Yield: 1 cheesecake
- Dietary Type: Vegan
Ingredients
-
For the Crust:
- 1 ½ cups Oreo cookies, finely crushed
- 3 tablespoons vegan margarine, melted
-
For the Cheesecake Filling:
- 300 g extra firm light silken tofu
- 220 g vegan cream cheese (Tofutti Better than Cream Cheese)
- ¾ cup sugar
- ½ cup soymilk
- 100 g chocolate
- 5 tablespoons peanut butter
- 2 tablespoons lemon juice
- 1 teaspoon vanilla
- 3 tablespoons cornflour
Equipment Needed
- Pie pan (9-inch recommended)
- Large bowl
- Food processor or high-powered blender
- Microwave-safe bowl or double boiler
- Spatula
- Oven
Instructions
-
Prepare the crust: Grease a pie pan. In a large bowl, stir together the Oreo cookie crumbs and the melted vegan margarine.
-
Press the crust: Using your fingertips or the bottom of a measuring cup, firmly and evenly press the cookie crumb mixture into the bottom and sides of the prepared pie plate. Ensure the crust is compact for a good base.
-
Preheat the oven: Preheat the oven to 180°C (350°F). This ensures that the cheesecake bakes evenly.
-
Blend the base: Drain the silken tofu thoroughly to remove excess water. Put the drained tofu and vegan cream cheese into your food processor or high-powered blender. Blend until completely smooth. This is crucial for a creamy, luscious texture.
-
Add the sugar and milk: Add the sugar and soymilk to the food processor. Process again until the sugar is fully dissolved, about 3 minutes. Taste to make sure it’s not grainy!
-
Incorporate remaining ingredients: Add the lemon juice, vanilla, and cornflour to the mixture (excluding the chocolate and peanut butter for now, as well as the prepared crust). Process until completely smooth, about 3 more minutes. The cornflour acts as a binder, helping the cheesecake set properly.
-
Melt the chocolate: Melt the chocolate in a microwave-safe container in short intervals, stirring in between to prevent burning. You can also melt it on the stove using a double boiler. Whichever method you use, be cautious – burnt chocolate is no fun!
-
Divide the mixture: Pour half of your blended cream mixture into a separate bowl. The most accurate way is using a kitchen scale.
-
Make the chocolate layer: Gently fold the melted chocolate into one of the cream mixture until it is fully incorporated. Be careful not to overmix.
-
Pour the chocolate mixture: Pour the chocolate mixture into the prepared pie crust. Spread evenly for a consistent layer.
-
Prepare the peanut butter layer: Add the peanut butter to your remaining cream mixture in the food processor and blend again until completely smooth and well combined.
-
Adjust peanut butter flavor (optional): Taste test the peanut butter mixture. If you desire a stronger peanut butter flavor, add one tablespoon of peanut butter, blend, then taste test again. Continue in this way until you are satisfied with the flavor. Remember, you can always add more, but you can’t take it away!
-
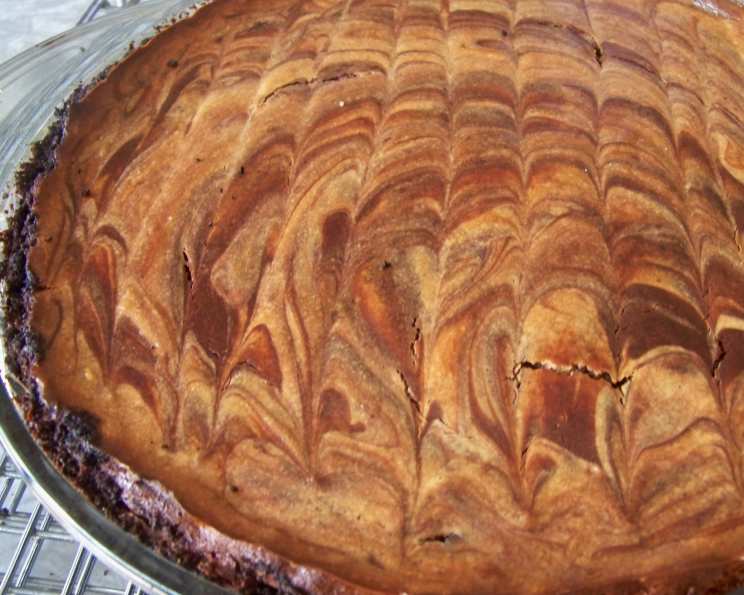
Swirl the mixtures: Carefully swirl the peanut butter mixture into the pie crust on top of the chocolate mixture layer. Use a knife or skewer to create a marbled effect. Be creative with your swirls!
-
Bake: Bake in the middle of the preheated oven for about 55 minutes. The edges should be set, and the filling will be slightly jiggly in the center. It will continue to set as it cools. Watch carefully to prevent the crust from browning too much.
-
Cool and refrigerate: Remove from the oven and allow to cool completely at room temperature. This prevents cracking. Then, refrigerate until completely chilled, preferably for at least 4 hours, or even overnight. The longer it chills, the better the texture will be.
Expert Tips & Tricks
- Tofu Prep is Key: Make sure your silken tofu is extra firm and well-drained. Pressing it beforehand can remove excess moisture and lead to a firmer, less watery cheesecake.
- Microwave Chocolate Carefully: When melting the chocolate in the microwave, use short 20-30 second intervals and stir frequently to avoid burning. Burnt chocolate can ruin the entire dish.
- Achieve the Perfect Swirl: Don’t over-swirl! A few deliberate strokes with a knife or skewer are all you need to create a beautiful marbled effect. Overdoing it can muddy the colors and lose the definition.
- Chilling is Crucial: Resist the urge to cut into the cheesecake before it’s fully chilled. The chilling process allows the flavors to meld together and the texture to set properly. An overnight chill is ideal.
Serving & Storage Suggestions
Serve this decadent cheesecake chilled, either on its own or with a dollop of vegan whipped cream or a sprinkle of shaved chocolate.
- Storage: Store leftover cheesecake in the refrigerator, covered, for up to 4 days.
- Freezing: You can also freeze individual slices for longer storage (up to 2 months). Wrap tightly in plastic wrap and then place in a freezer-safe container. Thaw in the refrigerator overnight before serving. Freezing might slightly alter the texture, but it will still be delicious.
Nutritional Information
| Nutrient | Amount per Serving | % Daily Value |
|---|---|---|
| Calories | 445 kcal | 22% |
| Total Fat | 25g | 38% |
| Saturated Fat | 8g | 40% |
| Cholesterol | 0mg | 0% |
| Sodium | 265mg | 11% |
| Total Carbohydrate | 55g | 18% |
| Dietary Fiber | 4g | 16% |
| Sugars | 38g | – |
| Protein | 6g | 12% |
Note: Nutritional information is an estimate and may vary based on specific ingredient brands and portion sizes.
Variations & Substitutions
- Gluten-Free Crust: Use gluten-free Oreo cookies or make a crust from gluten-free graham crackers.
- Different Nut Butter: Substitute almond butter, cashew butter, or sunflower seed butter for the peanut butter.
- Soy-Free Option: Replace the soymilk with another plant-based milk, such as almond milk, oat milk, or coconut milk.
- Sweetener Swap: Use maple syrup or agave nectar instead of sugar, adjusting the amount to taste. Be mindful that this may affect the texture slightly.
- Crustless: For an even simpler dessert, skip the crust altogether and bake the cheesecake filling in ramekins or a springform pan.
FAQs (Frequently Asked Questions)
Q: Can I use regular Oreos instead of a vegan version?
A: While regular Oreos aren’t vegan, you can certainly use them if you’re not strictly vegan. However, for a completely vegan dessert, be sure to use vegan Oreo alternatives, which are readily available.
Q: Why is it important to drain the silken tofu?
A: Draining the silken tofu removes excess water, which helps create a thicker, creamier cheesecake filling and prevents it from being too watery.
Q: My cheesecake cracked. What did I do wrong?
A: Cracking can happen if the cheesecake cools too quickly. Let it cool gradually at room temperature before refrigerating it. Also, avoid overbaking.
Q: Can I make this recipe ahead of time?
A: Absolutely! This cheesecake is even better the next day after the flavors have had time to meld together. Prepare it a day or two in advance for a stress-free dessert.
Q: How do I know when the cheesecake is done?
A: The edges should be set, and the center should still be slightly jiggly. It will continue to set as it cools in the refrigerator.
Final Thoughts
This Chocolate and Peanut Butter Swirl Cheesecake is more than just a recipe; it’s a testament to how delicious and satisfying vegan desserts can be. The rich, creamy texture and the irresistible combination of chocolate and peanut butter make it a crowd-pleaser every time. I encourage you to give this recipe a try and experience the joy of creating a truly decadent vegan treat. Don’t be afraid to experiment with variations and make it your own. And most importantly, enjoy every single bite! I would love to hear your thoughts and experiences with this recipe in the comments below. Happy baking!