
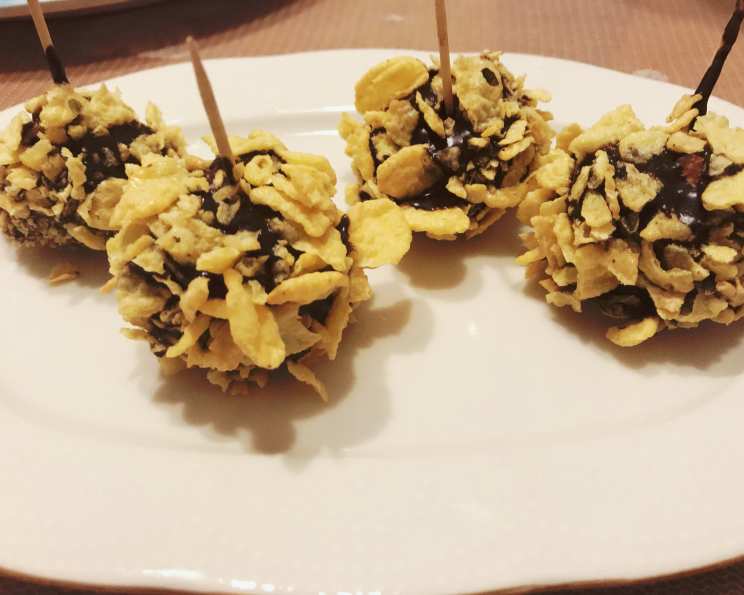
Chocolate Cereal Dream Balls
There’s something about chocolate and cereal that instantly transports me back to childhood. I remember sneaking into the kitchen late at night, pilfering a handful of colorful cereal, and then dipping it into my mom’s stash of baking chocolate. The sweet, crunchy, slightly rebellious indulgence was pure joy. These Chocolate Cereal Dream Balls perfectly capture that feeling in a sophisticated, bite-sized treat that’s just as fun to make as it is to eat!
Recipe Overview
- Prep Time: 20 minutes
- Cook Time: 5 minutes
- Total Time: 25 minutes
- Servings: Varies (Depends on ball size)
- Yield: Approx. 20-25 balls
- Dietary Type: Vegetarian (easily adaptable to vegan – see substitutions)
Ingredients
- 250g biscuits (Graham crackers, digestive biscuits, or similar)
- ½ cup milk (Dairy or plant-based)
- 1 tablespoon butter (at room temperature – or vegan butter alternative)
- 2 tablespoons cocoa powder
- 2 tablespoons sugar
- 1 cup desiccated coconut
- 200g bitter chocolate (dark chocolate)
- 3 cups cereal (Your favorite variety – corn flakes, rice krispies, etc.)
- 20 pieces toothpicks (Optional, for dipping)
Equipment Needed
- Large mixing bowl
- Microwave-safe bowl
- Cookie sheet or tray
- Parchment paper or silicone mat
- Spatula
- Rolling pin (optional, for crushing biscuits)
Instructions
- Begin by breaking the biscuits completely into small pieces. You can do this by hand, or place them in a ziplock bag and crush them with a rolling pin. The finer the crumbs, the better the balls will hold together.
- In a large mixing bowl, combine the crushed biscuits, milk, sugar, softened butter, cocoa powder, and desiccated coconut.
- Thoroughly mix all of the ingredients together. Use your hands to ensure everything is well combined.
- Knead the mixture like dough until a smooth, cohesive ball forms. If the mixture is too dry, add a tablespoon more of milk at a time until it comes together. If it’s too wet, add a little more crushed biscuit.
- Pinch off small pieces of the dough and roll them into round balls, about 1-inch in diameter. Place the formed balls on a cookie sheet lined with parchment paper.
- In a microwave-safe bowl, melt the bitter chocolate in 30-second intervals, stirring between each interval to prevent burning. Once the chocolate is almost completely melted, add a small amount of butter (about a teaspoon) to give it a glossy finish. Stir until smooth.
- Break the cereal into smaller pieces by gently crushing it in a bowl. This will make it easier for the cereal to adhere to the chocolate-covered balls.
- Dip each ball into the melted chocolate mixture, ensuring it’s fully coated. Use a toothpick or fork to help with the dipping process. Allow any excess chocolate to drip off.
- Immediately roll the chocolate-covered ball in the crushed cereal, pressing gently to ensure the cereal sticks to the chocolate.
- Place the cereal-coated balls back on the cookie sheet lined with parchment paper.
- Refrigerate the cookie sheet until the chocolate is set and the balls are firm, which usually takes about 15-20 minutes.
Expert Tips & Tricks
- For a richer flavor, try using a higher quality dark chocolate with a cacao percentage of 70% or more.
- If your melted chocolate is too thick, add a tiny bit of vegetable oil to thin it out. Be careful not to add too much, or the chocolate will become greasy.
- To avoid a messy dipping process, use two forks. One to lower the ball into the chocolate and another to lift it out and allow excess to drip off.
- Don’t over-melt the chocolate! Chocolate seizes easily. If that happens, try adding a tablespoon of hot water and stirring vigorously until smooth again.
- Get creative with your cereal! Experiment with different types of cereal to find your favorite combination of textures and flavors. Frosted flakes, cocoa puffs, or even granola can add a unique twist.
Serving & Storage Suggestions
These Chocolate Cereal Dream Balls are best served chilled. Arrange them on a decorative platter for a delightful dessert or snack.
Store leftover balls in an airtight container in the refrigerator for up to a week. You can also freeze them for up to a month. To thaw, place them in the refrigerator overnight.
They’re delicious on their own or paired with a glass of cold milk, a cup of hot coffee, or even a scoop of vanilla ice cream.
Nutritional Information
| Nutrient | Amount per Serving (approx.) | % Daily Value |
|---|---|---|
| Calories | 180 kcal | 9% |
| Total Fat | 9g | 14% |
| Saturated Fat | 5g | 25% |
| Cholesterol | 3mg | 1% |
| Sodium | 100mg | 4% |
| Total Carbohydrate | 22g | 7% |
| Dietary Fiber | 2g | 8% |
| Sugars | 8g | 16% |
| Protein | 2g | 4% |
Note: Nutritional information is an estimate and can vary based on specific ingredients used.
Variations & Substitutions
- Vegan: Use plant-based milk, vegan butter, and check that your biscuits and chocolate are dairy-free.
- Gluten-Free: Use gluten-free biscuits and ensure your cereal is also gluten-free. Rice Krispies are often gluten-free, but always check the label.
- Nut-Free: Omit the desiccated coconut or substitute it with sunflower seeds or chopped dried fruit.
- Flavor Boost: Add a pinch of cinnamon, a dash of vanilla extract, or a teaspoon of instant coffee powder to the biscuit mixture for extra flavor.
- Chocolate Variety: Use milk chocolate or white chocolate instead of dark chocolate, or drizzle with both for a marbled effect.
FAQs (Frequently Asked Questions)
Q: Can I use a different type of biscuit?
A: Absolutely! Graham crackers, digestive biscuits, or any similar dry, crumbly biscuit will work well. Experiment with different flavors for a unique twist.
Q: What if my chocolate seizes while melting?
A: Don’t panic! Try adding a tablespoon of hot water and stirring vigorously until the chocolate becomes smooth again.
Q: Can I make these ahead of time?
A: Yes, these balls can be made a day or two in advance and stored in the refrigerator until ready to serve.
Q: The mixture is too dry and doesn’t hold together. What should I do?
A: Add a tablespoon of milk at a time until the mixture comes together. Be careful not to add too much, or it will become too wet.
Q: Can I use different toppings instead of cereal?
A: Of course! Sprinkles, chopped nuts, cocoa powder, or even edible glitter can be used as alternative toppings.
Final Thoughts
I sincerely hope this recipe inspires you to create your own batch of Chocolate Cereal Dream Balls and experience the simple joy they bring. Feel free to experiment with different flavors, textures, and toppings to make them your own. Don’t hesitate to share your creations and feedback – I’d love to hear what you come up with! These little treats are perfect for parties, snacks, or simply a delightful indulgence any time of day. Happy baking!