
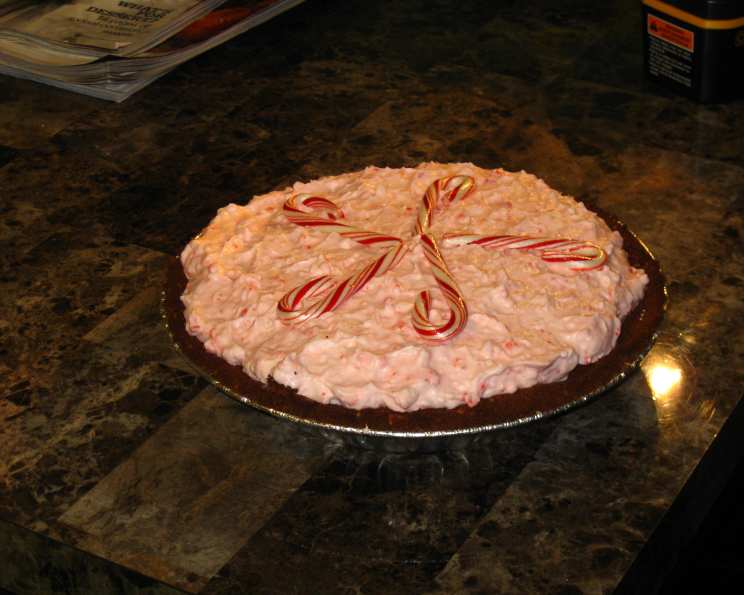
Chocolate Candy Cane Pie: A Slice of Holiday Magic
There’s a distinct scent that always transports me back to Christmas at my grandmother’s house: the sharp, sweet aroma of peppermint mingling with rich, dark chocolate. It wasn’t just the peppermint bark she made; it was the anticipation of this Chocolate Candy Cane Pie. The cool, creamy layers, the satisfying crunch of candy cane, and the deep chocolate base – it was always the star of the dessert table, a sugary beacon promising joy and festive cheer. Every bite was like a warm hug on a cold winter’s night, a cherished memory baked into every slice.
Recipe Overview
- Prep Time: 30 minutes
- Cook Time: 8-10 minutes
- Total Time: 4 hours 40 minutes (includes chilling time)
- Servings: 8-12
- Yield: 1 Nine-inch pie
- Dietary Type: Not specified, but adaptable for gluten-free with appropriate crust
Ingredients
For the Chocolate Crumb Crust:
- 2 cups vanilla wafer crumbs (about 60 wafers or an 8 oz box minus ¼ cup)
- 6 tablespoons unsweetened cocoa
- ⅓ cup confectioners’ sugar
- 6 tablespoons butter, melted
For the Chocolate Layer:
- 3 tablespoons water
- ¾ cup chocolate chips
- 1 cup heavy cream (plus additional for topping)
- ½ cup confectioners’ sugar
For the Peppermint Layer:
- 1 ½ cups miniature marshmallows
- ¼ cup milk
- 1 cup heavy cream (½ pint)
- ½ cup finely crushed candy cane (about 7 regular candy canes)
- Sweetened whipped cream, for topping
Equipment Needed
- 9-inch pie pan
- Mixing bowls (medium and large)
- Electric mixer
- Whisk
- Wok or saucepan
- Blender or food processor
- Measuring cups and spoons
Instructions
- Prepare the Chocolate Crumb Crust: In a medium mixing bowl, thoroughly combine the vanilla wafer crumbs, cocoa, and confectioners’ sugar.
- Incorporate the Butter: Stir in the melted butter until the mixture is evenly moistened and resembles damp sand.
- Press the Crust: Press the crumb mixture firmly onto the bottom and up the sides of a 9-inch pie pan, creating a uniform crust.
- Bake the Crust: Bake the crust in a preheated oven at 350 degrees Fahrenheit for 8 to 10 minutes. This will help it set and prevent it from becoming soggy.
- Cool the Crust: Remove the baked crust from the oven and allow it to cool completely before adding the filling.
- Make the Chocolate Layer: In a medium mixing bowl, bring the water to a boil.
- Melt the Chocolate: Remove the bowl from the heat and immediately add the chocolate chips. Stir continuously until the chocolate is completely melted and smooth. If needed, you can return the bowl to very low heat, stirring constantly, to finish melting any stubborn chocolate pieces.
- Cool to Room Temperature: Allow the melted chocolate to cool to room temperature. This is crucial to prevent the chocolate from melting the whipped cream later.
- Whip the Cream: In a large mixing bowl that has been chilled (along with the beaters of your electric mixer), whip the heavy cream with the confectioners’ sugar until stiff peaks form. The chilling helps the cream whip faster and hold its shape better.
- Combine Chocolate and Cream: Gently fold the whipped cream into the cooled chocolate mixture until just combined. Be careful not to overmix, as this can deflate the cream.
- Fill the Crust: Spoon the chocolate mixture into the cooled chocolate crumb crust, spreading it evenly.
- Chill the Chocolate Layer: Chill the pie in the refrigerator until the chocolate layer is set, about 1-2 hours.
- Prepare the Candy Cane: Break the candy canes into chunks and place them in a blender or food processor. Blend until the candy canes are finely crushed, resembling a powder.
- Melt the Marshmallows: In a wok or saucepan, combine the miniature marshmallows and milk.
- Cook the Marshmallow Mixture: Cook, stirring constantly, over low heat until the marshmallows are completely melted and the mixture is smooth.
- Cool the Marshmallow Mixture: Allow the melted marshmallow mixture to cool slightly, until it is just warm and slightly thickened.
- Whip More Cream: In the chilled bowl (cleaned, if necessary), whip the remaining heavy cream until stiff peaks form.
- Incorporate Candy Cane: Gently fold the crushed candy cane into the whipped cream.
- Combine Marshmallow and Candy Cane Cream: Stir the candy cane whipped cream gently into the slightly cooled marshmallow mixture until just combined.
- Chill Peppermint Layer Briefly: Chill the peppermint layer mixture for about 10 minutes to help it thicken slightly before adding it to the pie.
- Add Peppermint Layer to Pie: Spoon the peppermint layer onto the chilled chocolate layer, spreading it evenly.
- Chill the Finished Pie: Chill the entire pie in the refrigerator until the peppermint layer is completely set, at least 2-3 hours, or preferably overnight.
- Freeze (Optional): For an even firmer texture, you can freeze the pie until ready to serve.
- Garnish: Just before serving, top the pie with sweetened whipped cream and garnish with peppermint chips or coarsely crushed candy canes.
- Serve: Serve the pie chilled or frozen.
Expert Tips & Tricks
- For an intense chocolate flavor: Use high-quality dark chocolate chips.
- Prevent a soggy crust: Blind bake the crust by lining it with parchment paper and filling it with pie weights before baking.
- Make ahead: Prepare the crust and chocolate layer a day in advance. Store them separately in the refrigerator until ready to assemble.
- Easy Candy Cane Crushing: Place candy canes in a zip-top bag and crush with a rolling pin for a more rustic look.
- Flavor Boost: Add a few drops of peppermint extract to the marshmallow mixture for an extra peppermint kick.
Serving & Storage Suggestions
This Chocolate Candy Cane Pie is best served chilled or lightly frozen. The contrast between the cool, creamy layers and the crunchy candy cane topping is delightful.
To store leftovers, cover the pie tightly with plastic wrap or place it in an airtight container. It will keep in the refrigerator for up to 3 days or in the freezer for up to 1 month. If frozen, allow the pie to thaw in the refrigerator for several hours before serving. Freezing might alter the texture of the whipped cream topping slightly, but it will still taste delicious.
Nutritional Information
Please note that these values are estimates and can vary based on specific ingredients and serving sizes.
| Nutrient | Amount per Serving | % Daily Value |
|---|---|---|
| Calories | 717.8 kcal | N/A |
| Calories from Fat | 425 g | 59% |
| Total Fat | 47.2 g | 72% |
| Saturated Fat | 25.3 g | 126% |
| Cholesterol | 105.5 mg | 35% |
| Sodium | 271.5 mg | 11% |
| Total Carbohydrate | 74.5 g | 24% |
| Dietary Fiber | 3.4 g | 13% |
| Sugars | 26.4 g | N/A |
| Protein | 5.6 g | 11% |
Variations & Substitutions
- Gluten-Free: Use gluten-free vanilla wafers for the crust.
- Dairy-Free: Substitute the heavy cream with full-fat coconut milk (refrigerated overnight and whipped). Use dairy-free chocolate chips.
- Different Extracts: Experiment with other extracts like vanilla or almond in the whipped cream.
- Seasonal Twist: For a fall variation, add a layer of pumpkin puree between the chocolate and peppermint layers.
- Peppermint Bark Pie: Incorporate chopped peppermint bark into the chocolate layer for added texture and flavor.
FAQs (Frequently Asked Questions)
Q: Can I make this pie without an electric mixer?
A: Yes, but it will require some elbow grease! You can whip the cream by hand, but it will take longer and be more tiring. Ensure your bowl and whisk are thoroughly chilled for the best results.
Q: How can I prevent the crust from sticking to the pie pan?
A: Lightly grease the pie pan before pressing in the crumb mixture. You can also use a pie pan with a removable bottom for easy serving.
Q: My chocolate layer is grainy. What did I do wrong?
A: The chocolate likely seized up from overheating or coming into contact with water. Make sure the water is just brought to a boil and immediately removed from the heat before adding the chocolate chips. Stir gently and avoid overheating.
Q: Can I use regular-sized marshmallows instead of miniature ones?
A: Yes, but you may need to adjust the cooking time slightly to ensure they are completely melted.
Q: The peppermint layer is too runny. How can I fix it?
A: Chill the peppermint layer mixture for a longer period before adding it to the pie. This will allow it to thicken and set properly.
Final Thoughts
This Chocolate Candy Cane Pie is more than just a dessert; it’s a celebration of the holidays, a nostalgic trip back to childhood memories, and a chance to create new ones. I encourage you to gather your ingredients, preheat your oven, and embark on this delicious adventure. Don’t be afraid to experiment with variations, and most importantly, enjoy the process. Once you taste that first bite of cool, creamy, chocolatey peppermint bliss, you’ll understand why this pie is a family favorite. Share your creations, leave feedback, and pair it with a cup of hot cocoa for the ultimate holiday indulgence. Happy baking!