
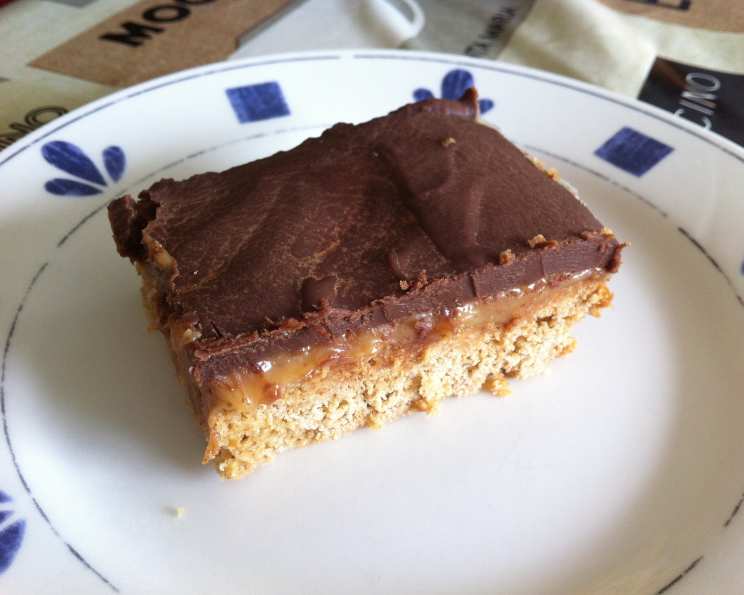
Chocolate Caramel Squares: A Symphony of Sweetness
My grandmother, bless her heart, wasn’t much of a baker, but she had a sixth sense for finding the best sweet treats at local bake sales. I remember one summer afternoon, sticky with humidity, she arrived home triumphant, a small, slightly smudged paper plate clutched in her hand. On it were these Chocolate Caramel Squares, glistening under a thin layer of dark and white chocolate. One bite, and I was hooked. The buttery, crumbly base, the gooey caramel, the snap of the chocolate… it was pure bliss. I’ve been chasing that memory, and perfecting my own version, ever since.
Recipe Overview
- Prep Time: 20 minutes
- Cook Time: 25-29 minutes
- Total Time: 1 hour 30 minutes (including cooling time)
- Servings: 16 squares
- Yield: 1 (8-inch) pan
- Dietary Type: Not specified
Ingredients
For the Crust:
- 1/3 cup butter, room temperature
- 4 tablespoons brown sugar
- 1 cup all-purpose flour
- 1/2 cup rolled oats
For the Caramel Filling:
- 2 tablespoons butter
- 2 tablespoons brown sugar
- 1 (7 ounce) can sweetened condensed milk
For the Topping:
- 4 ounces quality dark chocolate chips
- 1 ounce quality white chocolate chips
Equipment Needed
- Mixing bowl
- Pastry blender or fork
- 8-inch square cake pan
- Saucepan
- Rubber spatula
- Microwave-safe bowl (optional for melting chocolate)
- Pizza cutter (optional, for cutting squares)
Instructions
-
Preheat your oven to 350°F (175°C).
-
Prepare the crust: In a mixing bowl, combine the flour and rolled oats. Add the brown sugar.
-
Cut in the butter: Using a pastry blender, or two forks, cut the softened butter into the dry ingredients until the mixture resembles coarse crumbs. The butter should be evenly distributed throughout the flour and oats.
-
Press into pan: Press the crumbly mixture firmly and evenly into the bottom of an ungreased 8-inch square cake pan. A flat-bottomed measuring cup can help to create a smooth and compact crust.
-
Bake the crust: Bake in the preheated oven for approximately 25 minutes, or until the crust is just golden brown and feels firm to the touch. Be careful not to overbake, as a dry crust can be difficult to cut neatly.
-
Cool the crust: Remove the baked crust from the oven and allow it to cool completely in the pan before adding the caramel filling. This step is crucial to prevent the caramel from seeping into the crust.
-
Prepare the caramel filling: In a medium saucepan, combine the butter, brown sugar, and sweetened condensed milk.
-
Cook the caramel: Heat the mixture over low heat, stirring constantly until the sugar is completely dissolved and the butter is melted. Make sure not to let it burn.
-
Boil the caramel: Once the sugar is dissolved, bring the caramel to a gentle boil over low heat. Continue to boil very gently for 3 to 4 minutes, stirring constantly, until the mixture has thickened slightly. The caramel should coat the back of a spoon. Be careful not to burn the caramel.
-
Pour the caramel: Pour the hot caramel filling evenly over the cooled cookie base in the pan.
-
Allow the caramel to set: Let the caramel filling set completely at room temperature. This will take approximately 30 minutes to an hour. You can speed up the process by placing the pan in the refrigerator for a shorter period.
-
Melt the dark chocolate: In a heatproof bowl set over a saucepan of simmering water (or in the microwave in 30-second intervals, stirring in between), melt the dark chocolate chips until smooth. Be careful not to overheat the chocolate, as it can seize up.
-
Spread the dark chocolate: Spread the melted dark chocolate evenly over the set caramel layer.
-
Allow the dark chocolate to set: Let the dark chocolate layer cool and set completely. Again, you can speed this up in the refrigerator.
-
Melt the white chocolate: Melt the white chocolate chips using the same method as the dark chocolate.
-
Drizzle the white chocolate: Once the dark chocolate is set, drizzle the melted white chocolate artfully over the top. You can use a spoon or a piping bag for more precise lines.
-
Cut into squares: Once all the chocolate layers have completely set, use a sharp knife or a pizza cutter to cut the squares into desired size. As DH suggested, a pizza cutter works like a charm to get clean, even cuts.
-
Enjoy! Serve immediately or store for later.
Expert Tips & Tricks
- Room Temperature Butter: Using room temperature butter for the crust is essential for creating the right crumbly texture. If you forget to take the butter out ahead of time, you can microwave it for a few seconds, but be careful not to melt it.
- Gentle Caramel: The key to a perfect caramel is low and slow cooking. Rushing the process can result in a burnt or grainy caramel.
- Chocolate Tempering (Optional): For an extra-shiny and snappy chocolate topping, consider tempering the chocolate. This involves carefully heating and cooling the chocolate to stabilize the cocoa butter crystals.
- Preventing Chocolate Seizing: When melting chocolate, avoid getting any water or steam into the bowl, as this can cause the chocolate to seize up.
- Clean Cuts: For clean cuts, use a warm knife or pizza cutter. Dipping the blade in hot water and wiping it dry between cuts can also help.
Serving & Storage Suggestions
These Chocolate Caramel Squares are perfect served at room temperature. They are wonderfully rich, so small squares are ideal. Store any leftovers in an airtight container at room temperature for up to 3 days, or in the refrigerator for up to a week. For longer storage, you can freeze the squares for up to 2 months. Thaw in the refrigerator before serving.
Nutritional Information
| Nutrient | Amount per Serving | % Daily Value |
|---|---|---|
| Calories | 188 kcal | N/A |
| Calories from Fat | 83 kcal | 45% |
| Total Fat | 9.3 g | 14% |
| Saturated Fat | 5.7 g | 28% |
| Cholesterol | 18.6 mg | 6% |
| Sodium | 66.3 mg | 2% |
| Total Carbohydrate | 25.1 g | 8% |
| Dietary Fiber | 0.9 g | 3% |
| Sugars | 16.7 g | 66% |
| Protein | 2.6 g | 5% |
Note: Nutritional information is an estimate and may vary based on specific ingredients and portion sizes.
Variations & Substitutions
- Gluten-Free: Substitute the all-purpose flour with a gluten-free blend for a gluten-free version.
- Nutty Crust: Add chopped nuts, such as pecans or walnuts, to the crust for added flavor and texture.
- Salted Caramel: Sprinkle a pinch of sea salt over the caramel filling before adding the chocolate for a salted caramel twist.
- Different Chocolate: Experiment with different types of chocolate, such as milk chocolate or a combination of dark and milk chocolate.
FAQs (Frequently Asked Questions)
Q: Can I use a different size pan?
A: While an 8-inch square pan is recommended, you can use a 9-inch square pan. The squares will be slightly thinner, so reduce the baking time for the crust by a few minutes.
Q: My caramel is too runny. What did I do wrong?
A: The caramel may not have been cooked long enough. Ensure that you bring it to a gentle boil and stir constantly for the recommended 3-4 minutes until it thickens slightly.
Q: Can I make these ahead of time?
A: Yes, these squares are perfect for making ahead of time. They can be stored in the refrigerator for up to a week.
Q: The chocolate is cracking when I cut the squares. How can I prevent this?
A: Make sure the chocolate is completely set before cutting. Using a warm knife or pizza cutter can also help to prevent cracking.
Q: Can I freeze these squares?
A: Yes, you can freeze the squares for up to 2 months. Wrap them tightly in plastic wrap and then place them in a freezer-safe container. Thaw in the refrigerator before serving.
Final Thoughts
These Chocolate Caramel Squares are a true indulgence, a perfect balance of textures and flavors that will leave you craving more. Don’t be intimidated by the multiple steps; each one is simple and straightforward. Give this recipe a try, and I promise you’ll be rewarded with a treat that’s worthy of any special occasion – or just a regular Tuesday! Feel free to experiment with variations and make it your own. And be sure to share your creations and feedback – I’d love to hear how they turn out! These squares pair wonderfully with a cup of hot coffee or a scoop of vanilla ice cream for the ultimate dessert experience.