
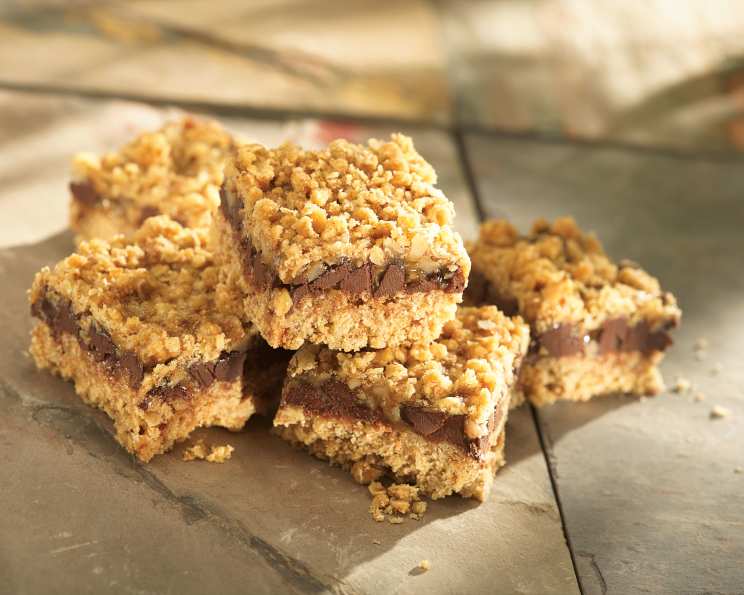
Chocolate Carmelita Bars: A Slice of Nostalgia
The first time I tasted a Carmelita bar, I was at a school bake sale, a freckled kid with pigtails and a serious sweet tooth. These weren’t just any bake-sale squares; the layers of oats, caramel, chocolate, and pecans seemed impossibly decadent. I remember the way the gooey caramel stretched as I took a bite, the crunch of the nuts, and the comforting sweetness that lingered long after the last crumb disappeared. From that moment, Carmelitas became synonymous with warmth, comfort, and the simple joy of a perfect homemade treat.
Recipe Overview
- Prep Time: 20 minutes
- Cook Time: 28-34 minutes (including initial bake)
- Total Time: 1 hour, 4 minutes
- Yields: 3 dozen bars
- Serves: 36
Ingredients
- Crisco® Original No-Stick Cooking Spray
For the Crust & Topping:
- 1 3/4 cups oats (quick or old fashioned, uncooked)
- 1 1/2 cups flour, divided
- 3/4 cup firmly packed light brown sugar
- 3/4 cup (1 1/2 sticks) Crisco® Baking Sticks Butter Flavor All-Vegetable Shortening, OR 3/4 cup Crisco® Butter Flavor All-Vegetable Shortening (from the can)
- 1 tablespoon water
- 1/2 teaspoon baking soda
- 1/4 teaspoon salt
For the Filling:
- 1 cup chopped pecans or 1 cup chopped walnuts
- 1 cup semi-sweet chocolate chips (6 oz. package)
- 1 cup Smucker’s® Caramel Sundae Syrups Ice Cream Topping
- 1/4 cup flour
Equipment Needed
- 13 x 9-inch baking pan
- Large bowl
- Measuring cups and spoons
- Mixing spoon or spatula
- Cooling rack
- Knife
Instructions
-
Preheat your oven to 350°F (175°C). Spray a 13 x 9-inch pan generously with Crisco® Original No-Stick Cooking Spray. This is crucial to prevent the bars from sticking and making them easier to remove later.
-
In a large bowl, combine the oats, 1 1/2 cups of the flour, brown sugar, Crisco® Butter Flavor All-Vegetable Shortening, water, baking soda, and salt. Stir with a spoon until the mixture is well blended and crumbly.
-
Reserve 1 cup of the oat mixture. This will be used as the topping for the bars.
-
Press the remaining oat mixture firmly and evenly into the bottom of the prepared pan to form the crust. Use the bottom of a measuring cup or your fingers to ensure it’s packed tightly.
-
Bake the crust for 10 to 12 minutes, or until it is lightly golden brown around the edges. Keep a close eye on it, as ovens can vary, and you don’t want it to burn.
-
Remove the pan from the oven and place it on a cooling rack. Let the crust cool for 10 minutes. This slight cooling period helps the chocolate chips melt more evenly in the next step.
-
Sprinkle the chopped pecans or walnuts evenly over the partially baked crust. Then, sprinkle the semi-sweet chocolate chips evenly over the nuts.
-
In a separate bowl, combine the Smucker’s® Caramel Sundae Syrups Ice Cream Topping and the remaining 1/4 cup of flour. Stir until the caramel is smooth and the flour is fully incorporated. This step is important to prevent the caramel from becoming too runny during baking.
-
Drizzle the caramel mixture evenly over the chocolate chips and nuts, leaving a 1/4-inch border around the edges of the pan. This border will prevent the caramel from overflowing and sticking to the sides.
-
Sprinkle the reserved 1 cup of the oat mixture evenly over the caramel layer.
-
Return the pan to the oven. Bake for 18 to 22 minutes, or until the topping is golden brown and the caramel is bubbly. Watch carefully to prevent the topping from burning.
-
Remove the pan from the oven and place it on a cooling rack to cool completely. Before it cools entirely, use a knife to loosen the edges from the pan. This makes it easier to remove the bars once they are cooled.
-
Cool completely before cutting into bars, this may take 1-2 hours to achieve a more cohesive bar.
-
Cut into bars about 2 x 1 1/2 inches.
Expert Tips & Tricks
- Crisco® Substitution: While the recipe calls for Crisco® Butter Flavor All-Vegetable Shortening, you can use regular Crisco® All-Vegetable Shortening or even melted butter, but the butter flavor shortening adds a nice richness.
- Nut Variety: Experiment with different nuts, like slivered almonds, macadamia nuts, or even a mix of nuts.
- Chocolate Intensity: For a richer chocolate flavor, use dark chocolate chips instead of semi-sweet.
- Caramel Consistency: If your caramel topping seems too thick, microwave it for 10-15 seconds to make it easier to drizzle. However, be careful not to overheat it, or it will burn.
- Preventing Sticking: Lining the baking pan with parchment paper that overhangs the sides before spraying ensures easy removal and clean cuts.
- Even Baking: Rotate the pan halfway through baking to ensure even browning.
- Make-Ahead Tip: The oat mixture can be prepared a day ahead and stored in an airtight container at room temperature. This saves time on the day of baking.
Serving & Storage Suggestions
Serve the Chocolate Carmelita Bars at room temperature. They are delicious on their own, or with a scoop of vanilla ice cream. Store leftover bars in an airtight container at room temperature for up to 3 days, in the refrigerator for up to a week, or freeze for longer storage (up to 2 months). To freeze, wrap the bars individually in plastic wrap and then place them in a freezer-safe bag. Thaw at room temperature before serving. They are best enjoyed within a few days of baking, as the caramel can become sticky over time.
Nutritional Information
| Nutrient | Amount per Serving | % Daily Value |
|---|---|---|
| Calories | 131.2 kcal | N/A |
| Calories from Fat | 56 g | 43% |
| Total Fat | 6.3 g | 9% |
| Saturated Fat | 1.6 g | 8% |
| Cholesterol | 0 mg | 0% |
| Sodium | 35.8 mg | 1% |
| Total Carbohydrate | 17.6 g | 5% |
| Dietary Fiber | 1.5 g | 6% |
| Sugars | 7.1 g | N/A |
| Protein | 2.4 g | 4% |
Note: Nutritional information is an estimate and may vary based on specific ingredients and preparation methods.
Variations & Substitutions
- Gluten-Free: Use a gluten-free all-purpose flour blend in place of regular flour. Ensure your oats are certified gluten-free, as some oats can be processed in facilities that also handle wheat.
- Vegan: Replace the Crisco® Butter Flavor All-Vegetable Shortening with a vegan butter substitute. Use a vegan caramel sauce instead of the Smucker’s® Caramel Sundae Syrups Ice Cream Topping.
- Dairy-Free: Use dairy-free chocolate chips and a dairy-free caramel sauce.
- Spice It Up: Add a pinch of cinnamon or a dash of cayenne pepper to the oat mixture for a warm, spicy kick.
- Fruit Addition: Incorporate dried cranberries, chopped apples, or shredded coconut for added texture and flavor.
- Peanut Butter Swirl: Add a swirl of peanut butter to the caramel layer for a peanut butter caramel flavor.
FAQs (Frequently Asked Questions)
Q: Can I use salted butter instead of shortening?
A: While you could, the Crisco® Butter Flavor All-Vegetable Shortening contributes to a specific texture. If you substitute, expect a slightly different result. You may want to reduce the added salt in the recipe.
Q: Why is my caramel runny?
A: Make sure you’re using a thick caramel topping specifically designed for ice cream. Also, be sure to measure your flour accurately when mixing it with the caramel.
Q: How do I prevent the bars from sticking to the pan?
A: Generously spray your pan with Crisco® Original No-Stick Cooking Spray. Consider lining the pan with parchment paper, leaving an overhang on the sides for easy removal.
Q: Can I use quick oats instead of old-fashioned oats?
A: Yes, you can use quick oats, but old-fashioned oats provide a chewier texture. The recipe works well with either!
Q: Can I make these ahead of time?
A: Absolutely! Carmelita bars are great for making ahead. They store well at room temperature, in the refrigerator, or in the freezer.
Final Thoughts
These Chocolate Carmelita Bars are more than just a dessert; they’re a trip down memory lane, a sweet reminder of simpler times. I hope this recipe brings you as much joy as it has brought me over the years. Don’t be afraid to experiment with different nuts, chocolates, or even a pinch of sea salt on top to make them your own. Bake a batch, share them with loved ones, and let the comforting flavors create new memories. I’d love to hear about your variations and experiences in the comments below! Enjoy!