
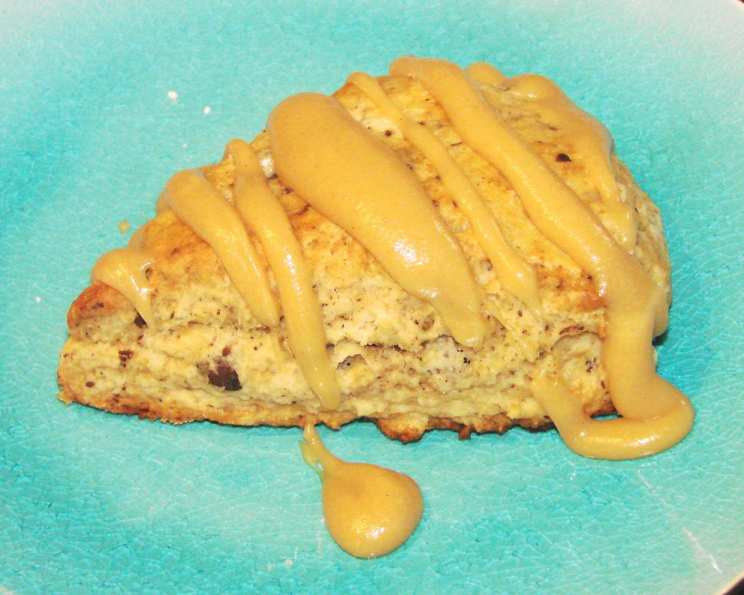
Chocolate Chip Scones With Peanut Butter Glaze
I remember being a wide-eyed kid, perched on a stool in my grandmother’s kitchen, watching her create magic. The aroma of freshly baked goods always filled her cozy space, but nothing quite compared to the scent of her chocolate chip scones. They were slightly crumbly, intensely chocolatey, and always topped with a creamy, sweet glaze. Though her original recipe was wonderful, I was inspired to add a twist: a luscious peanut butter glaze. The combination takes me right back to her kitchen, but with my own nutty, chocolatey upgrade.
Recipe Overview
- Prep Time: 15 minutes
- Cook Time: 12-15 minutes
- Total Time: 27-30 minutes
- Servings: 8
- Yield: 8 scones
- Dietary Type: Vegetarian
Ingredients
For the Chocolate Chip Scones:
- 2 cups all-purpose flour
- 1/3 cup packed brown sugar
- 2 teaspoons baking powder
- 1/4 teaspoon baking soda
- 1/2 teaspoon kosher salt
- 1/2 cup (1 stick) unsalted butter, cold & cut into 1/2-inch pieces
- 3/4 cup semi-sweet chocolate chips (Guittard recommended)
- 1/2 cup buttermilk (do not substitute)
- 1 large egg, lightly beaten
- 1 teaspoon vanilla
- 1 tablespoon milk
For the Peanut Butter Glaze:
- 3/4 cup sifted powdered sugar
- 2 tablespoons milk
- 2 tablespoons creamy peanut butter
- 1/2 teaspoon vanilla extract
Equipment Needed
- Large mixing bowl
- Measuring cups and spoons
- Pastry blender or two knives
- Baking sheet
- Parchment paper
- Wire rack
- Glass measuring cup
- Whisk
Instructions
- Preheat your oven to 425°F (220°C). Line a baking sheet with parchment paper. This ensures that the scones don’t stick and makes for easy cleanup.
- In a large mixing bowl, stir together the flour, brown sugar, baking powder, baking soda, and salt. Make sure everything is well combined. This even distribution of leavening agents ensures a consistent rise.
- Using a pastry blender or two knives, cut the cold butter into the dry ingredients until the mixture resembles coarse meal. The smaller the pieces of butter, the more tender the scones will be. Aim for pea-sized crumbs. Working quickly is key to keep the butter cold.
- Stir in the chocolate chips. This is where the magic happens! Be sure to distribute them evenly throughout the flour mixture.
- Make a well in the center of the dry ingredients. Pour in the buttermilk, vanilla, and lightly beaten egg.
- Stir just until combined, taking care not to overmix. Overmixing develops the gluten in the flour, which results in tough scones. The dough should be shaggy and slightly sticky.
- Transfer the dough to a lightly floured work surface. Gently knead it 5 or 6 times. This helps bring the dough together without overworking it.
- Pat the dough into an 8-inch circle. Using a sharp knife or a bench scraper, cut the circle into 8 equal wedges.
- Transfer the wedges to the prepared baking sheet, placing them about 1-1/2 inches apart. This spacing allows for proper air circulation and even baking.
- Brush each wedge of dough lightly with milk. This gives the scones a beautiful golden-brown crust.
- Bake until the scones are golden brown, about 12 to 15 minutes. Keep a close eye on them, as baking times can vary depending on your oven. To check for doneness, insert a toothpick into the center of a scone; it should come out clean or with a few moist crumbs.
- Let the scones cool on the pan for 5 minutes before removing them to a wire rack to cool completely. This prevents them from sticking to the pan and allows them to cool evenly.
- While the scones are cooling, prepare the peanut butter glaze. In a glass measuring cup, whisk together the sifted powdered sugar, milk, creamy peanut butter, and vanilla extract until smooth. If the glaze is too thick, add a little more milk, a teaspoon at a time. If it’s too thin, add a little more powdered sugar.
- Once the scones are mostly cooled (they can still be slightly warm), drizzle the peanut butter glaze generously over the tops. For an extra smooth glaze, microwave the glaze for 30 seconds increments 2 or 3 times, stirring well between each heating, to thin it slightly.
- Allow the glaze to set before serving. This usually takes about 15-20 minutes.
Expert Tips & Tricks
- Keep your ingredients cold: Cold butter is essential for creating flaky scones. You can even chill your flour and mixing bowl for 15 minutes before starting.
- Don’t overmix: Overmixing develops the gluten in the flour, leading to tough scones. Mix just until the ingredients are combined.
- Freeze for later: These scones freeze beautifully. After cutting the dough into wedges, place them on a tray in the freezer for an hour, then transfer them to a plastic freezer bag. Bake them directly from frozen, adding a few extra minutes to the baking time.
- Brush with egg wash: For an even more golden-brown crust, brush the scones with an egg wash (1 egg beaten with 1 tablespoon of water) instead of milk.
- Spice it up: Add a pinch of cinnamon or nutmeg to the dry ingredients for a warm, comforting flavor.
Serving & Storage Suggestions
These chocolate chip scones with peanut butter glaze are best served fresh, ideally within a few hours of baking. They’re perfect with a cup of coffee or tea for breakfast, brunch, or an afternoon treat.
Store leftover scones in an airtight container at room temperature for up to 2 days. For longer storage, freeze them in a freezer-safe bag for up to 2 months. To reheat frozen scones, bake them in a preheated oven at 350°F (175°C) for 5-10 minutes, or until warmed through. You can also microwave them for a few seconds, but be careful not to overheat them.
Nutritional Information
| Nutrient | Amount per Serving | % Daily Value |
|---|---|---|
| Calories | 414.7 kcal | N/A |
| Calories from Fat | N/A | 42% |
| Total Fat | 19.5 g | 29% |
| Saturated Fat | 11 g | 54% |
| Cholesterol | 55.2 mg | 18% |
| Sodium | 292 mg | 12% |
| Total Carbohydrate | 56.3 g | 18% |
| Dietary Fiber | 2 g | 8% |
| Sugars | 29.8 g | N/A |
| Protein | 6.5 g | 13% |
Note: Nutritional information is an estimate and may vary based on specific ingredients and preparation methods.
Variations & Substitutions
- Gluten-Free: Substitute the all-purpose flour with a gluten-free all-purpose blend. Be sure to add 1 teaspoon of xanthan gum to help bind the ingredients.
- Dairy-Free: Use a dairy-free butter alternative and substitute the buttermilk with a mixture of almond milk and 1 teaspoon of lemon juice or vinegar. Let it sit for 5 minutes to curdle before using.
- Different Nut Butter: If you’re not a fan of peanut butter, try using almond butter, cashew butter, or sunflower seed butter in the glaze.
- White Chocolate: Swap the semi-sweet chocolate chips for white chocolate chips for a sweeter flavor.
- Lemon Poppy Seed: Omit the chocolate chips and add the zest of one lemon and 1 tablespoon of poppy seeds to the dry ingredients.
FAQs (Frequently Asked Questions)
Q: Can I make the dough ahead of time?
A: Yes, you can prepare the dough up to 24 hours in advance. Wrap it tightly in plastic wrap and store it in the refrigerator. Let it sit at room temperature for 15-20 minutes before rolling and cutting.
Q: Why is it important to use cold butter?
A: Cold butter creates small pockets of fat within the dough. As the scones bake, the butter melts and releases steam, creating flaky layers.
Q: What if I don’t have buttermilk?
A: While buttermilk is ideal, you can make a substitute by adding 1 tablespoon of lemon juice or white vinegar to a liquid measuring cup, then filling it with milk to reach 1/2 cup. Let it sit for 5 minutes to curdle before using.
Q: How do I prevent the scones from drying out?
A: Avoid overbaking the scones. Check for doneness after 12 minutes, and remove them from the oven as soon as they are golden brown. Store them in an airtight container.
Q: Can I add nuts to the scone dough?
A: Absolutely! Chopped pecans, walnuts, or almonds would be a delicious addition to these scones. Add about 1/2 cup to the dough along with the chocolate chips.
Final Thoughts
These chocolate chip scones with peanut butter glaze are a delightful treat that’s sure to impress. The combination of chocolate and peanut butter is simply irresistible, and the slightly crumbly texture of the scones makes them incredibly satisfying. Don’t be afraid to experiment with variations and substitutions to create your own signature version. I hope you enjoy baking and savoring these delectable scones as much as I do! Happy baking!