
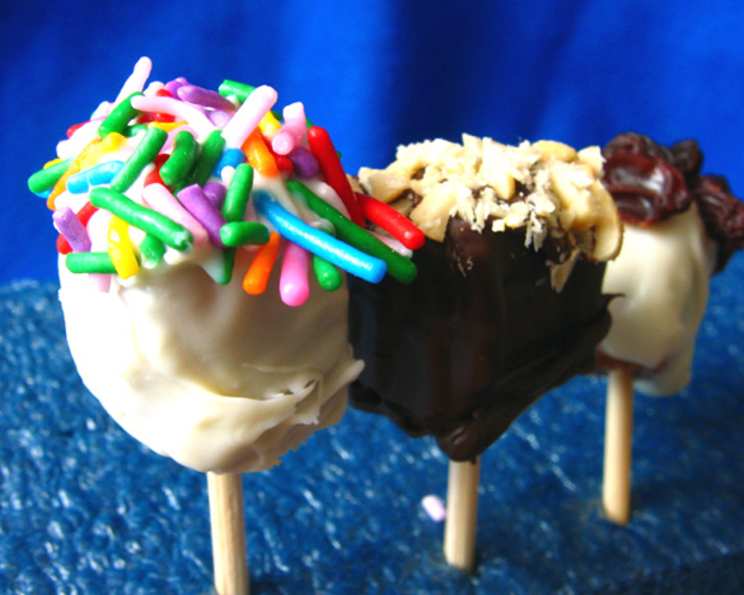
Decadent Chocolate Covered Caramels: A Sweet Treat Adventure
The memory of my first foray into chocolate covered caramels is forever etched in my mind. I was maybe eight years old, standing on a wobbly stool next to my grandmother, her hands guiding mine as we dipped sticky, chewy caramels into a shimmering pool of melted chocolate. The kitchen filled with the intoxicating aroma of caramel and cocoa, a scent that instantly transports me back to those warm, joyful moments. We experimented with sprinkles, chopped nuts, and even crushed pretzels, creating a colorful assortment of personalized treats. It wasn’t just about the candy; it was about the shared laughter, the sticky fingers, and the pure, unadulterated joy of creating something delicious together.
Recipe Overview
- Prep Time: 15 minutes
- Cook Time: 6 minutes
- Total Time: 21 minutes
- Servings: 8
- Yield: 8 caramels
- Dietary Type: Vegetarian
Ingredients
- 8 vanilla caramels, individually wrapped
- 50 g chocolate wafers (your choice: milk chocolate, dark chocolate, or white chocolate)
Toppings (your choice):
- Candy sprinkles
- Unsalted chopped peanuts
- Miniature marshmallows
- Graham wafer crumbs
- Raisins
Equipment Needed
- Dinner plate
- Waxed paper
- Wooden skewers or toothpicks
- Small ramekins (microwave-safe)
- Microwave
- Cereal or soup bowl
- Pickle fork (optional)
Instructions
-
Begin by unwrapping all 8 vanilla caramels.
-
Line a dinner plate with a sheet of waxed paper. This will serve as a non-stick surface for your finished caramels.
-
Take wooden skewers and break each one into 4 or 5 pieces. Alternatively, you can use round toothpicks or even those small plastic swords often found with cocktails.
-
Carefully insert a piece of skewer into the center of each unwrapped caramel. This will act as a handle, allowing you to dip the caramels into the chocolate without making a mess. Aim for a lollipop-type appearance.
-
Measure out 50 grams of your chosen chocolate wafers. Place the chocolate into small, microwave-safe ramekins. Using separate ramekins will allow you to use multiple types of chocolate.
-
Microwave the chocolate on low power (power level 5 or 6) for 10 to 15 seconds at a time, stirring frequently to prevent burning. Chocolate can burn very easily in the microwave, so it’s crucial to use short bursts and stir in between. Continue until the chocolate is completely melted and smooth.
-
Since you’re working with a small batch of caramels, the melted chocolate may harden quickly. To prevent this, fill a cereal or soup bowl with a small amount of hot tap water.
-
Place the ramekin with the melted chocolate into the bowl of warm water, ensuring that the water surrounds the ramekin without getting inside. This creates a makeshift double boiler, keeping the chocolate warm and fluid. Be extremely careful not to get any water in the melted chocolate, as even a small amount can cause it to seize.
-
Now for the fun part! Pick up a caramel by its stick and dip it into the melted chocolate.
-
Spread the chocolate evenly onto the surface of the caramel. I find that a small pickle fork works perfectly for this, but you can also use a spoon or even your fingers (just be prepared for a little mess!).
-
Immediately dip the chocolate-covered caramel into your desired toppings. The chocolate hardens quickly once it hits the caramel, so you need to work fast. Have your toppings prepared and ready to go before you start dipping.
-
Place the decorated chocolate caramel back onto the waxed paper-lined dinner plate. This allows the chocolate to fully harden without sticking.
-
Repeat this dipping and decorating process with all of the remaining caramels.
-
Once all the caramels are finished and the chocolate is completely hardened, you can store them in a sealed container at room temperature or individually wrap them in plastic wrap for gifting.
-
S’more Variation: Cut mini marshmallows in half. Cover the caramel with dark or milk chocolate, and immediately press the cut marshmallows onto the chocolate surface. Let dry. Spread a small amount of white chocolate onto each marshmallow and immediately dip in graham wafer crumbs.
Expert Tips & Tricks
- For an even smoother chocolate coating, add a tiny bit of vegetable oil or shortening to the chocolate while melting. This will thin out the chocolate and give it a glossy finish.
- If your chocolate starts to seize or become grainy, try adding a few drops of hot water and stirring vigorously. However, be very cautious, as too much water will ruin the chocolate completely.
- Experiment with different types of chocolate and toppings to create unique flavor combinations. Consider using salted caramel, sea salt flakes, or dried fruit for a sophisticated twist.
- To make these ahead of time, store the finished caramels in an airtight container in a cool, dry place. They can be made up to a week in advance.
- For a more intense chocolate flavor, use a high-quality dark chocolate with a cocoa content of 70% or higher.
- Toasting your nuts before chopping them will bring out their flavor and add a pleasant crunch.
- If you don’t have wooden skewers or toothpicks, you can simply dip the caramels using a fork. Just be careful not to pierce the caramel all the way through.
Serving & Storage Suggestions
Serve these delightful chocolate-covered caramels as a sweet ending to any meal, as a delightful party treat, or as a thoughtful homemade gift. Arrange them attractively on a platter or package them individually in cellophane bags tied with ribbon.
Store leftover caramels in an airtight container at room temperature for up to one week. They can also be stored in the refrigerator for longer storage, but the chocolate may become slightly dull. These caramels are not ideal for freezing, as the caramel may become hard and the chocolate may bloom (develop a white coating).
Nutritional Information
Note: Nutritional information is an estimate and will vary based on the specific ingredients used.
| Nutrient | Amount per Serving | % Daily Value |
|---|---|---|
| Calories | 70 kcal | 4% |
| Total Fat | 2g | 3% |
| Saturated Fat | 1g | 5% |
| Cholesterol | 1mg | 0% |
| Sodium | 60mg | 3% |
| Total Carbohydrate | 13g | 5% |
| Dietary Fiber | 0g | 0% |
| Sugars | 9g | 18% |
| Protein | 1g | 2% |
Variations & Substitutions
- Vegan Caramels: Use vegan caramels and vegan chocolate wafers to make this a completely vegan treat.
- Nut-Free: Omit the chopped nuts and use other toppings like sprinkles, chocolate shavings, or dried fruit.
- Spiced Caramels: Add a pinch of cinnamon or nutmeg to the melted chocolate for a warm, spiced flavor.
- Peanut Butter Drizzle: Drizzle melted peanut butter over the chocolate-covered caramels for a delicious peanut butter and chocolate combination.
- White Chocolate Raspberry: Use white chocolate and top with freeze-dried raspberries for a pretty and flavorful treat.
FAQs (Frequently Asked Questions)
Q: Can I use homemade caramels for this recipe?
A: Absolutely! Homemade caramels will add an extra touch of love and flavor to these treats. Just make sure they are firm enough to hold their shape when dipped.
Q: What if my chocolate seizes while melting?
A: Try adding a few drops of hot water and stirring vigorously. If that doesn’t work, unfortunately, you may need to start with fresh chocolate. Prevention is key – use low power and stir frequently.
Q: Can I use a double boiler instead of the microwave?
A: Yes, a double boiler is a great alternative for melting chocolate. It provides gentle, even heat and reduces the risk of burning.
Q: How long do these chocolate-covered caramels last?
A: They will stay fresh for up to a week when stored in an airtight container at room temperature.
Q: What is the best way to melt white chocolate?
A: White chocolate is more prone to burning than milk or dark chocolate, so be extra careful. Use very low power in the microwave and stir frequently, or use a double boiler.
Final Thoughts
These chocolate-covered caramels are a simple yet incredibly satisfying treat that’s perfect for any occasion. Whether you’re making them with kids, gifting them to loved ones, or simply indulging in a sweet craving, I encourage you to give this recipe a try. Don’t be afraid to get creative with your toppings and experiment with different flavors. Let the aroma of caramel and chocolate fill your kitchen and enjoy the process of creating something delicious and memorable. I would love to hear about your experience and the unique twists you add to this classic treat, so please share your feedback! Consider pairing these caramels with a warm cup of coffee or a scoop of vanilla ice cream for an extra touch of indulgence. Happy dipping!